This article will show you how to deploy your second and third NSX-T Manager nodes to form a cluster. This will be done after Deploying the first NSX-T Manager Node.
The high–level steps
Below you will find the high-level steps on how to deploy your second and third NSX-T Manager nodes.
- STEP 1) Verify the status of the current NSX-T node and add a new (second) NSX-T Manager node (using the NSX-T GUI) to the NSX-T Manager Cluster.
- STEP 2.1) Add a new (third) NSX-T Manager node (using the vCenter Server OVA deployment method) to the NSX-T Manager Cluster.
- STEP 2.2) Register the new (third) NSX-T Manager node so that it is part of the NSX-T Manager Cluster.
- STEP 3) Verify if all the NSX-T Manager nodes in the NSX-T Manager Cluster is ok.
STEP 1〉 Verify the status of the current NSX–T node and add a new 〈second〉 NSX–T Manager node 〈using the NSX–T GUI〉 to the NSX–T Manager Cluster
NSX-T GUI: System >> Configuration >> Applicances >> Add NSX Applicance
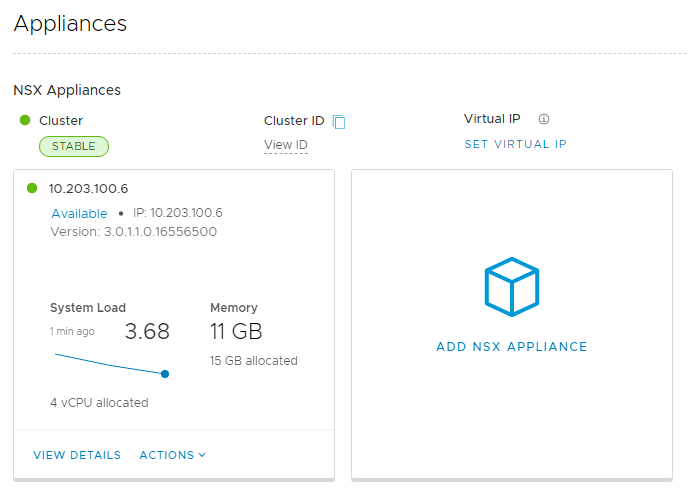
The configuration parameters that you have to use here are of the same type that you used when you deployed your first NSX-T Manager Node. The differences will be the hostname and IP address.
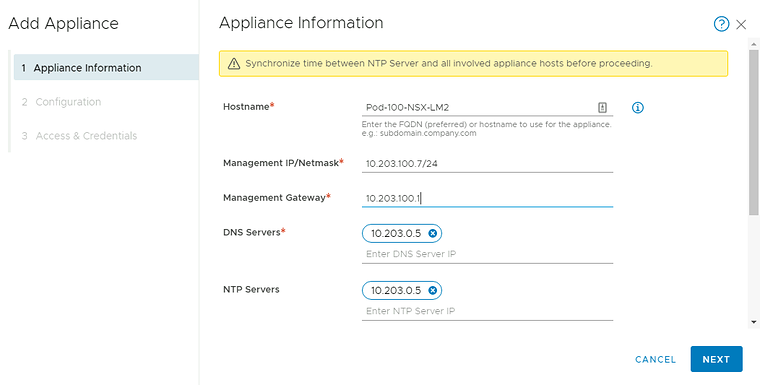
Type in the NSX-T Network details.
And select the small deployment size. 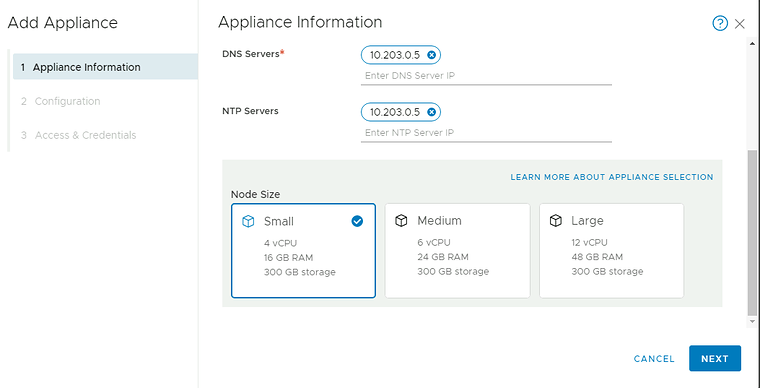
Specify the compute, storage, and network resources you want to use for the deployment.
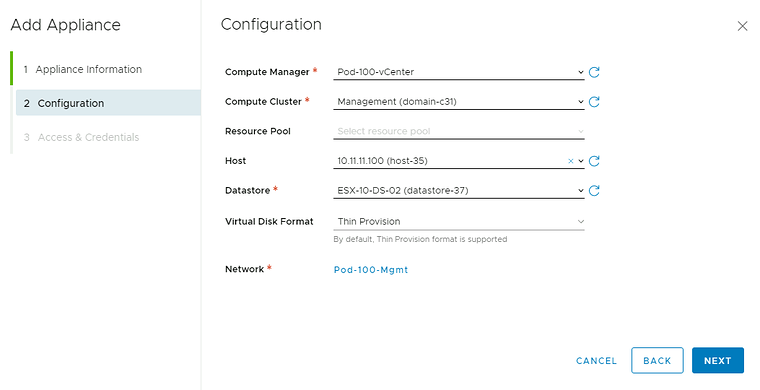
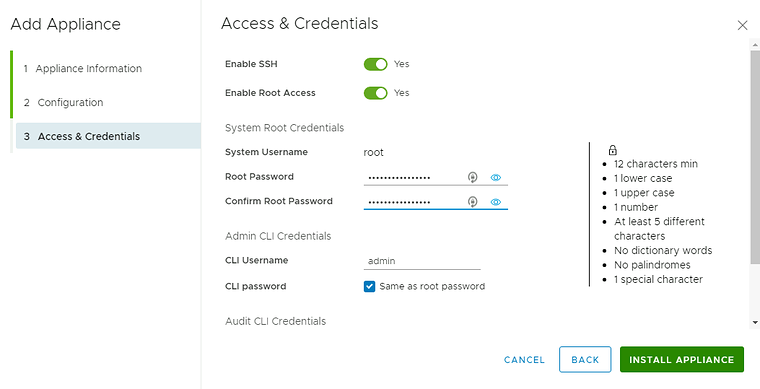
Specify the access credentials here.
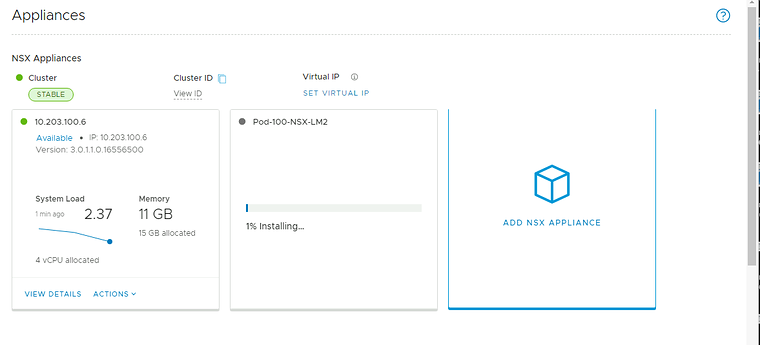
Verify if the deployment has started successfully.
STEP 2-1〉 Add a new 〈third〉 NSX–T Manager node 〈using the vCenter Server OVA deployment method〉 to the NSX–T Manager Cluster
When you deployed your first NSX-T Manager Node, we did the deployment using the ESXi Server using the OVA deployment method.
Above, we added the second NSX-T Manager node using the NSX-T Manager GUI.
For your third and last deployment, we are going to perform the deployment a bit differently as you are going to deploy the OVA using the vCenter Server Web Client.
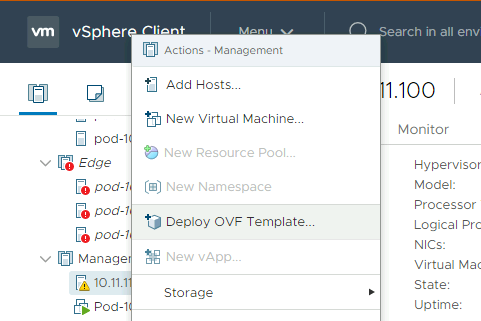
Go the vCenter Server Web Client and right-click the Cluster and select “Deploy OVF Template.”
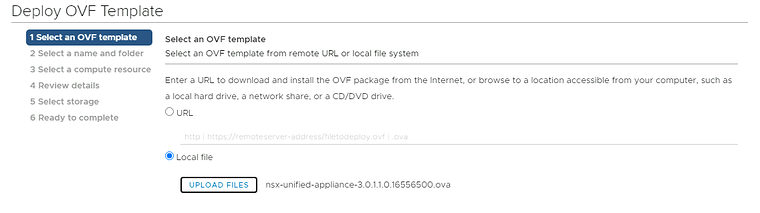
Now select the OVA template of the NSX-T Manager.
Provide a name for the Virtual Machine.
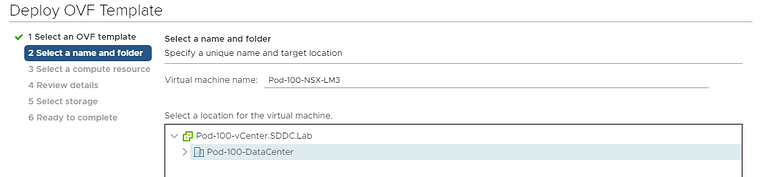
Now select a proper compute resource.
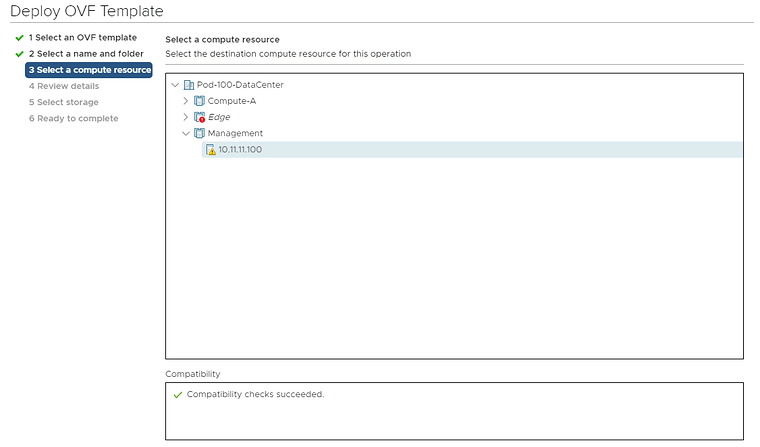
Review the details (so far).
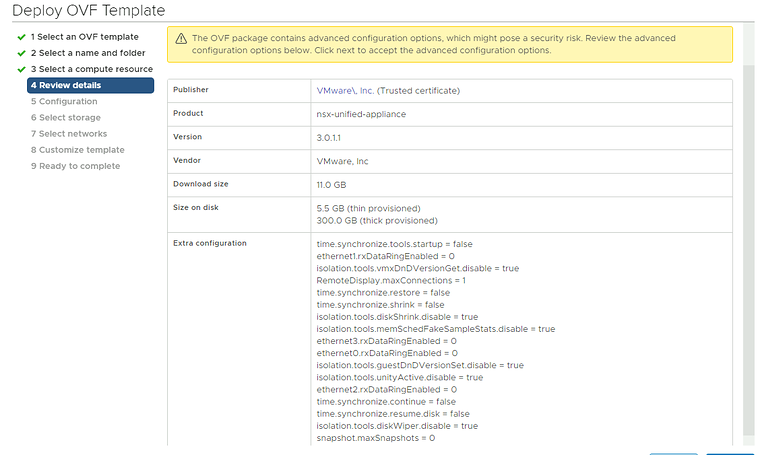
Deploy the “Small” form factor.
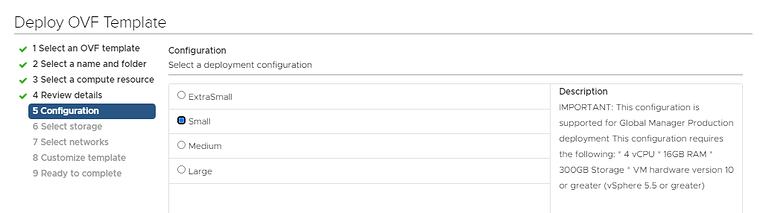
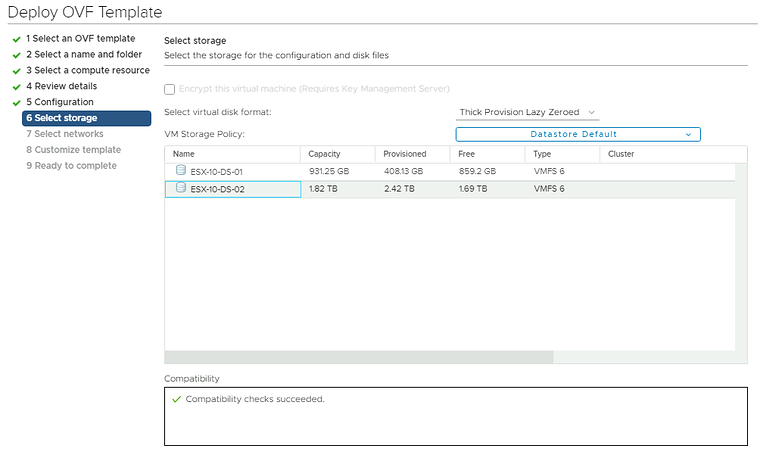
Now select a proper storage resource.
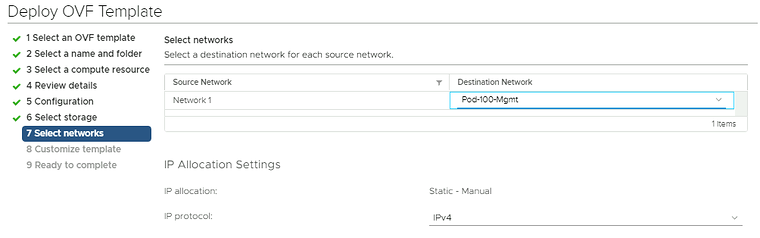
Configure the network interfaces as required.
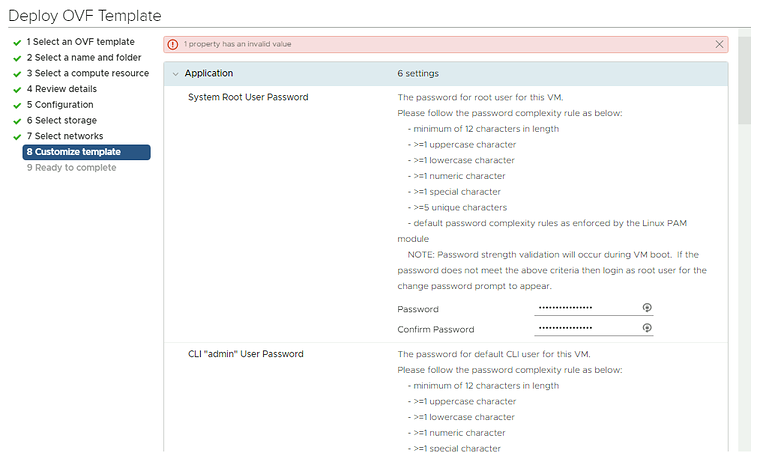
Type in the passwords.
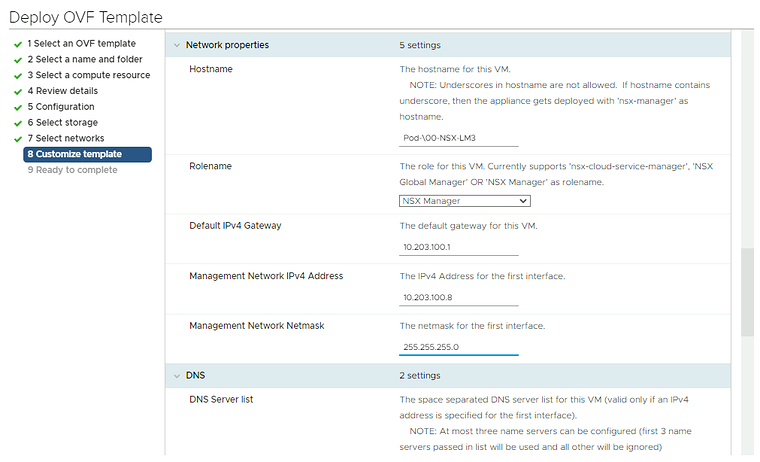
Type in the NSX-T Network details.
Specify if you want to enable SSH and/or allow the root user to log in with SSH.
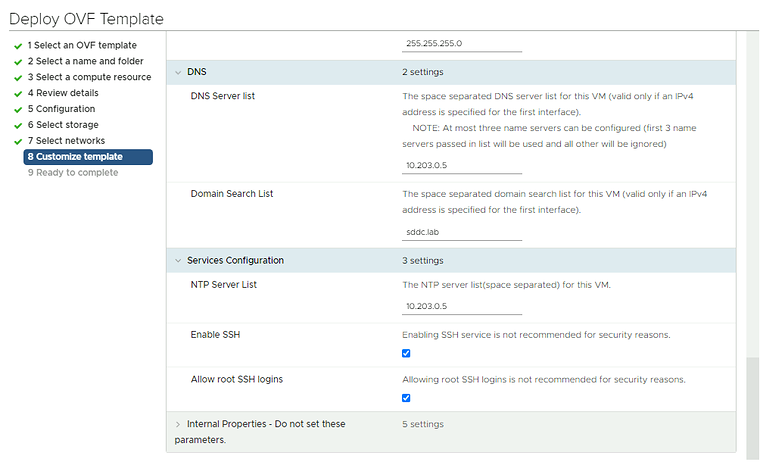
Verify the details in the summary before you start the deploy.
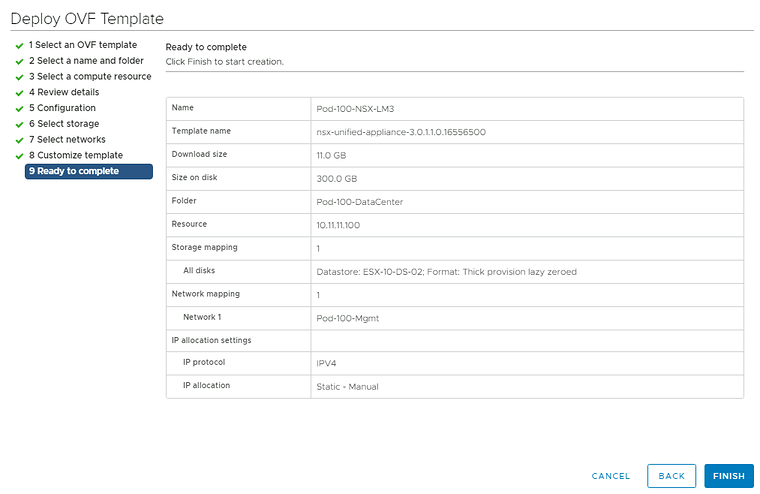
Verify if the deployment has started or in progress.

Verify the deployment is finished.

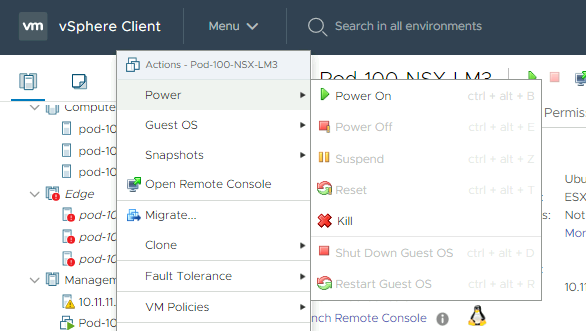
Power on the newly deployed NSX-T Manager node.
STEP 2-2〉 Register the new 〈third〉 NSX–T Manager node so that it is part of the NSX–T Manager Cluster
Now connect to the first NSX-T Manager in the NSX-T Manager cluster.
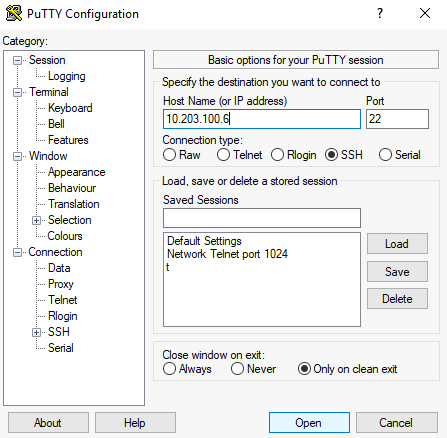
Add the SSH key to your computer (if you connect for the first time).
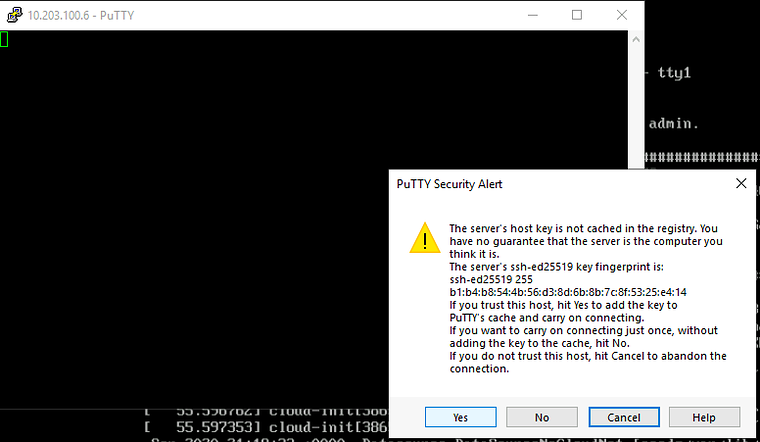
Type in your credentials to log in.
login as: adminadmin@10.203.100.6's password:NSX CLI (Manager, Policy, Controller 3.0.1.1.0.16556500). Press ? for command list or enter: helpPod-100-NSX-LM>Now get the certificate api thumbprint.
The certificate api thumbprint is required to join the newly deployed NSX-T Manager Node to the cluster.
Pod-100-NSX-LM> get certificate api thumbprint1d7df960ebeada0969b50b97ed7afc39057d8b0a53ba06c32b5cccf4e1b5c551Now get the Cluster Id.
The Cluster Id is required to join the newly deployed NSX-T Manager Node to the cluster.
Pod-100-NSX-LM> get cluster configCluster Id: 4a25d164-915d-47dd-82ac-8f3e100ad295Cluster Configuration Version: 1Number of nodes in the cluster: 2
Node UUID: 7ec44d56-d2b5-e020-c6e7-efe8c48b141aNode Status: JOINED    ENTITY                               UUID                                                                                      IP ADDRESS      PORT     FQDN    HTTPS                                2e3dc910-483b-428f-9230-56af59fae081                                                      10.203.100.6    443      Pod-100-NSX-LM    ASYNC_REPLICATOR                     1a01ee06-feeb-4292-966c-504c7e3607fb                                                      10.203.100.6    -        Pod-100-NSX-LM    CONTROLLER                           f435d2f9-c342-4f80-a534-60bcc3d57d43                                                      10.203.100.6    -        Pod-100-NSX-LM    CLUSTER_BOOT_MANAGER                 09d7463e-bbe4-4b56-b14b-9bd645246933                                                      10.203.100.6    -        Pod-100-NSX-LM    DATASTORE                            96c66b44-edcd-4b31-aac3-1d9bced71622                                                      10.203.100.6    9000     Pod-100-NSX-LM    CORFU_NONCONFIG                      ef2e1c58-4767-4d0e-ae6e-451f65007f7a                                                      10.203.100.6    9040     Pod-100-NSX-LM    IDPS_REPORTING                       a0af32f9-8011-43a7-a363-080e633d9a17                                                      10.203.100.6    -        Pod-100-NSX-LM    MONITORING                           1d94f8f7-0f7c-493f-aa20-5254adfc3983                                                      10.203.100.6    -        Pod-100-NSX-LM    MANAGER                              e3dd82c0-06f9-44bd-b93c-667c27be7681                                                      10.203.100.6    -        Pod-100-NSX-LM    POLICY                               50b54440-3c01-4322-be51-76d17ae85139                                                      10.203.100.6    -        Pod-100-NSX-LM
Node UUID: d7dddcbf-f259-4469-ad42-b8d15c257609Node Status: JOINED    ENTITY                               UUID                                                                                      IP ADDRESS      PORT     FQDN    HTTPS                                b8f778f1-6ae9-469c-a344-792a6d3c3c22                                                      10.203.100.7    443      Pod-100-NSX-LM2    ASYNC_REPLICATOR                     7a794f8b-bf20-4445-9292-7008428c1400                                                      10.203.100.7    -        Pod-100-NSX-LM2    CONTROLLER                           c5b83af6-2529-47e4-9e8d-2c92ab83352f                                                      10.203.100.7    -        Pod-100-NSX-LM2    CLUSTER_BOOT_MANAGER                 3ec17f27-8b41-484d-831c-2bb66cd68f6a                                                      10.203.100.7    -        Pod-100-NSX-LM2    DATASTORE                            c3891cf2-8fd7-43f3-8ccc-887ad53ef2e3                                                      10.203.100.7    9000     Pod-100-NSX-LM2    CORFU_NONCONFIG                      5e6374b8-fd90-48f8-9d58-0724516e8e4b                                                      10.203.100.7    9040     Pod-100-NSX-LM2    IDPS_REPORTING                       a0086468-9ca0-4ffa-a115-b34696fdafa1                                                      10.203.100.7    -        Pod-100-NSX-LM2    MONITORING                           33bbce5f-a760-4cd0-9bca-0473f2527970                                                      10.203.100.7    -        Pod-100-NSX-LM2    MANAGER                              bf76d4c8-a385-41f4-8648-4a45f87142d8                                                      10.203.100.7    -        Pod-100-NSX-LM2    POLICY                               9d4496fa-d7d8-4ee8-a9db-87916f6752d8                                                      10.203.100.7    -        Pod-100-NSX-LM2
Pod-100-NSX-LM>
Now use the above information to join Pod-100-NSX-LM3 to the NSX-T Manager Cluster.
nsx-manager> join 10.203.100.6 cluster-id 4a25d164-915d-47dd-82ac-8f3e100ad295 thumbprint 1d7df960ebeada0969b50b97ed7afc39057d8b0a53ba06c32b5cccf4e1b5c551 username admin password VMware1!VMWare1!STEP 3〉 Verify if all the NSX–T Manager nodes in the NSX–T Manager Cluster ok
NSX-T GUI: System >> Configuration >> Applicances >> Add NSX Applicance
Verify if all three NSX-T Manager nodes are in the cluster and the cluster is stable.
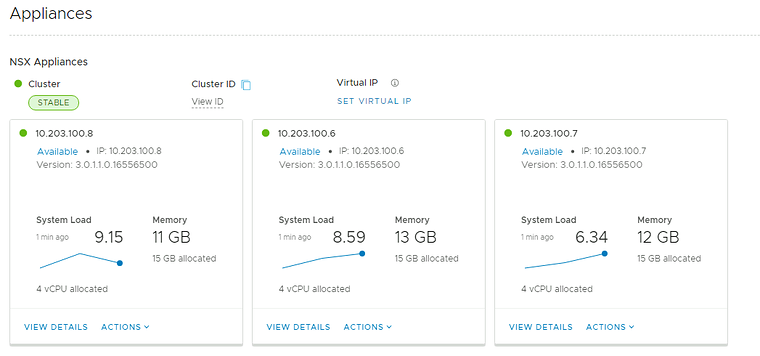
You can also use the CLI to get the cluster config.
Pod-100-NSX-LM> get cluster configCluster Id: 4a25d164-915d-47dd-82ac-8f3e100ad295Cluster Configuration Version: 2Number of nodes in the cluster: 3
Node UUID: 7ec44d56-d2b5-e020-c6e7-efe8c48b141aNode Status: JOINED    ENTITY                               UUID                                       IP ADDRESS      PORT     FQDN    HTTPS                                2e3dc910-483b-428f-9230-56af59fae081       10.203.100.6    443      Pod-100-NSX-LM    ASYNC_REPLICATOR                     1a01ee06-feeb-4292-966c-504c7e3607fb       10.203.100.6    -        Pod-100-NSX-LM    CONTROLLER                           f435d2f9-c342-4f80-a534-60bcc3d57d43       10.203.100.6    -        Pod-100-NSX-LM    CLUSTER_BOOT_MANAGER                 09d7463e-bbe4-4b56-b14b-9bd645246933       10.203.100.6    -        Pod-100-NSX-LM    DATASTORE                            96c66b44-edcd-4b31-aac3-1d9bced71622       10.203.100.6    9000     Pod-100-NSX-LM    CORFU_NONCONFIG                      ef2e1c58-4767-4d0e-ae6e-451f65007f7a       10.203.100.6    9040     Pod-100-NSX-LM    IDPS_REPORTING                       a0af32f9-8011-43a7-a363-080e633d9a17       10.203.100.6    -        Pod-100-NSX-LM    MONITORING                           1d94f8f7-0f7c-493f-aa20-5254adfc3983       10.203.100.6    -        Pod-100-NSX-LM    MANAGER                              e3dd82c0-06f9-44bd-b93c-667c27be7681       10.203.100.6    -        Pod-100-NSX-LM    POLICY                               50b54440-3c01-4322-be51-76d17ae85139       10.203.100.6    -        Pod-100-NSX-LM
Node UUID: d7dddcbf-f259-4469-ad42-b8d15c257609Node Status: JOINED    ENTITY                               UUID                                       IP ADDRESS      PORT     FQDN    HTTPS                                b8f778f1-6ae9-469c-a344-792a6d3c3c22       10.203.100.7    443      Pod-100-NSX-LM2    ASYNC_REPLICATOR                     7a794f8b-bf20-4445-9292-7008428c1400       10.203.100.7    -        Pod-100-NSX-LM2    CONTROLLER                           c5b83af6-2529-47e4-9e8d-2c92ab83352f       10.203.100.7    -        Pod-100-NSX-LM2    CLUSTER_BOOT_MANAGER                 3ec17f27-8b41-484d-831c-2bb66cd68f6a       10.203.100.7    -        Pod-100-NSX-LM2    DATASTORE                            c3891cf2-8fd7-43f3-8ccc-887ad53ef2e3       10.203.100.7    9000     Pod-100-NSX-LM2    CORFU_NONCONFIG                      5e6374b8-fd90-48f8-9d58-0724516e8e4b       10.203.100.7    9040     Pod-100-NSX-LM2    IDPS_REPORTING                       a0086468-9ca0-4ffa-a115-b34696fdafa1       10.203.100.7    -        Pod-100-NSX-LM2    MONITORING                           33bbce5f-a760-4cd0-9bca-0473f2527970       10.203.100.7    -        Pod-100-NSX-LM2    MANAGER                              bf76d4c8-a385-41f4-8648-4a45f87142d8       10.203.100.7    -        Pod-100-NSX-LM2    POLICY                               9d4496fa-d7d8-4ee8-a9db-87916f6752d8       10.203.100.7    -        Pod-100-NSX-LM2
Node UUID: 103f0942-082b-35c1-6088-17efc56be3efNode Status: JOINED    ENTITY                               UUID                                       IP ADDRESS      PORT     FQDN    HTTPS                                6d0e0fcf-f51d-4473-97ba-b6bd4615001e       10.203.100.8    443      nsx-manager    ASYNC_REPLICATOR                     cd9172d3-8c86-4646-9de7-2f82fe742a8b       10.203.100.8    -        nsx-manager    CONTROLLER                           5f876926-be6d-4ad2-be10-b1904e0a4d27       10.203.100.8    -        nsx-manager    CLUSTER_BOOT_MANAGER                 c960c263-b3e4-49ea-88d1-fd8eb133c4ca       10.203.100.8    -        nsx-manager    DATASTORE                            1076a0ce-a37a-481b-bf6d-c414662a7564       10.203.100.8    9000     nsx-manager    CORFU_NONCONFIG                      64141163-2529-4197-ad07-c5f4fa948864       10.203.100.8    9040     nsx-manager    IDPS_REPORTING                       4acf1905-4e09-452c-94ae-6ea09d758f5a       10.203.100.8    -        nsx-manager    MONITORING                           e638ab62-f8ea-4442-aec8-f0fcf29a13d6       10.203.100.8    -        nsx-manager    MANAGER                              c9f064fb-d13a-45b6-bd5c-235717b3f063       10.203.100.8    -        nsx-manager    POLICY                               bebda7fc-8c99-4e00-ae68-7e5aa6ef93d3       10.203.100.8    -        nsx-manager
Pod-100-NSX-LM>
You can also use the CLI to get the cluster status.
Pod-100-NSX-LM> get cluster statusCluster Id: 4a25d164-915d-47dd-82ac-8f3e100ad295Overall Status: STABLE
Group Type: DATASTOREGroup Status: STABLE
Members:    UUID                                       FQDN                                       IP               STATUS    7ec44d56-d2b5-e020-c6e7-efe8c48b141a       Pod-100-NSX-LM                             10.203.100.6     UP    d7dddcbf-f259-4469-ad42-b8d15c257609       Pod-100-NSX-LM2                            10.203.100.7     UP    103f0942-082b-35c1-6088-17efc56be3ef       nsx-manager                                10.203.100.8     UP
Group Type: CLUSTER_BOOT_MANAGERGroup Status: STABLE
Members:    UUID                                       FQDN                                       IP               STATUS    7ec44d56-d2b5-e020-c6e7-efe8c48b141a       Pod-100-NSX-LM                             10.203.100.6     UP    d7dddcbf-f259-4469-ad42-b8d15c257609       Pod-100-NSX-LM2                            10.203.100.7     UP    103f0942-082b-35c1-6088-17efc56be3ef       nsx-manager                                10.203.100.8     UP
Group Type: CONTROLLERGroup Status: STABLE
Members:    UUID                                       FQDN                                       IP               STATUS    f435d2f9-c342-4f80-a534-60bcc3d57d43       Pod-100-NSX-LM                             10.203.100.6     UP    c5b83af6-2529-47e4-9e8d-2c92ab83352f       Pod-100-NSX-LM2                            10.203.100.7     UP    5f876926-be6d-4ad2-be10-b1904e0a4d27       nsx-manager                                10.203.100.8     UP
Group Type: MANAGERGroup Status: STABLE
Members:    UUID                                       FQDN                                       IP               STATUS    7ec44d56-d2b5-e020-c6e7-efe8c48b141a       Pod-100-NSX-LM                             10.203.100.6     UP    d7dddcbf-f259-4469-ad42-b8d15c257609       Pod-100-NSX-LM2                            10.203.100.7     UP    103f0942-082b-35c1-6088-17efc56be3ef       nsx-manager                                10.203.100.8     UP
Group Type: POLICYGroup Status: STABLE
Members:    UUID                                       FQDN                                       IP               STATUS    7ec44d56-d2b5-e020-c6e7-efe8c48b141a       Pod-100-NSX-LM                             10.203.100.6     UP    d7dddcbf-f259-4469-ad42-b8d15c257609       Pod-100-NSX-LM2                            10.203.100.7     UP    103f0942-082b-35c1-6088-17efc56be3ef       nsx-manager                                10.203.100.8     UP
Group Type: HTTPSGroup Status: STABLE
Members:    UUID                                       FQDN                                       IP               STATUS    7ec44d56-d2b5-e020-c6e7-efe8c48b141a       Pod-100-NSX-LM                             10.203.100.6     UP    d7dddcbf-f259-4469-ad42-b8d15c257609       Pod-100-NSX-LM2                            10.203.100.7     UP    103f0942-082b-35c1-6088-17efc56be3ef       nsx-manager                                10.203.100.8     UP
Group Type: MONITORINGGroup Status: STABLE
Members:    UUID                                       FQDN                                       IP               STATUS    7ec44d56-d2b5-e020-c6e7-efe8c48b141a       Pod-100-NSX-LM                             10.203.100.6     UP    d7dddcbf-f259-4469-ad42-b8d15c257609       Pod-100-NSX-LM2                            10.203.100.7     UP    103f0942-082b-35c1-6088-17efc56be3ef       nsx-manager                                10.203.100.8     UP
Group Type: IDPS_REPORTINGGroup Status: STABLE
Members:    UUID                                       FQDN                                       IP               STATUS    7ec44d56-d2b5-e020-c6e7-efe8c48b141a       Pod-100-NSX-LM                             10.203.100.6     UP    d7dddcbf-f259-4469-ad42-b8d15c257609       Pod-100-NSX-LM2                            10.203.100.7     UP    103f0942-082b-35c1-6088-17efc56be3ef       nsx-manager                                10.203.100.8     UP
Group Type: CORFU_NONCONFIGGroup Status: STABLE
Members:    UUID                                       FQDN                                       IP               STATUS    7ec44d56-d2b5-e020-c6e7-efe8c48b141a       Pod-100-NSX-LM                             10.203.100.6     UP    d7dddcbf-f259-4469-ad42-b8d15c257609       Pod-100-NSX-LM2                            10.203.100.7     UP    103f0942-082b-35c1-6088-17efc56be3ef       nsx-manager                                10.203.100.8     UP
Pod-100-NSX-LM>
I am always trying to improve the quality of my articles, so if you see any errors, mistakes in this article or you have suggestions for improvement, please contact me, and I will fix this.
Originally published on the old wiki at /index.php/Deploying_the_second_and_third_NSX-T_Manager_Nodes_and_form_an_NSX-T_Manager_Cluster.