Introduction
This tutorial provides a step-by-step guide to setting up Oracle Hold Your Own Key (HYOK) with Thales CipherTrust Manager (CTM) without using the API Gateway option. This approach allows you to control your encryption keys completely while enabling integration with Oracle Cloud Infrastructure (OCI) services that support external key management.
We will walk through the whole configuration, starting with reviewing the network architecture and setting up application integrations in OCI, then configuring the CipherTrust Manager to communicate directly with Oracle’s External Key Management (EKM) service over a private endpoint. The guide also includes creating and registering identity providers, Oracle tenancies, external vaults, and keys, as well as testing access to customer-managed Object Storage using these external keys.
By the end of this tutorial, you will have a fully operational HYOK setup, capable of encrypting and controlling access to OCI resources using externally managed keys hosted on your CipherTrust Manager—without the need for an intermediate API Gateway.
This tutorial builds upon the technical foundation established in the guide: “Setting up two Thales CipherTrust Cloud Key Manager (CCKM) Appliances inside OCI, creating a cluster between them, and configuring one as a Certificate Authority (CA).”
If you want to implement Oracle Hold Your Own Key (HYOK) using CipherTrust Manager with the API Gateway option, follow this guide: “Set up Oracle Hold Your Own Key (HYOK) with the CipherTrust Manager (with API Gateway option).”
The Steps
- [ ] STEP 01: Review complete cloud network architecture
- [ ] STEP 02: Creating a Confidential Resource App and Associating Confidential Client Applications (Application integrations) and collecting the Client and Secrets (OCI Console)
- [ ] STEP 03: Collecting the Identity Domain URL (OCI Console)
- [ ] STEP 04: Creating Identity Providers (CTM)
- [ ] STEP 05: Adding Oracle Tenancies (CTM)
- [ ] STEP 06: Creating a Private Endpoint for the External Key Manager Service (OCI Console)
- [ ] STEP 07: Adding External Vaults (CTM)
- [ ] STEP 08: Creating an External Key Management Vault (OCI Console)
- [ ] STEP 09: Adding External Keys (CTM)
- [ ] STEP 10: Creating Key References (OCI Console)
- [ ] STEP 11: Creating an Object Storage Bucket with customer-managed keys (OCI Console)
- [ ] STEP 12: Blocking & Unblocking Oracle Keys and testing the Object Storage Bucket accessibility (CTM and OCI Console)
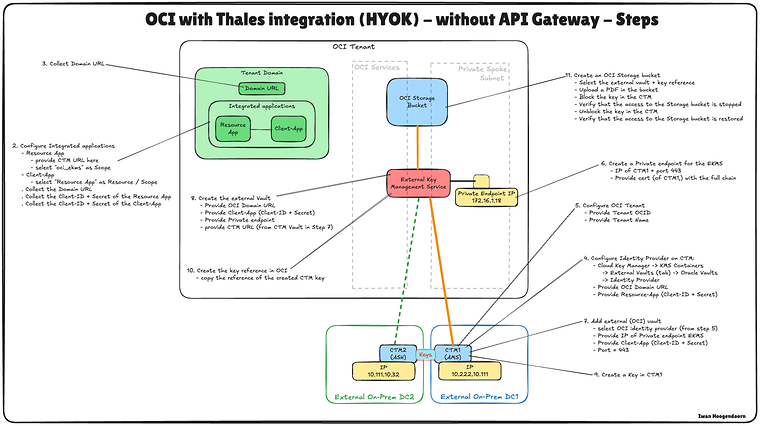
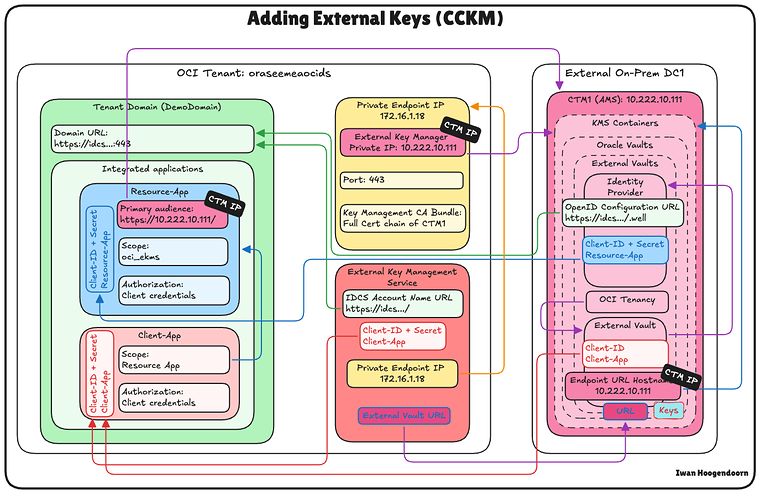
The diagram below illustrates the components and configuration set up all the steps in this tutorial.
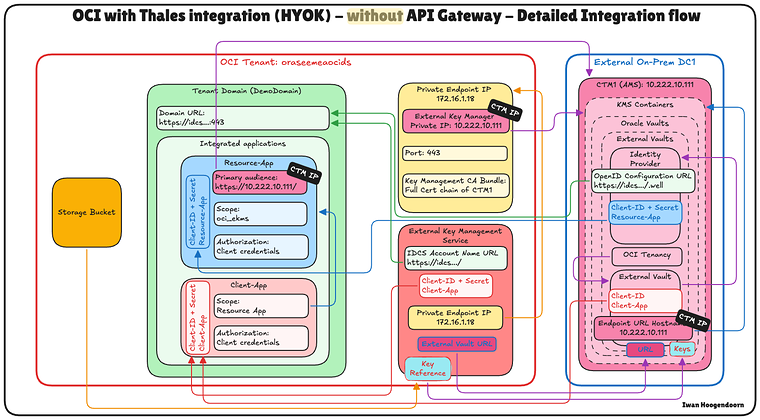
STEP 01 - Review the complete cloud network architecture
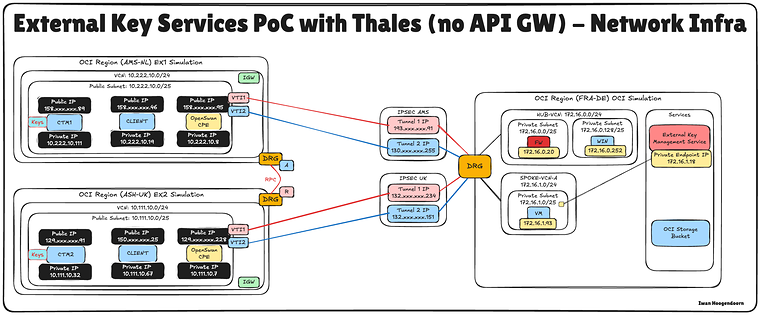
Before we dive into the technical steps of configuring Oracle Hold Your Own Key (HYOK) with CipherTrust Manager (CTM), it’s essential to understand the cloud network architecture in which this setup resides.
In this scenario, three Oracle Cloud Infrastructure (OCI) regions are used:
- Two OCI regions simulate on-premises data centres (DCs). These regions are connected to OCI via VPN tunnels, representing hybrid environments.
- A third OCI region represents the primary OCI environment and follows a hub-and-spoke Virtual Cloud Network (VCN) architecture. In this design:
- The hub VCN hosts shared network services such as firewalls.
- Multiple spoke VCNs connect to the hub and host various workloads.
Connectivity between the two simulated on-prem DCs is established using Remote Peering Connections (RPC). However, for this tutorial, the VPN setup, RPC configuration, and hub-and-spoke VCN architecture details are considered out of scope and will not be covered.
- To set up VPN connections to OCI where a DC is simulated, you can read this tutorial.
- To set up RPC connections between OCI regions, you can read this tutorial.
- To set up an OCI Hub and Spoke VNC network architecture, read this tutorial.
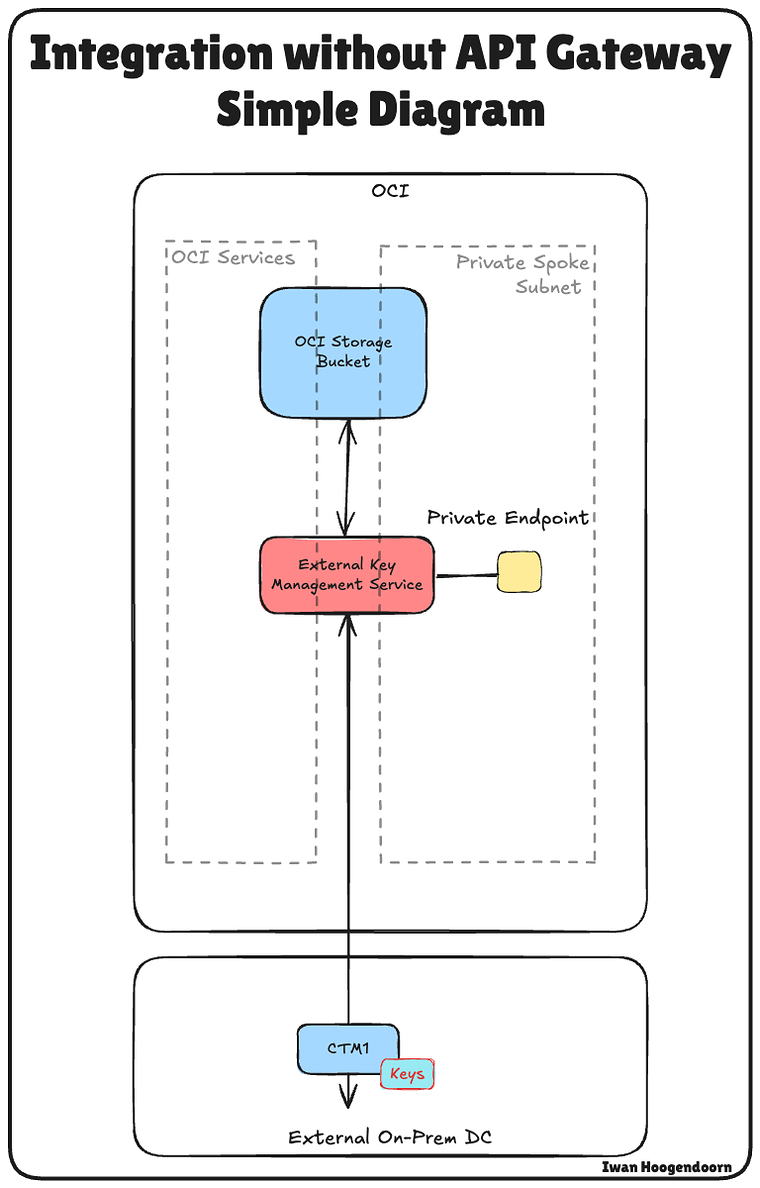
This tutorial focuses strictly on setting up HYOK using CipherTrust Manager deployed in the Amsterdam (AMS) region, which is one of the simulated on-premises DCs. All key management operations will be performed from this CTM instance.
The External Key Manager Service (EKMS) private enables OCI to communicate securely with the external CTM—and will be deployed in one of thespoke VCNs'''' in the primary OCI region. This ensures a secure and direct communication path between OCI services and the external key manager without exposing the traffic to the public internet.
This architecture supports strong security and compliance postures for sensitive workloads in OCI by isolating the key management within a well-defined and secure network boundary.
Below is a diagram illustrating the complete architecture.
STEP 02 - Creating a Confidential Resource App and Associating Confidential Client Applications Application integrations and collecting the Client and Secrets on OCI Console
- Official OCI documentation: Creating Confidential Resource App
- Official OCI documentation: Associating Confidential Client Application
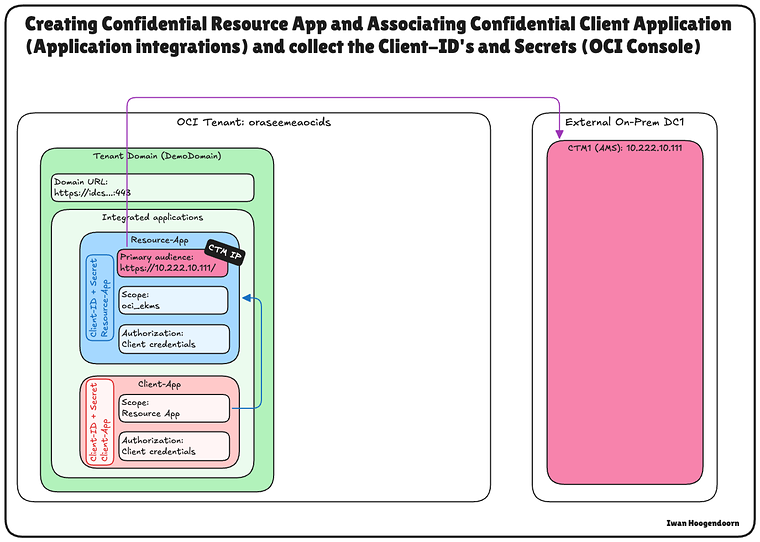
To enable Oracle HYOK integration with Thales CipherTrust Manager, you must establish trust between Oracle Cloud Infrastructure (OCI) and the external key manager.
This is done by registering two key components in OCI Identity: a Confidential Resource Application and a Confidential Client Application. These are essential to authenticate and authorize communication between OCI and CipherTrust Manager.
This setup enables the CipherTrust Manager to authenticate with OCI Identity via OAuth 2.0. The Confidential Client acts on behalf of the external key manager, while the Confidential Resource defines the scope of access and trust configuration. OCI cannot validate or securely communicate with the external key source without these components.
The diagram below illustrates the components and configuration set up in this step.
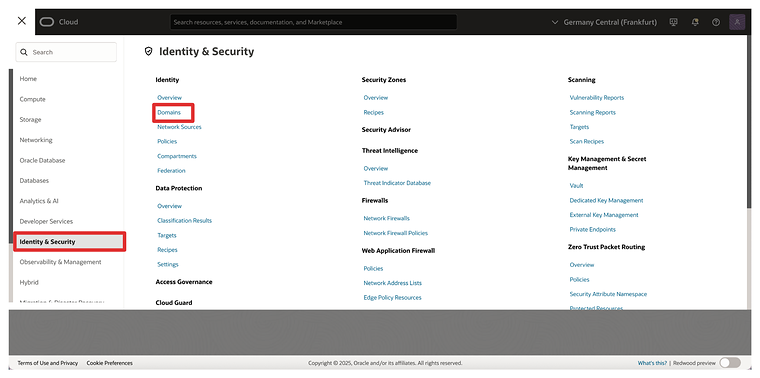
- Navigate to Identity & Security > Domains in the OCI Console.
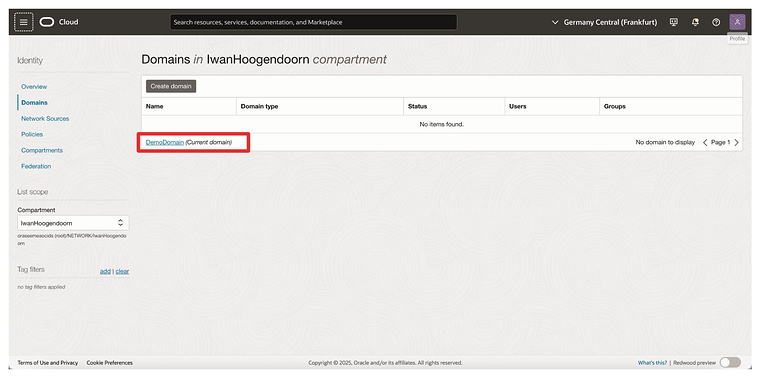
- Click on the Domain that you want to use for the authentication.
- Click on Integrated applications.
- Click on Add application.
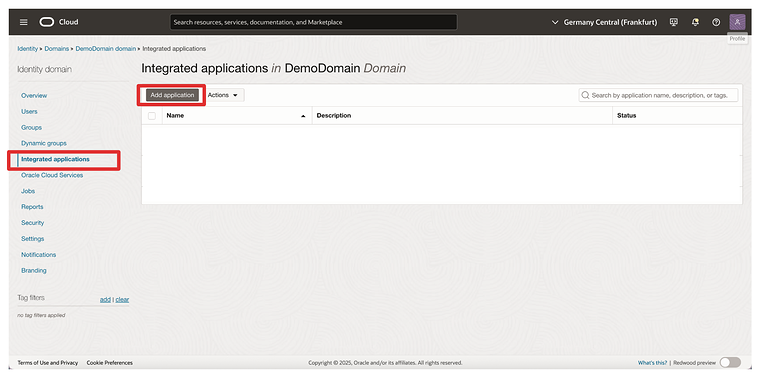
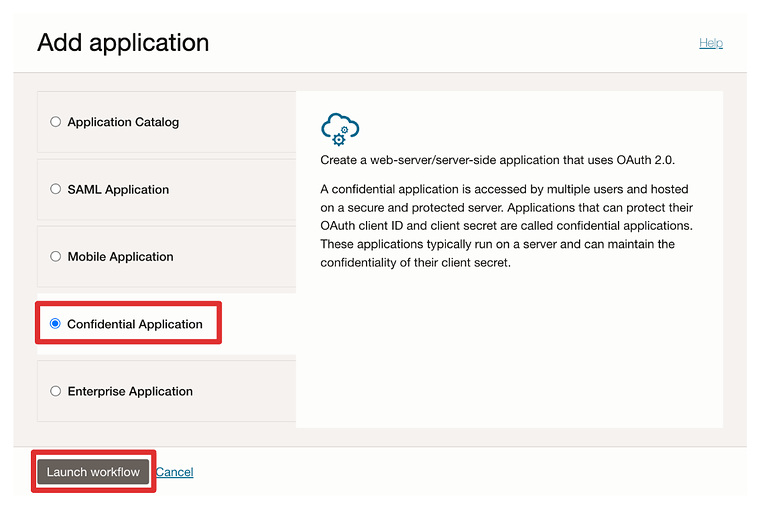
- Select Confidential Application.
- Click on Launch workflow.
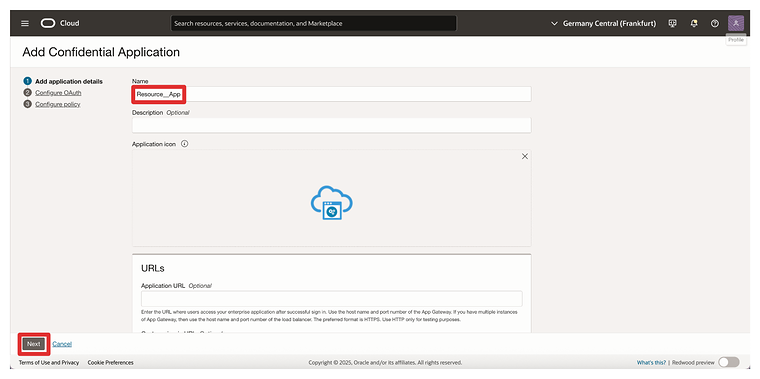
- Name the application, e.g.,
Resource_App. - Click Next.
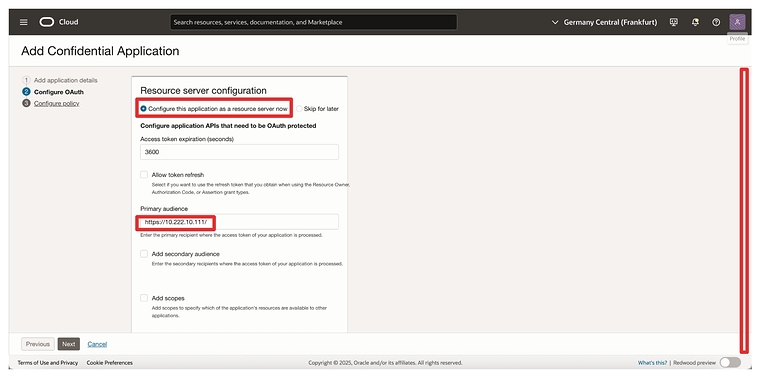
- For the Resource Server configuration:
- Select Configure this application as a resource server now.
- Primary audience: https://10.222.10.111/ (The IP address of the AMS CTM1 Server)
- Scroll down.
- Check the Add scopes box.
- Click on Add.
- Add the scope:
oci_ekms. - Click on Add.
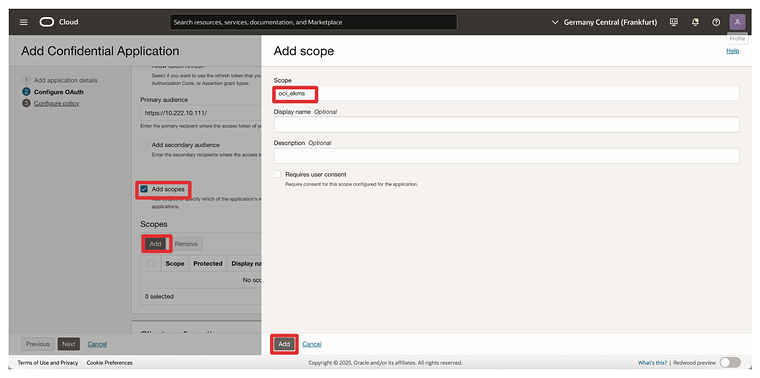
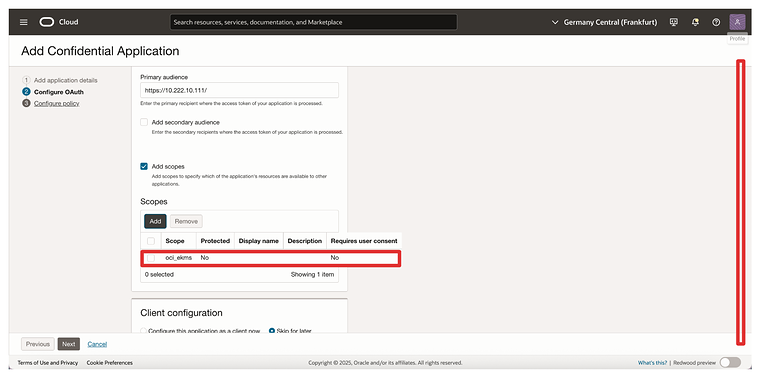
- Notice the added scope
oci_ekms - Scroll down.
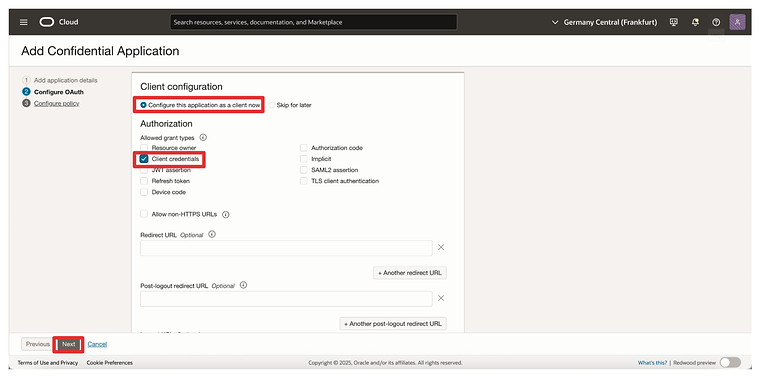
- For the Client configuration:
- Select Configure this application as a client now.
- Check the box Client credentials.
- Click Next.
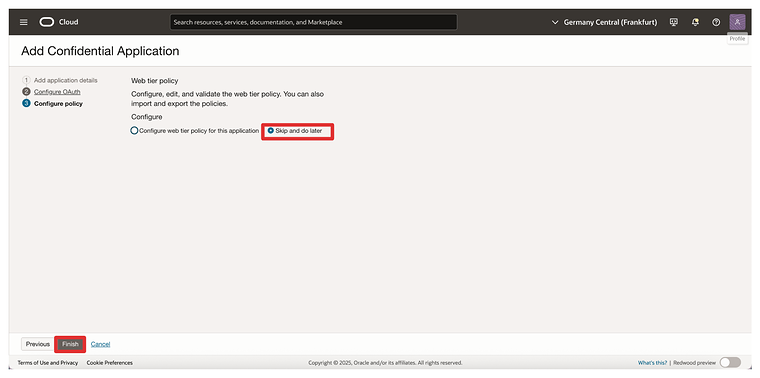
- Skip the web tier policy creation.
- Click Finish.
- Notice that the Resource_App integration application is created.
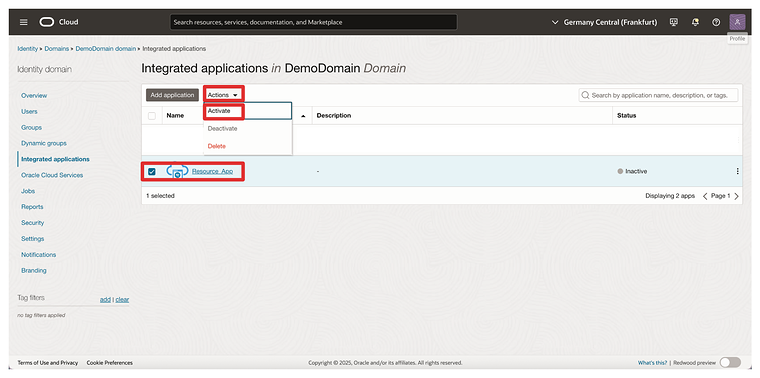
- Select the Resource_App integration application.
- Click on the Actions dropdown menu
- Click on Activate.
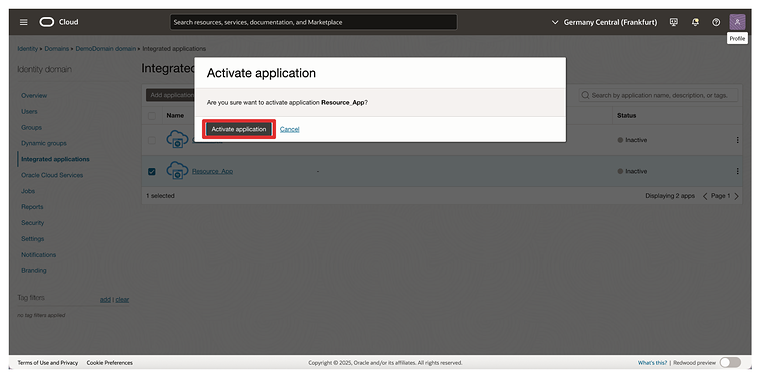
- Click on Activate application.
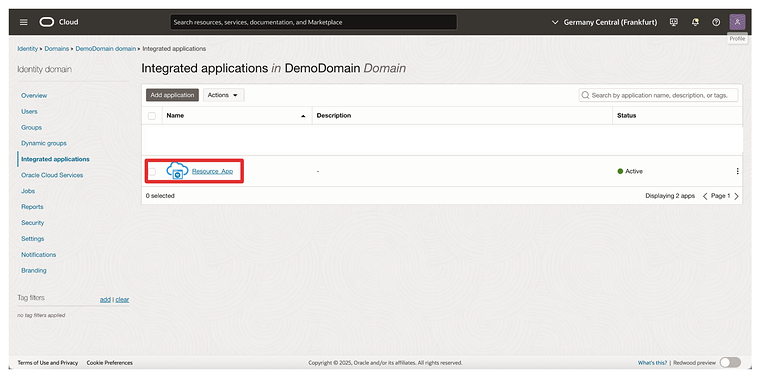
Click on the Resource_App integration application.
- Scroll down.
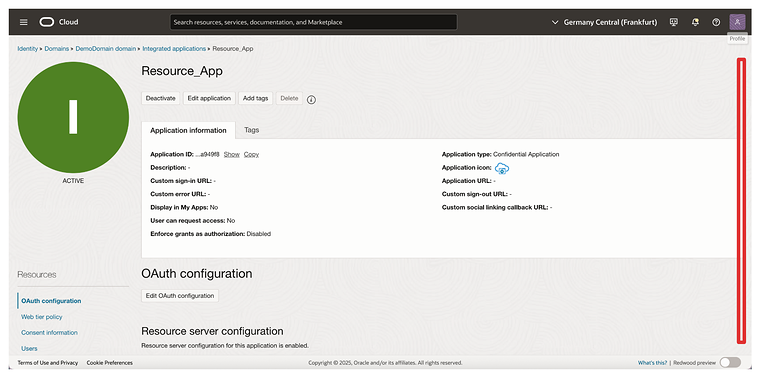
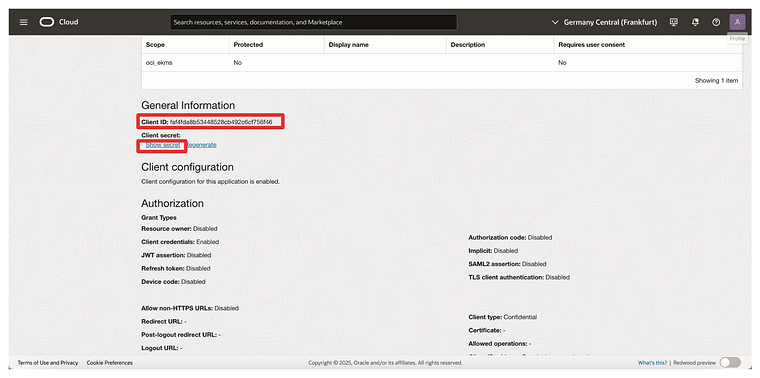
- Copy the Client ID (and store this on a notepad).
- Click on Show secret to show the Client secret.
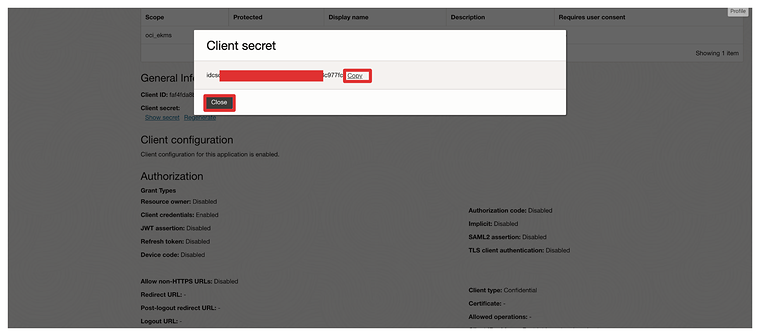
- Click on Copy to copy the Client secret (and store this on a notepad).
- Click on Close.
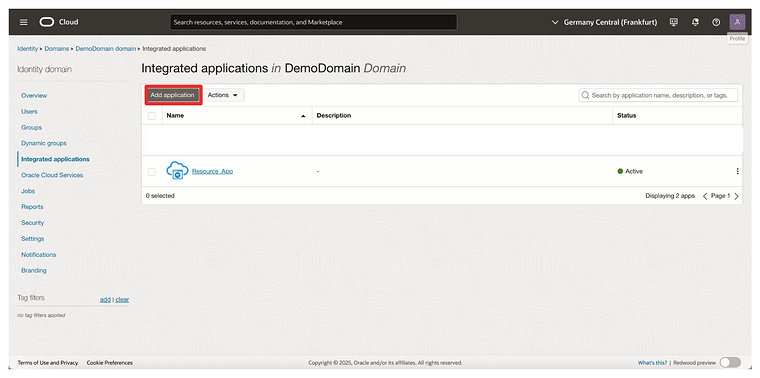
- Click on Add application.
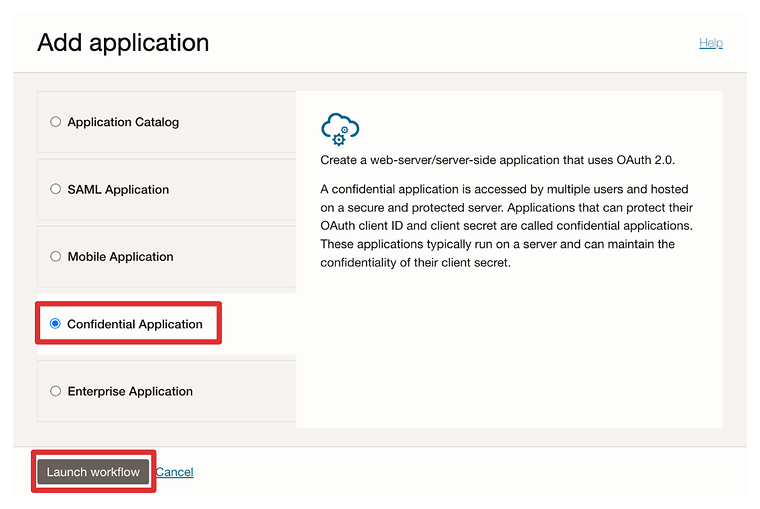
- Select Confidential Application.
- Click on Launch workflow.
- Name the application, e.g.,
Client_App. - Click Next.
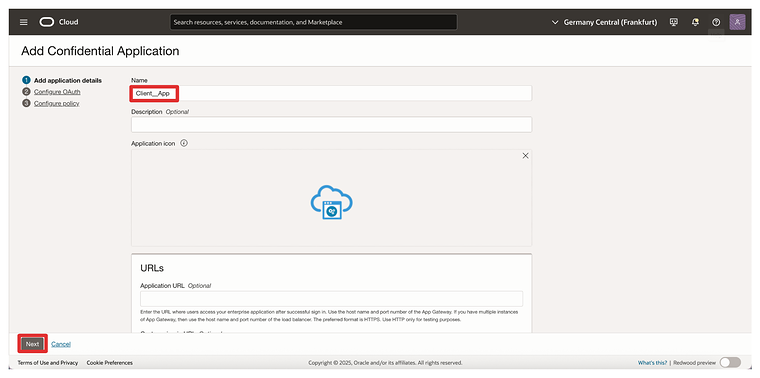
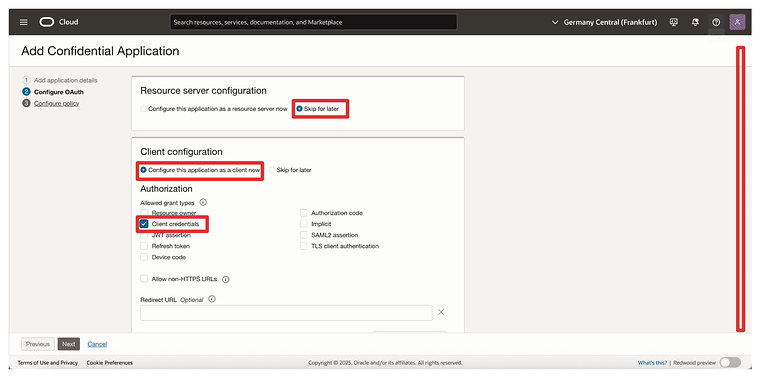
- For the Resource Server configuration:
- Select Skip for later.
- For the Client configuration:
- Select Configure this application as a client now.
- Check the box Client credentials.
- Scroll down.
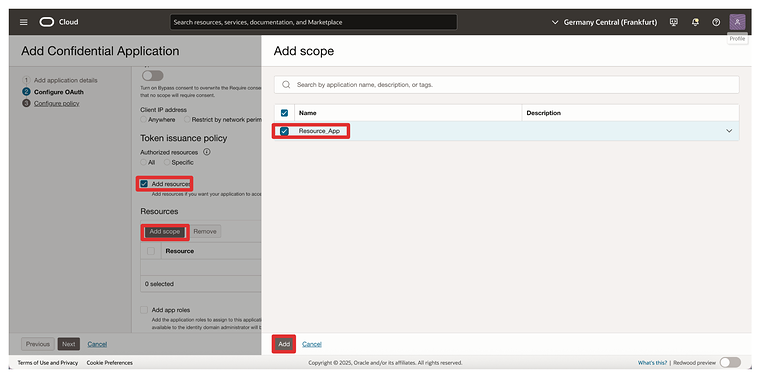
- Check the Add resources box.
- Click on Add scope.
- Add the scope:
Resource_App. - Click on Add.
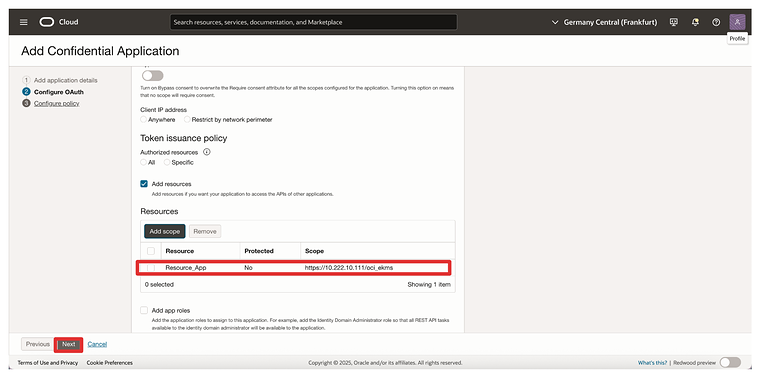
- Notice the added resource
Resource_App - Click Next.
- Skip the web tier policy creation.
- Click Finish.
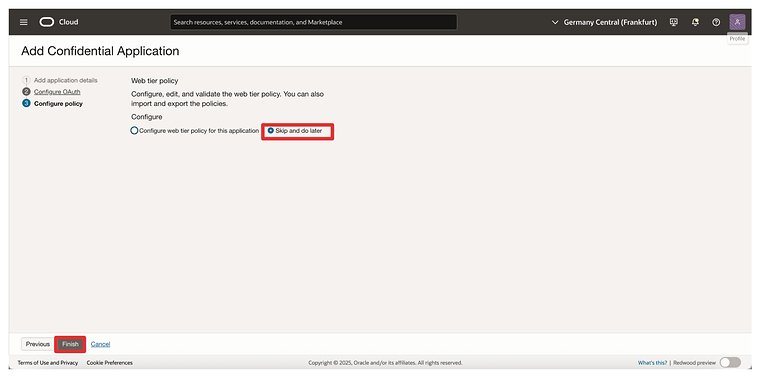
- Notice that the Client_App integration application is created.
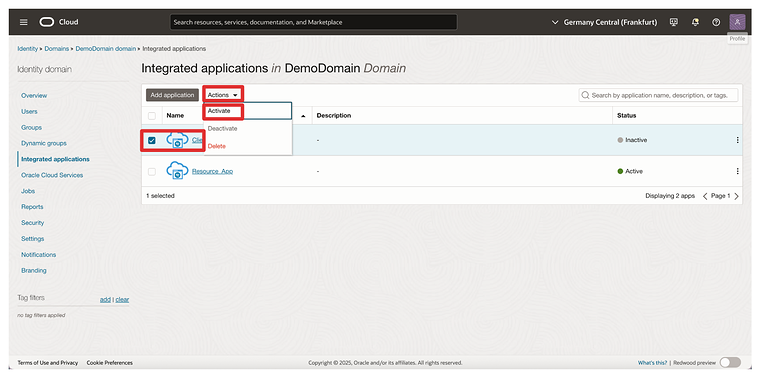
- Select the Client_App integration application.
- Click on the Actions dropdown menu
- Click on Activate.
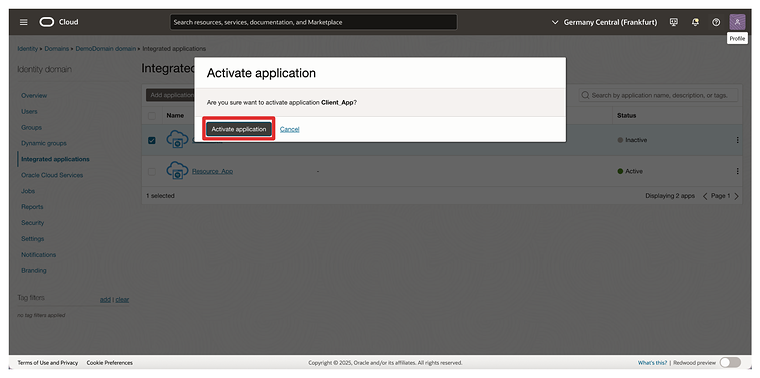
- Click on Activate application.
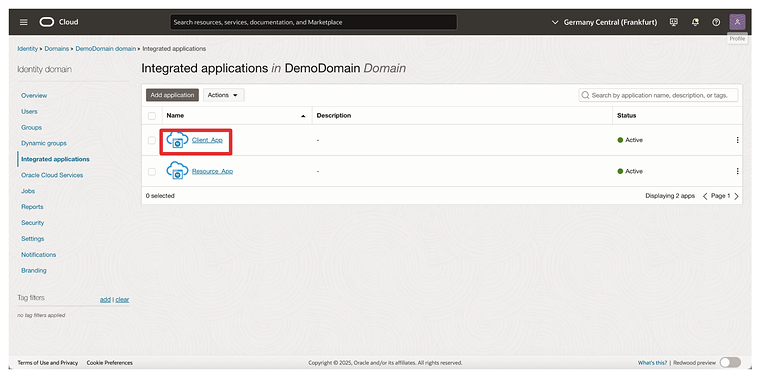
Click on the Client_App integration application.
- Scroll down.
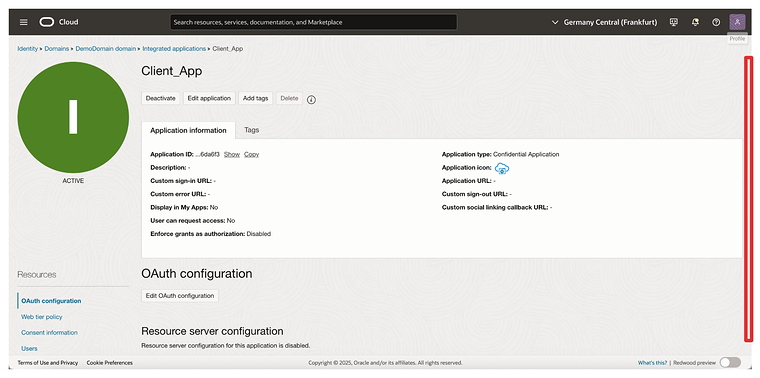
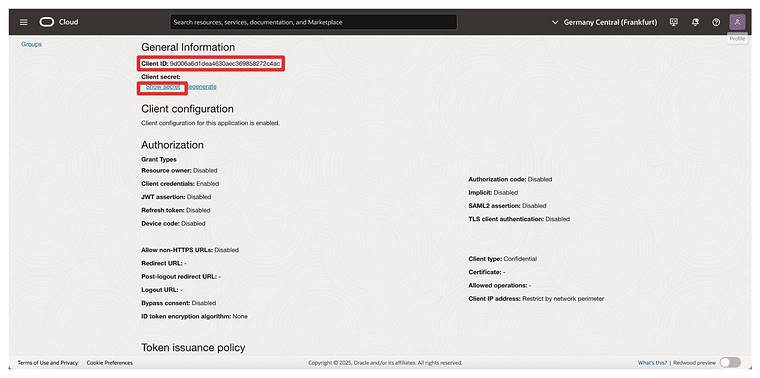
- Copy the Client ID (and store this on a notepad).
- Click on Show secret to show the Client secret.
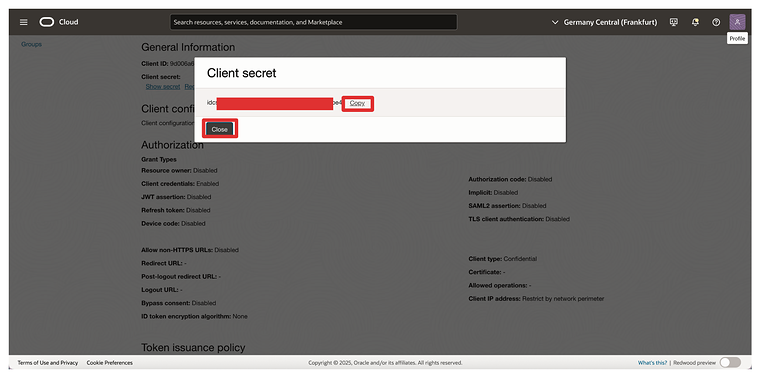
- Click on Copy to copy the Client secret (and store this on a notepad).
- Click on Close.
STEP 03 - Collecting the Identity Domain URL on OCI Console
- Official OCI documentation: Getting an Identity Domain’s Details
To enable OAuth-based communication between Oracle Cloud Infrastructure (OCI) and Thales CipherTrust Manager, you need to provide the Identity Domain URL during the configuration of the Identity Provider in CipherTrust Manager.
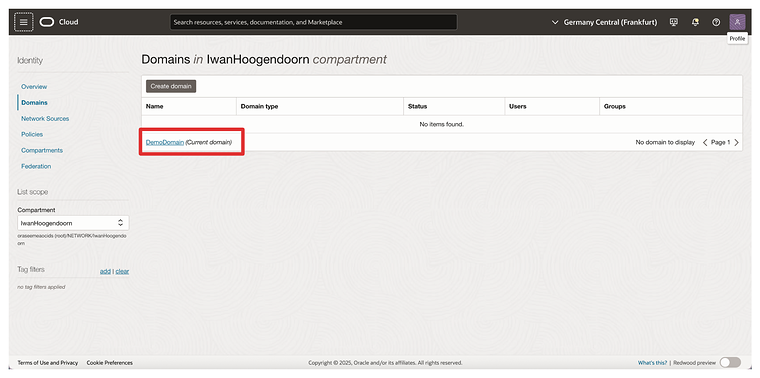
In the OCI Console, navigate to Identity & Security > Domains.
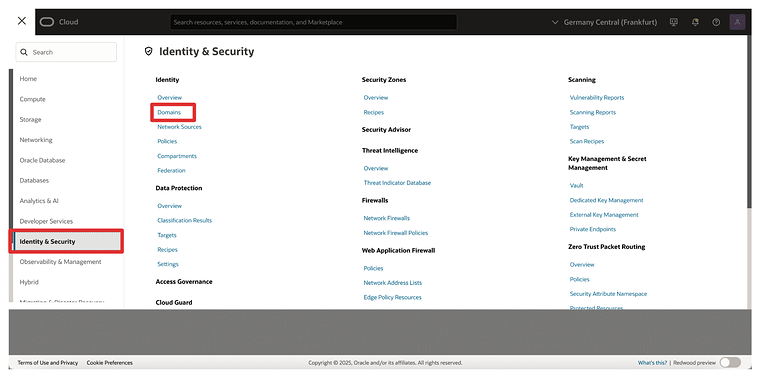
Select the Identity Domain where your Confidential Applications were created.
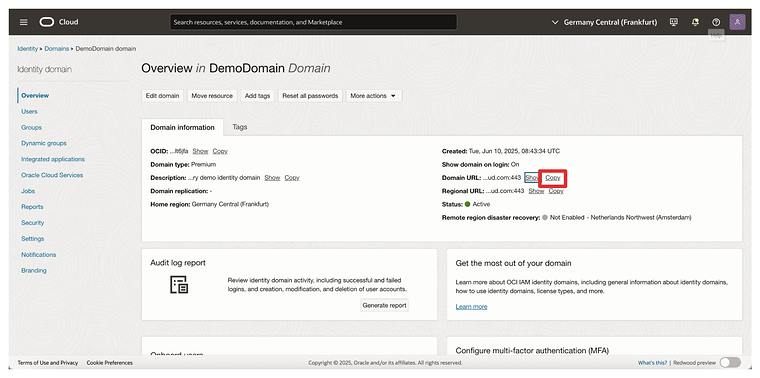
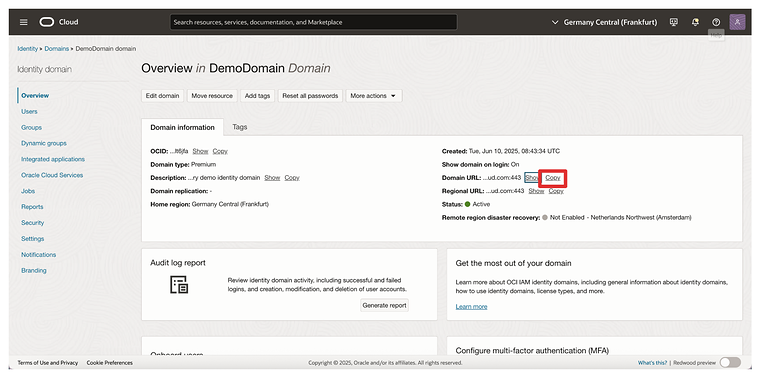
- On the domain details page, locate the Domain URL.
- Click on copy (and store this on a notepad).
STEP 04 - Creating Identity Providers on CTM
- Official Thales documentation for CTM version 2.19: Creating Identity Providers
- Official Thales documentation for CTM version 2.19: Register Identity Provider with CipherTrust Manager
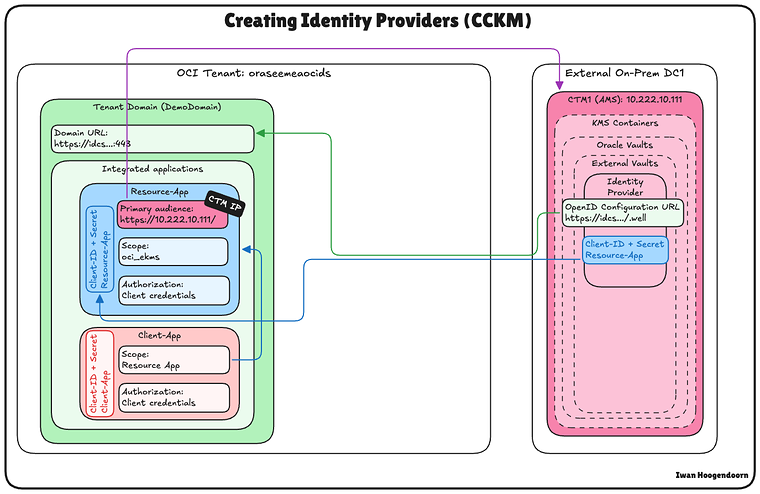
In this step, you will configure the Identity Provider in the Thales CipherTrust Manager (CTM). This setup allows CTM to authenticate with Oracle Cloud Infrastructure (OCI) using the OAuth 2.0 credentials you created earlier.
The diagram below illustrates the components and configuration set up in this step.
On the CTM1 (in AMS):
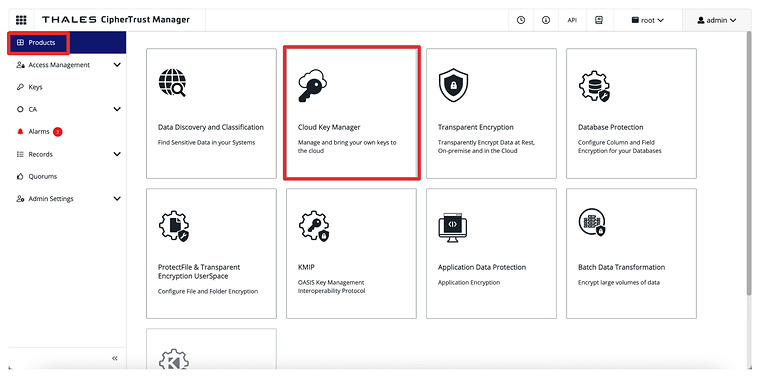
- Click on Products.
- Click on Cloud Key Manager.
- Open the KMS Containers menu on the left side.
- Click on Oracle Vaults.
- Select the External Vaults tab.
- Click on Add Identity Provider.
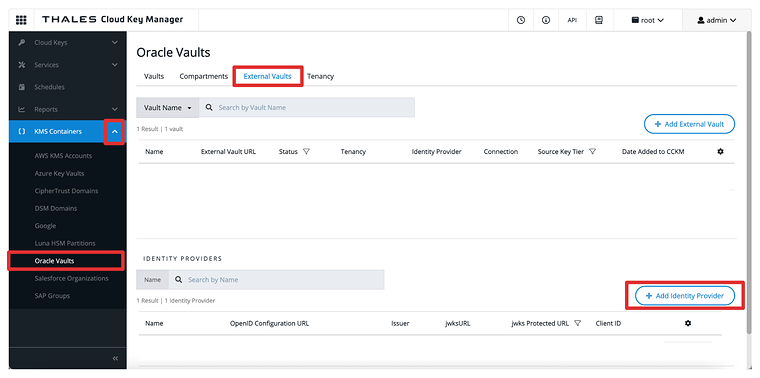
- Name the Identity Provider, e.g.,
OCI. - Select OpenID Configuration URL as the Provider Verifier.
- Paste in the OpenID Configuration URL (the domain URL we copied in the previous step).
- add the following suffix to the URL:
.well-known/openid-configuration. - So the full OpenID Configuration URL will be:
https://idcs-.identity.oraclecloud.com:443/.well-known/openid-configuration. - Check the box jwks Protected URL.
- Provide the Client ID and the Client Secret of the Resource_App created earlier as an integrated application.
- Click Add.
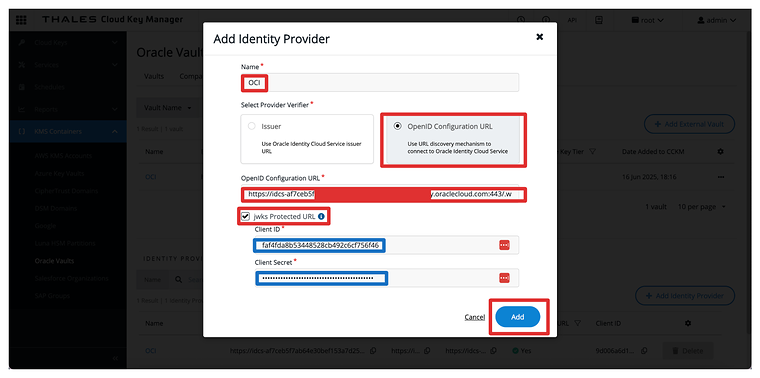
- Notice that the Identity Provider is created.
[missing image: output/article_2/aeeeeda500c9b0d1907d89e70d90a6db.png]
STEP 05 - Adding Oracle Tenancies on CTM
- Official Thales documentation for CTM version 2.19: Adding Oracle Tenancies
After configuring the Identity Provider in CipherTrust Manager (CTM), the next step is registering your Oracle Cloud Infrastructure (OCI) Tenancy. This allows CTM to manage external vaults and keys on behalf of your OCI environment using the previously configured OAuth credentials.
The diagram below illustrates the components and configuration set up in this step.
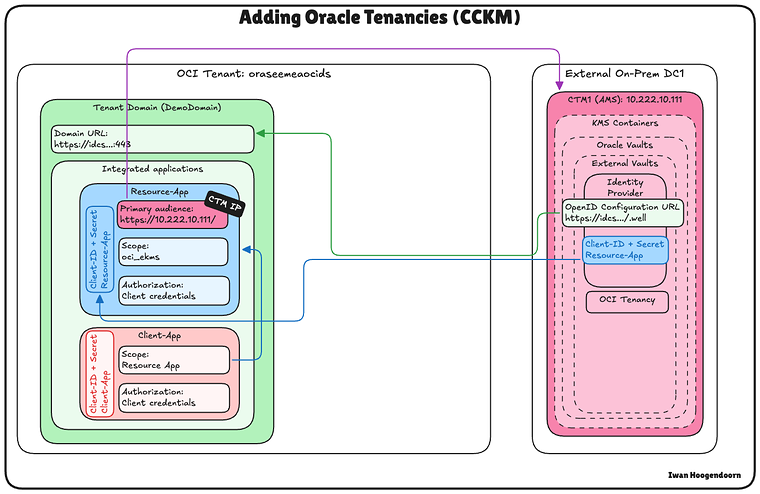
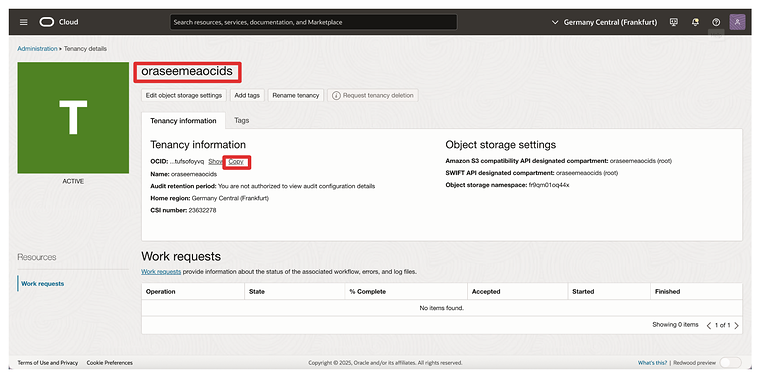
First, we must get the tenant’s name and OCID from OCI.
- Click on your profile in the upper right corner.
- Click on the Tenancy.
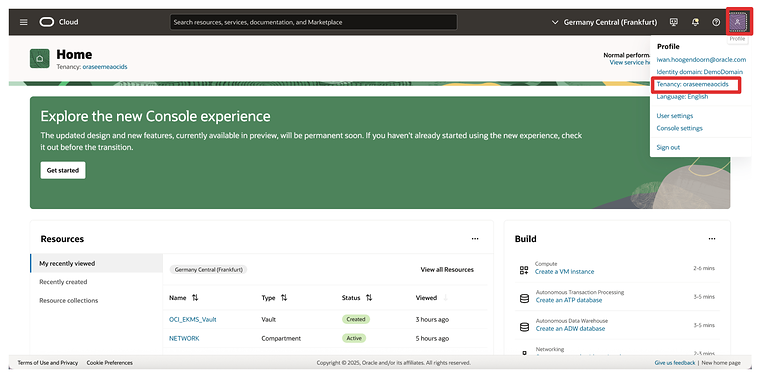
- Copy the tenant’s name (and store this on a notepad).
- Copy the tenant’s OCID (and store this on a notepad).
- Go back to the CTM.
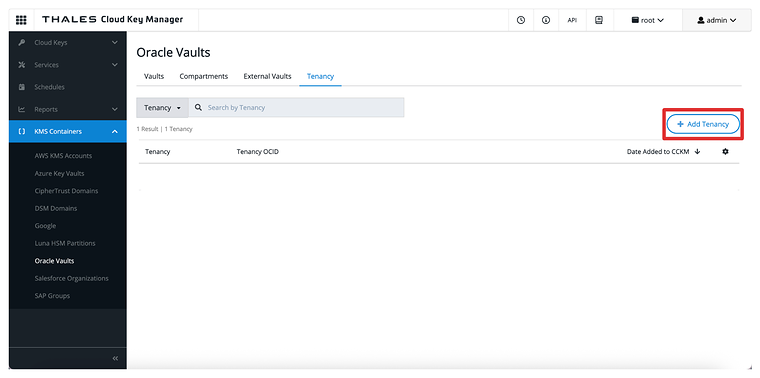
- Open the KMS Containers menu on the left side.
- Click on Oracle Vaults.
- Select the Tenancy tab.
- Click on Add Tenancy.
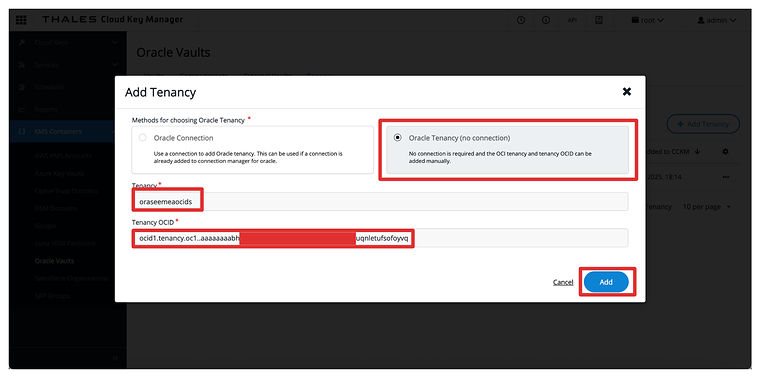
- Select Oracle Tenancy (no connection) as the method.
- Paste in the Name of the Tenancy we collected earlier.
- Paste in the Tenancy OCID, that we collected earlier.
- Click on Add.
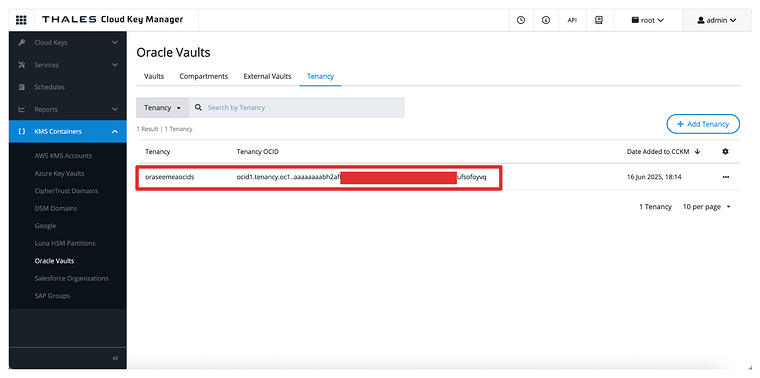
- Notice that the OCI Tenant is added to the CTM.
STEP 06 - Creating a Private Endpoint for the External Key Manager Service on OCI Console
- Official OCI documentation: Creating a Private Endpoint
To securely connect Oracle Cloud Infrastructure (OCI) to the Thales CipherTrust Manager (CTM) without exposing traffic to the public internet, you must create a Private Endpoint for the External Key Management Service (EKMS).
This ensures all communication between OCI and CTM happens over a private, controlled network path.
Make sure the following prerequisites are met:
- The CipherTrust Manager (CTM) must be reachable from OCI through your private network setup (e.g., via VPN)
- Ensure the subnet has routing and security rules allowing traffic to the CTM instance.
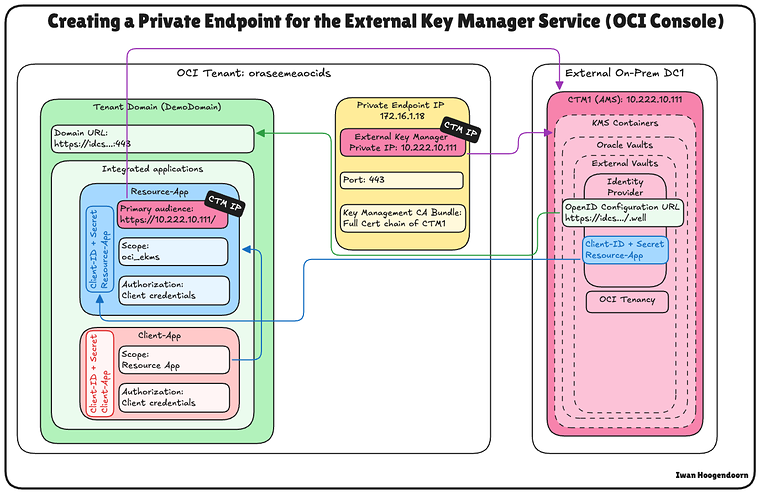
The diagram below illustrates the components and configuration set up in this step.
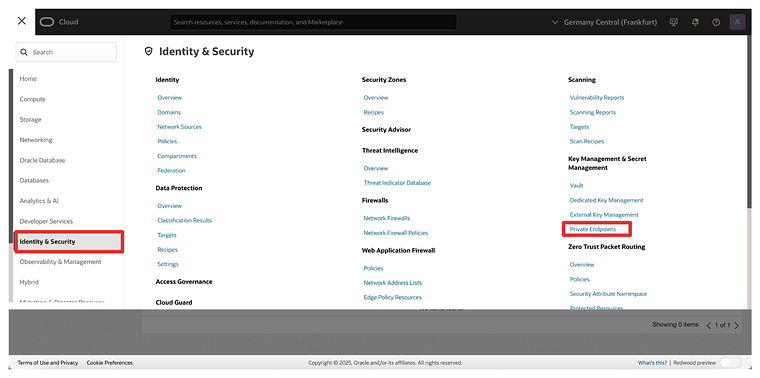
In the OCI Console, navigate to Identity & Security > Private Endpoints.
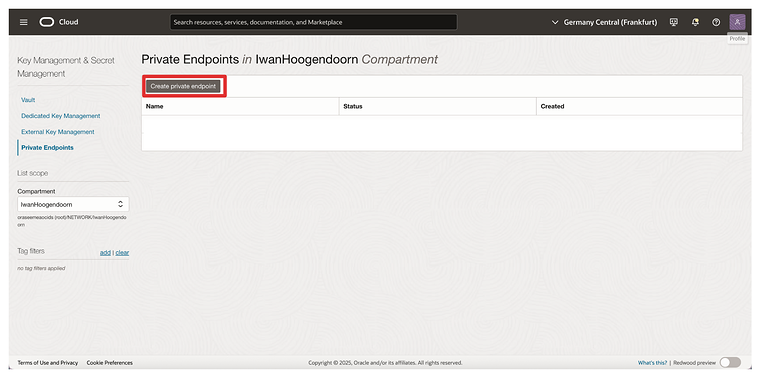
- Go to the Private Endpoints tab and click Create Private Endpoint.
- Name the Private Endpoint, e.g.,
Private-Endpoint-For-Vault. - Select a VCN and Subnet this Private Endpoint needs to be in.
- Specify the Private IP address of the External Key Manager: 10.222.10.111 (The IP address of the AMS CTM1 Server)
- Specify the Port: 443.
- Upload the External Key Management CA bundle. Click on Browse.
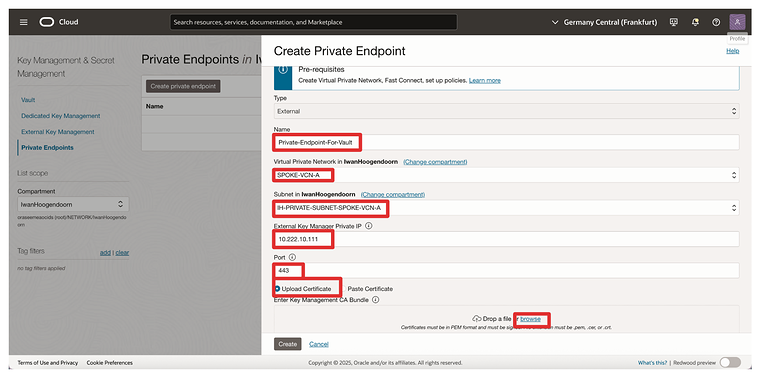
- I have selected the Full Chain certificate that was created in this tutorial (but you could also only select the CA Root certificate)
- Click on Open.
ADD the URL of the first tutorial.
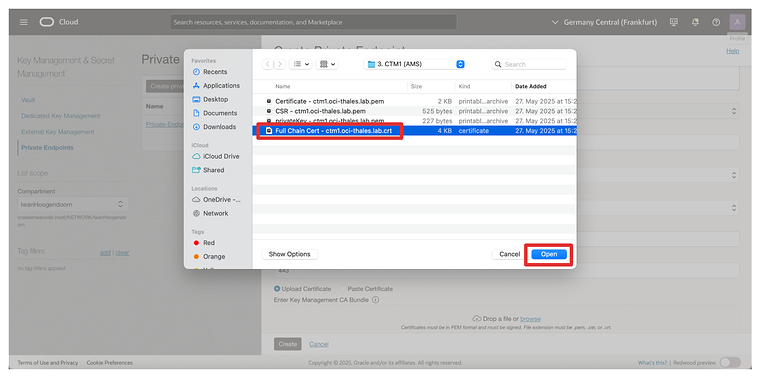
- Make sure the certificate, the Root CA, or the Full chain cert of the CTM is selected.
- Click on Create.
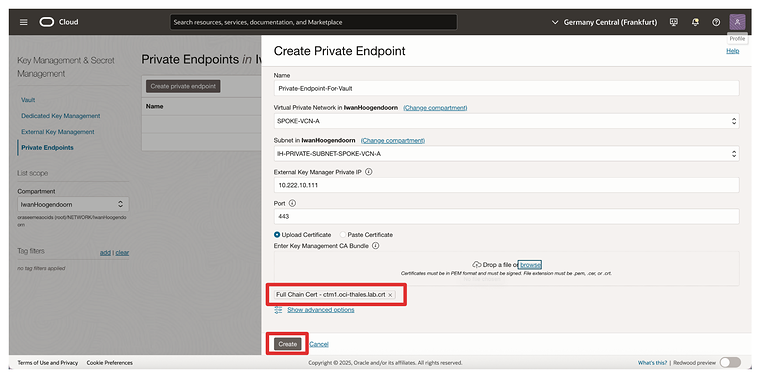
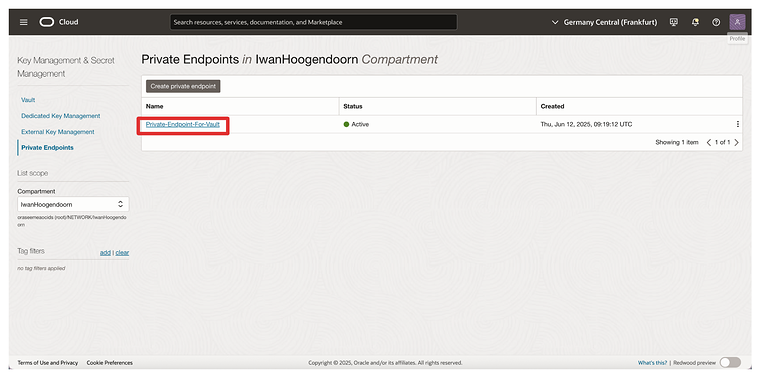
- Notice that the Private Endpoint is created.
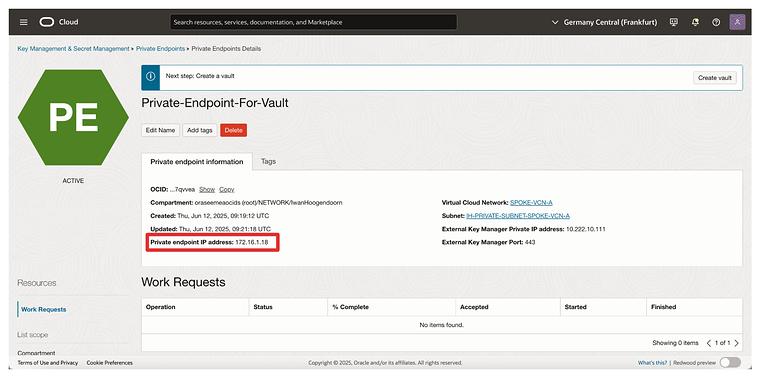
- Click on it.
- Notice that the IP address of the Private endpoint is configured.
STEP 07 - Adding External Vaults on CTM
- Official Thales documentation for CTM version 2.19: Adding External Vaults
With the Oracle tenancy and private endpoint in place, the next step is to add an External Vault in Thales CipherTrust Manager (CTM). An external vault in CTM is a logical container that maps to the External Key Management Vault in OCI, enabling the CipherTrust Manager to manage keys used for HYOK encryption.
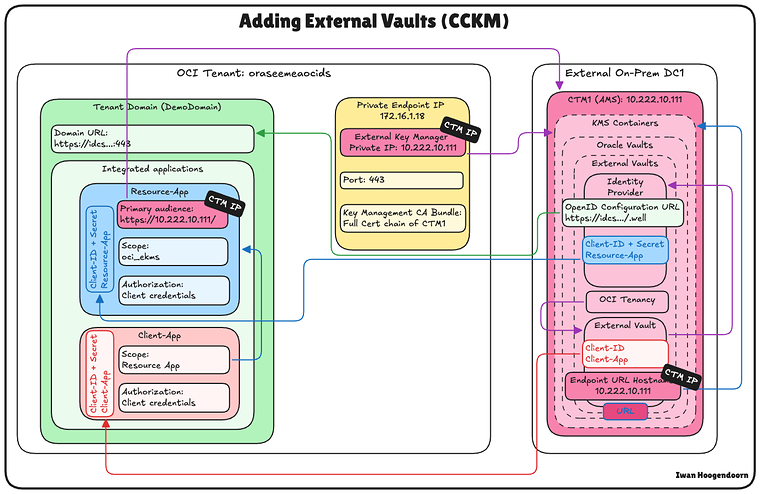
The diagram below illustrates the components and configuration set up in this step.
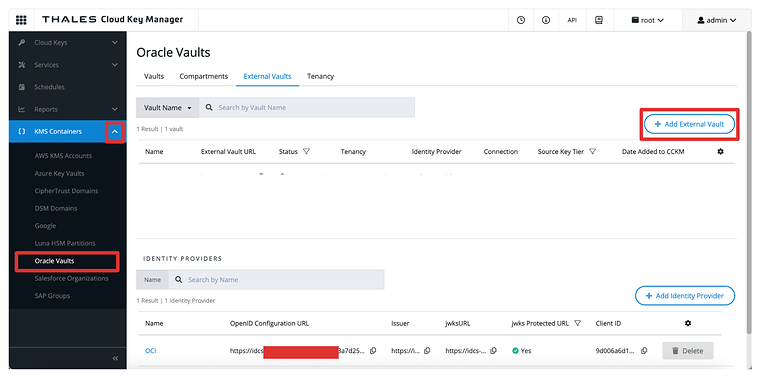
- Open the KMS Containers menu on the left side.
- Click on Oracle Vaults.
- Select the External Vaults tab.
- Click on Add External Vault.
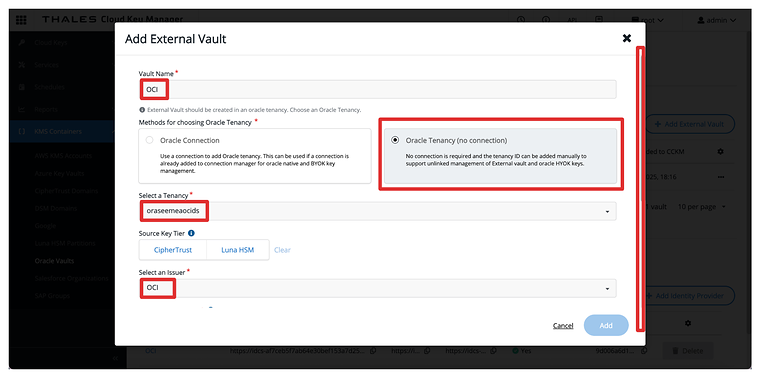
- Name the External Vault (CTM), e.g.,
OCI. - Select Oracle Tenancy (no connection) as the method.
- Select the Tenancy, that we create earlier.
- Select the Issuer (the identity provider that we created earlier)
- Scroll down.
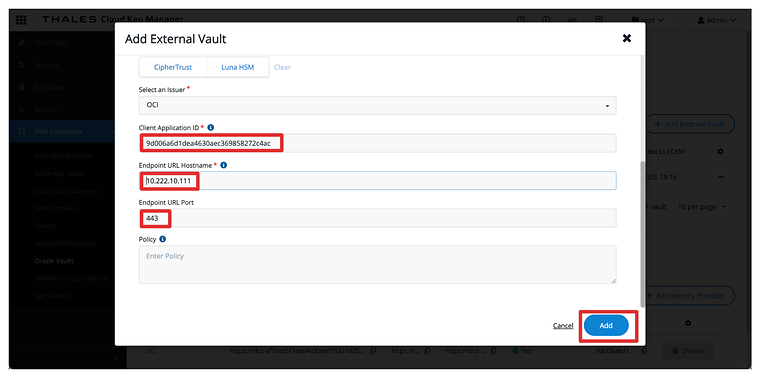
- Provide the Client ID of the Client_App created earlier as an integrated application.
- Specify the Endpoint URL Hostname: 10.222.10.111 (The IP address of the AMS CTM1 Server).
- Specify the Port: 443.
- Click Add.
- Notice the configured External Vault.
- Copy the External Vault URL (and store this on a notepad).
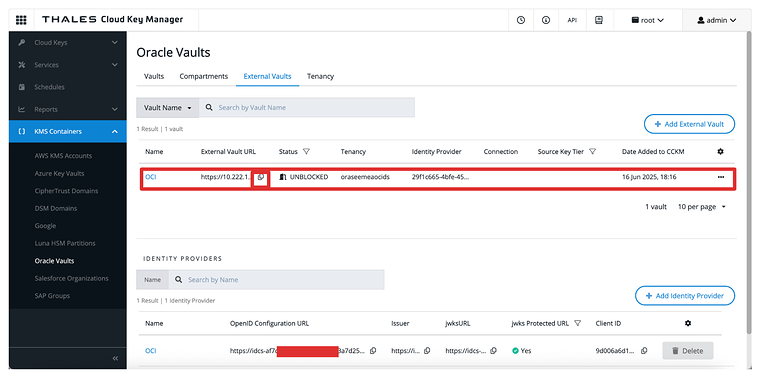
Once configured, this vault becomes the target location for storing external keys that OCI services will reference. It bridges your OCI environment and the CipherTrust-managed keys, enabling complete control over encryption operations in a HYOK model.
STEP 08 - Creating an External Key Management Vault on OCI Console
- Official OCI documentation: Creating an External Key Management Vault
Now that the External Vault has been defined in CipherTrust Manager (CCKM), the next step is to create a corresponding External Key Management Vault in the Oracle Cloud Infrastructure (OCI) Console.
This OCI vault will be linked to your CipherTrust Manager and used by OCI services to perform encryption and decryption operations using external keys.
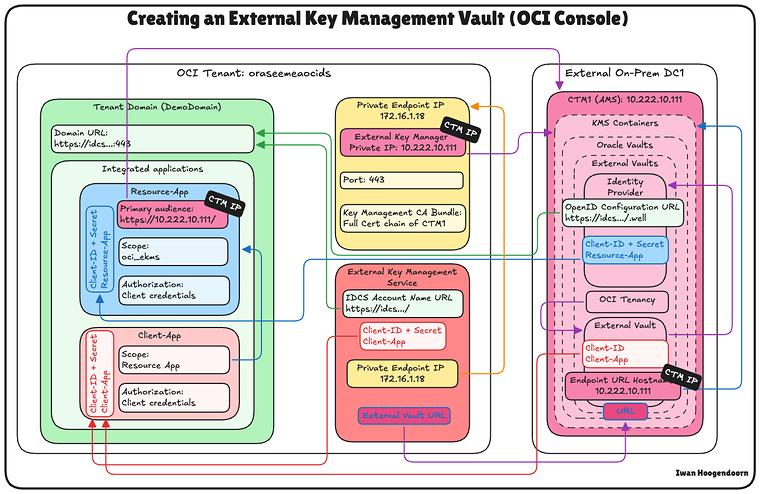
The diagram below illustrates the components and configuration set up in this step.
- Retrieve the Domain URL from Step 03 (you will need this to configure the External Key Vault in OCI).
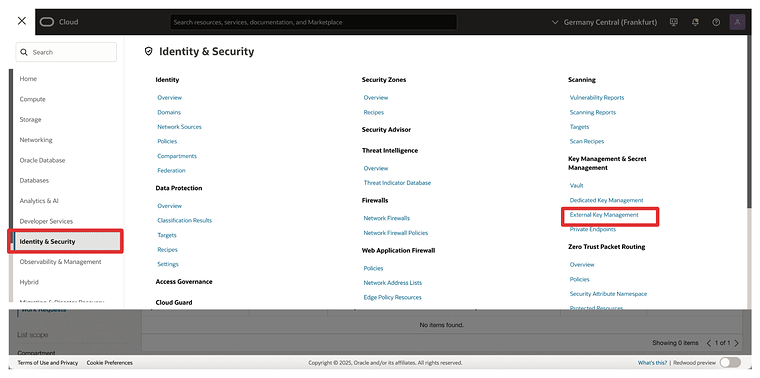
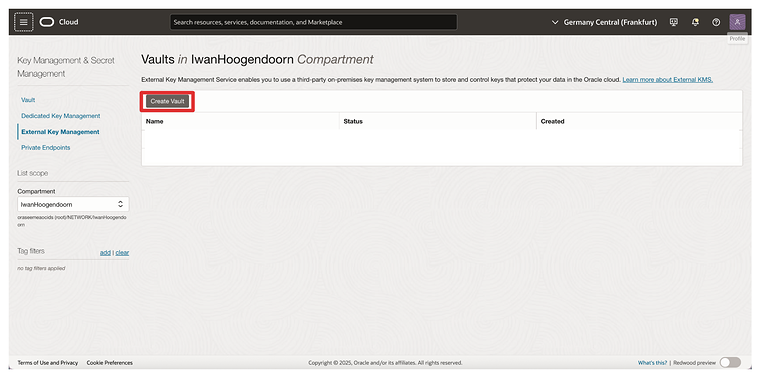
In the OCI Console, go to Identity & Security > External Key Management.
- Click on Create Vault.
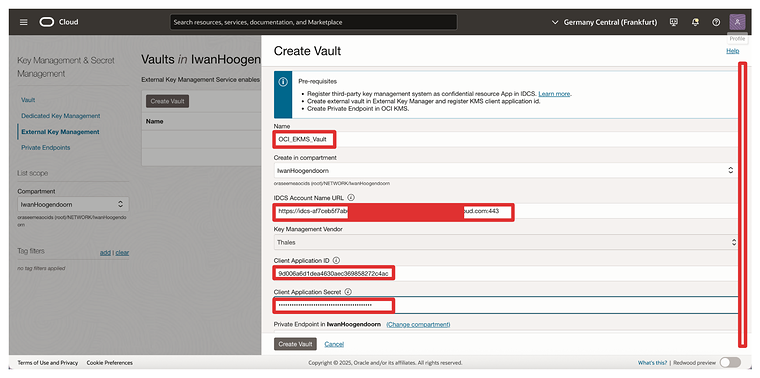
- Name the Vault (OCI), e.g.,
OCI_EKMS_Vault. - Paste in the IDCS Account Name URL (the domain URL we copied in the previous step).
- So the full URL will be:
https://idcs-.identity.oraclecloud.com:443/. - Provide the Client ID and the Client Application Secret of the Client_App created earlier as an integrated application.
- Scroll down.
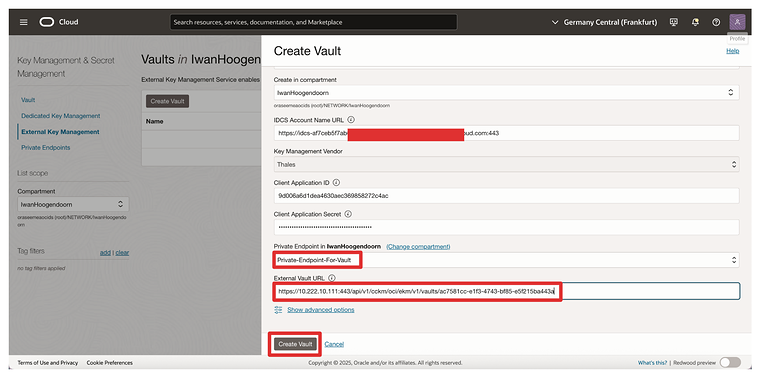
- Select the Private Endpoint we created in the previous step.
- Paste the External Vault URL (copied from the previous step when we created the external vault on CTM1).
- Click on Create Vault.
- Notice that the vault has been created.
- Click on the Vault.
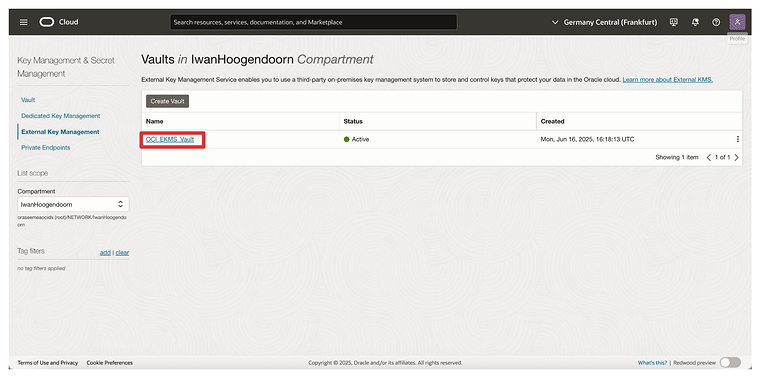
- Review the Vault settings.
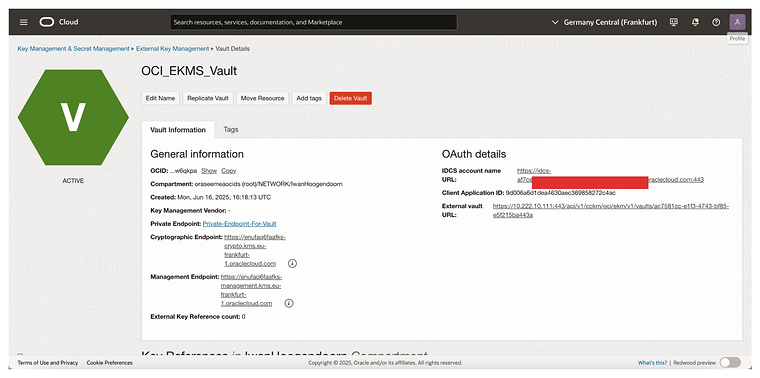
OCI will now connect to your CipherTrust Manager using the specified private endpoint. Once this vault is active, it becomes the interface through which OCI interacts with external keys managed by CCKM—enabling HYOK support for OCI services like Object Storage, Block Volumes, and more. Later, we will perform some tests with Object Storage.
STEP 09 - Adding External Keys on CTM
- Official Thales documentation for CTM version 2.19: Adding External Keys
With the external vault set up in CipherTrust Manager (CTM) and linked to Oracle Cloud Infrastructure (OCI), the next step is to create or import the external encryption keys that OCI will use for HYOK-enabled services.
These keys reside securely within the CipherTrust Manager and are referenced by OCI through the external key management interface. Depending on your organizational requirements, you can generate a new key directly within CTM or import an existing one.
The diagram below illustrates the components and configuration set up in this step.
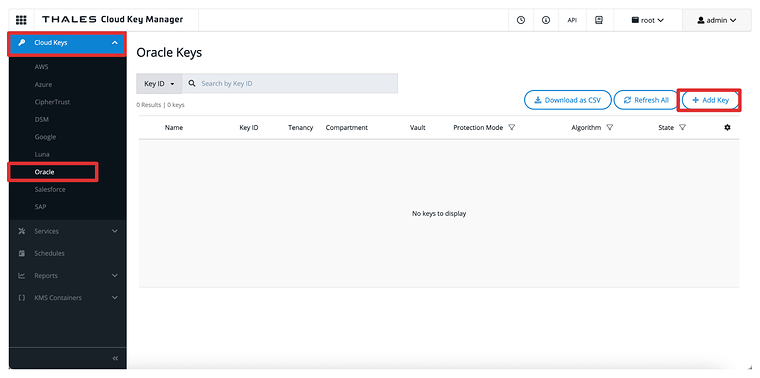
- Open the Cloud Keys menu on the left side.
- Click on Oracle.
- Click on Add Key.
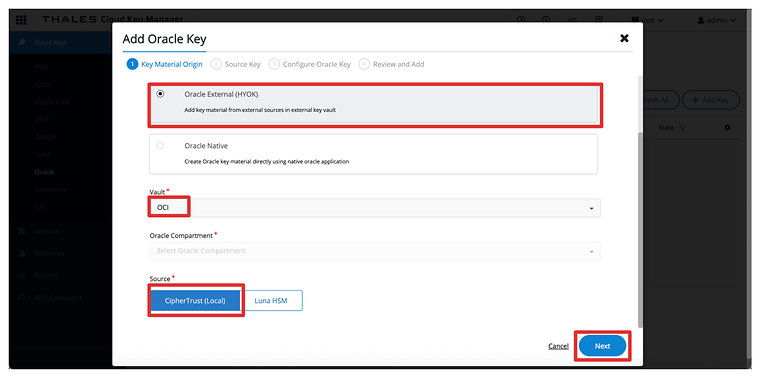
- Select Oracle External (HYOK).
- Select the (CTM) Vault that we created earlier.
- Select the Source to be CipherTrust (Local).
- Click on Next.
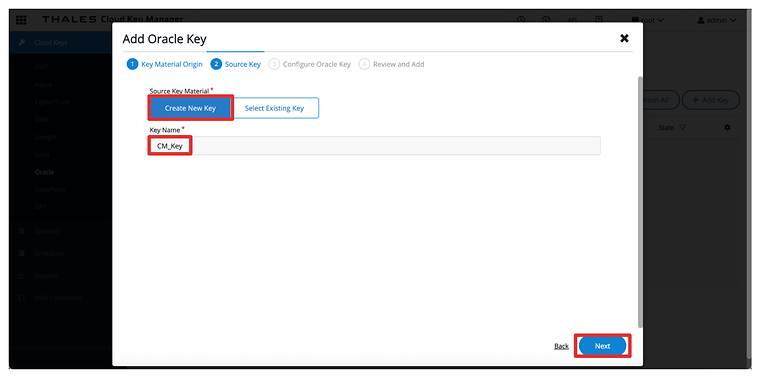
- Select the Source Key Material to be Create New Key.
- Name the Key, e.g.,
CM_Key. - Click on Next.
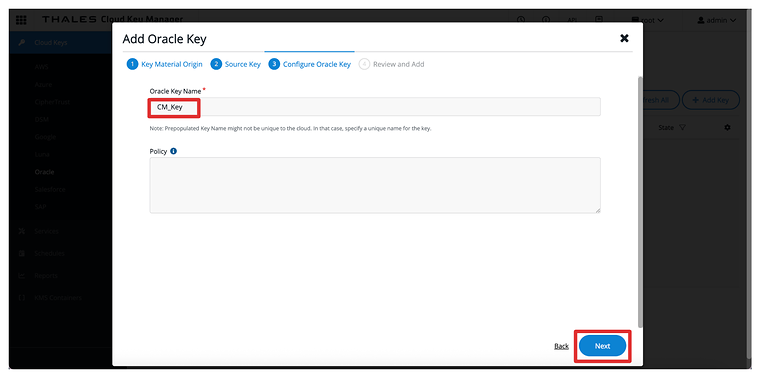
- Name the Oracle Key, e.g.,
CM_Key. - Click on Next.
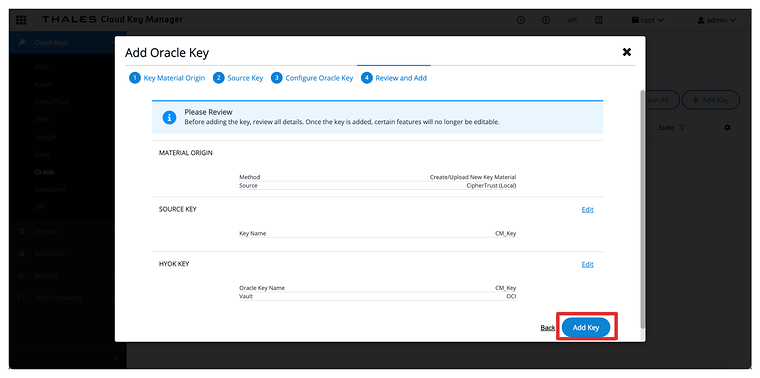
- Click on Add Key.
- Click on Close.
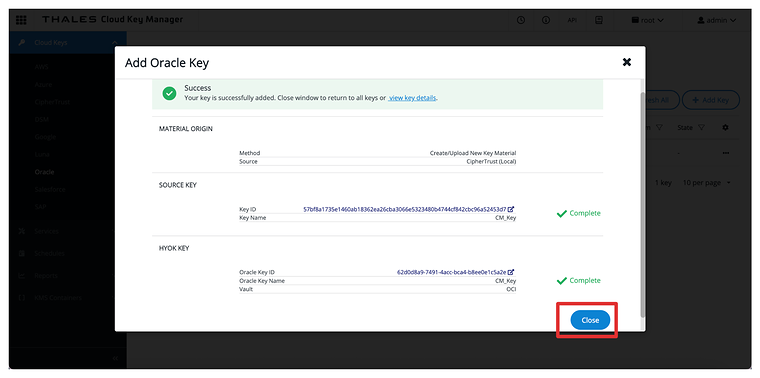
- Notice the created key.
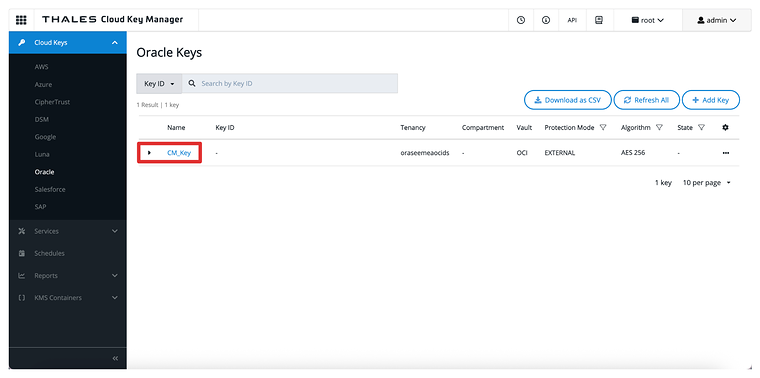
Once added, the key becomes available to OCI via the External Key Management Vault. However, to allow OCI services to use the key, you must create a key reference in the OCI Console, which we’ll cover in the next step.
STEP 10 - Creating Key References on OCI Console
- Official OCI documentation: Creating Key References
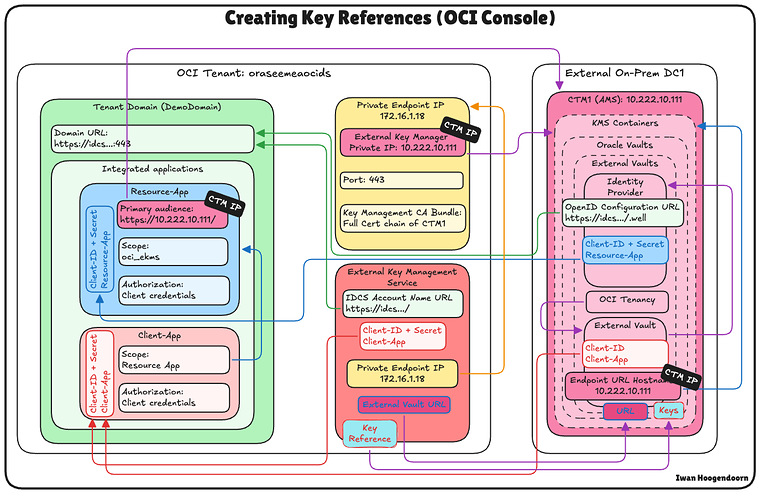
Once the external key has been created or imported into the CipherTrust Manager (CTM), the next step is to create a Key Reference in the Oracle Cloud Infrastructure (OCI) Console. A key reference acts as a pointer that allows OCI services to access and use the external key stored in your CipherTrust Manager via the External Key Management (EKM) Vault.
The diagram below illustrates the components and configuration set up in this step.
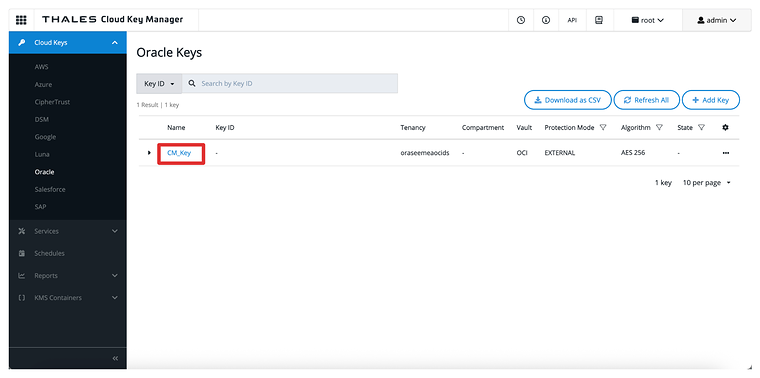
- Open the Cloud Keys menu on the left side (on the CTM).
- Click on Oracle.
- Click on the Key we created in the previous step.
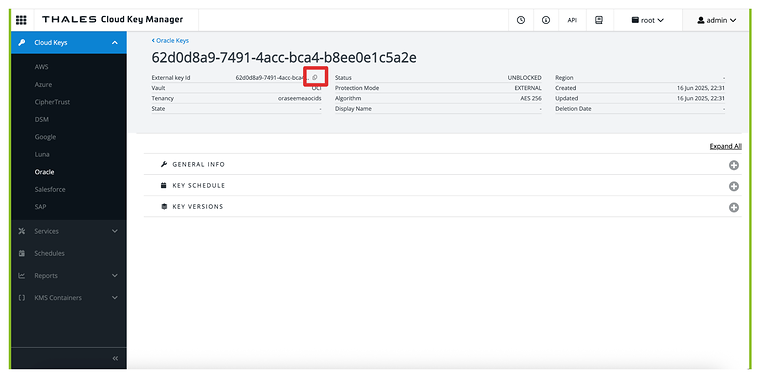
- Notice that the key will have an External Key ID; copy this ID.
- Return to the Vault in OCI that we created in previous steps.
- Click on the Vault.
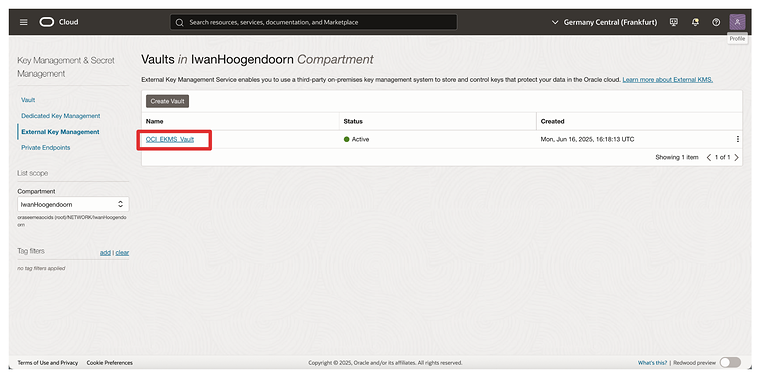
- Scroll down.
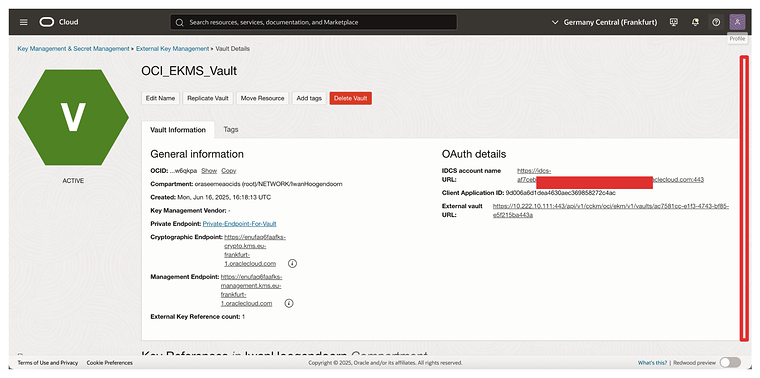
Click on Create Key Reference.
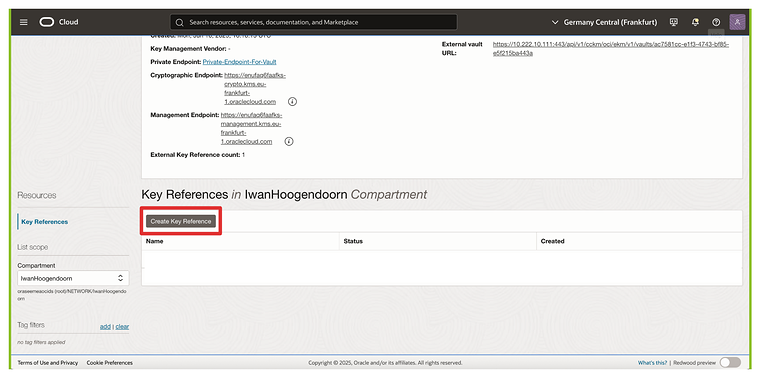
- Name the (OCI) Key Reference, e.g.,
OCI_Key_Reference. - Paste in the copied External Key ID (CTM) key.
- Click on Create Key Reference.
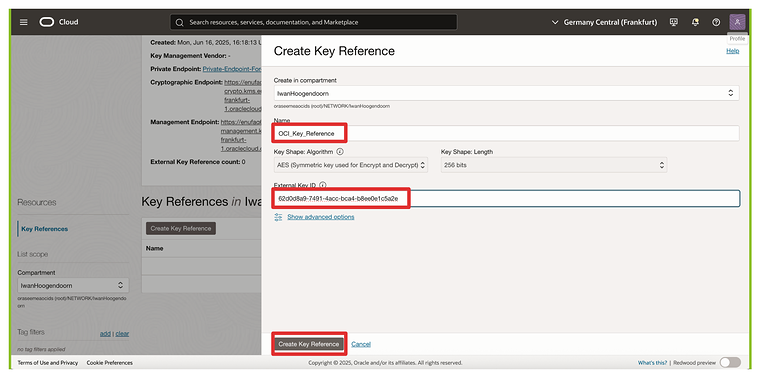
- Notice that the Key Reference has been created.
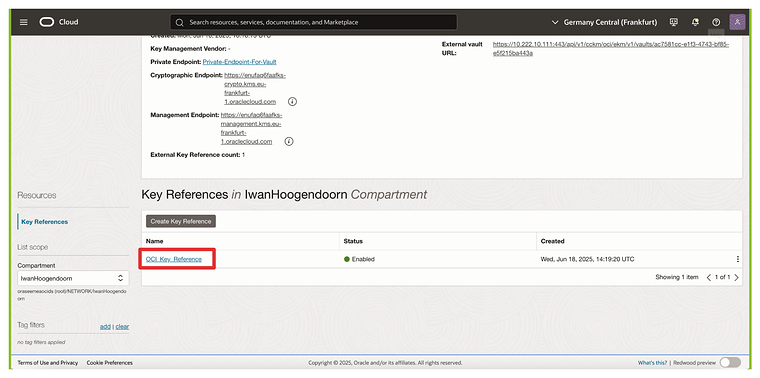
OCI will now associate this key reference with the external key managed in CipherTrust Manager. This enables OCI services—such as Object Storage, Block Volumes, and others—to send cryptographic requests to the external key over the private endpoint. In contrast, the key material itself remains entirely under your control.
We will test the key reference immediately by attaching it to an Object Storage bucket to verify that the integration is working as expected.
STEP 11 - Creating an Object Storage Bucket with customer-managed keys on OCI Console
- Official OCI documentation: Creating an Object Storage Bucket
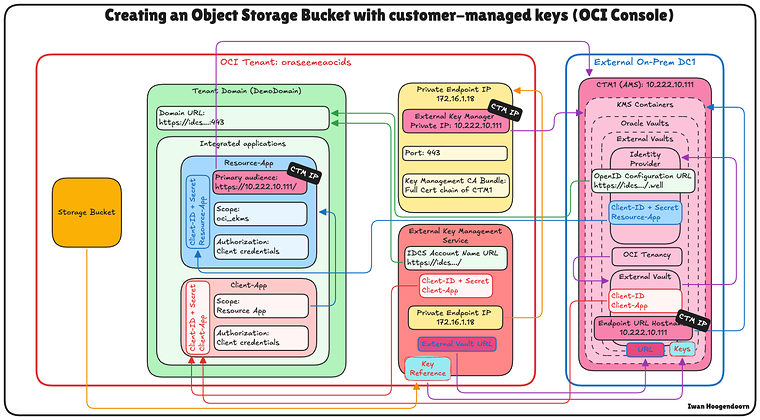
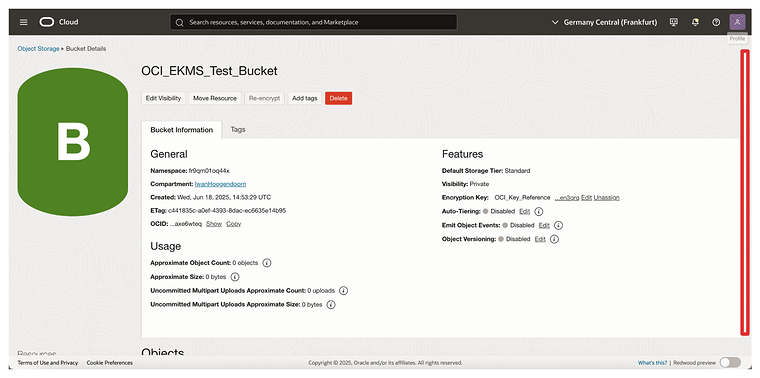
You can encrypt resources using the external key referenced in Oracle Cloud Infrastructure (OCI). In this step, we will create an Object Storage bucket that uses the external, customer-managed key hosted on the CipherTrust Manager (CTM) via the External Key Management Vault.
This setup ensures that all objects stored in the bucket are encrypted using a key you fully control—meeting strict compliance, sovereignty, or internal policy requirements.
The diagram below illustrates the components and configuration set up in this step.
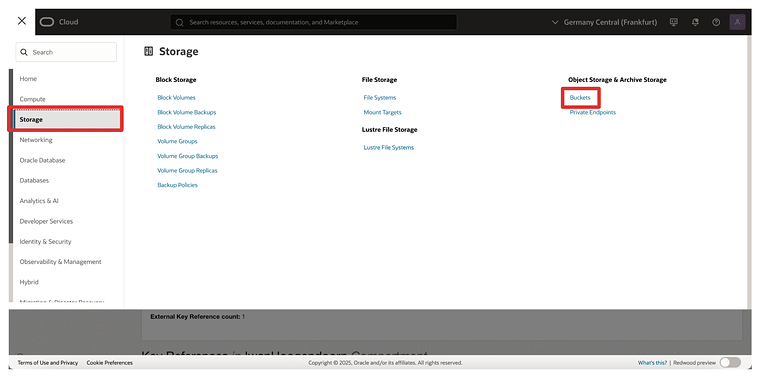
In the OCI Console, navigate to Storage > Buckets.
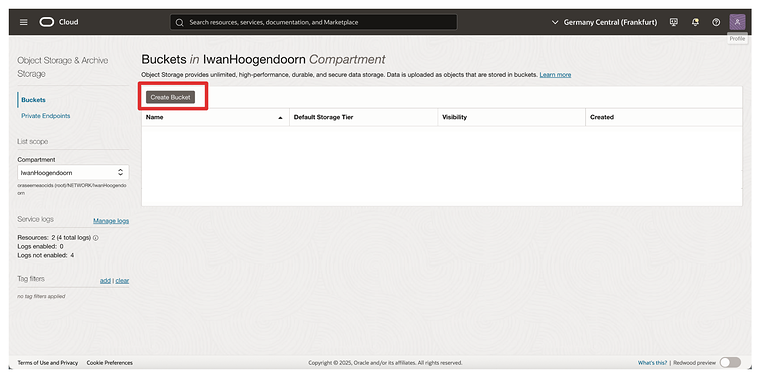
- Click on Create Bucket.
- Name the (OCI) Bucket, e.g., `OCI_EKMS_Test_Bucket.
- Scroll down.
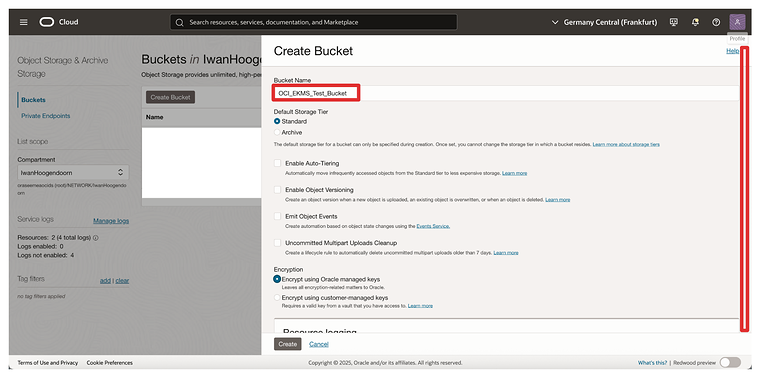
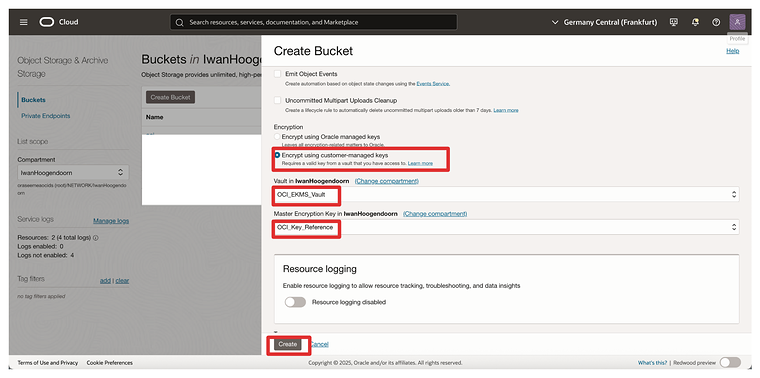
- Under Encryption, select Encrypt using customer-managed keys.
- Choose the Vault: Select your External Key Management Vault that we created earlier.
- Choose the Key: Select the Key Reference that we created earlier.
- Click on Create.
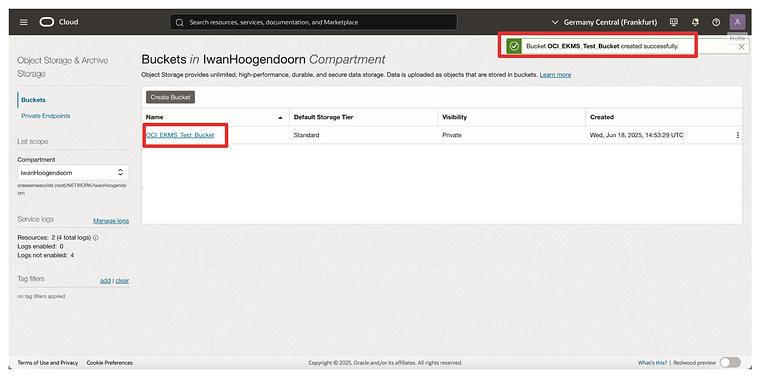
- Notice that the Storage Bucket is created.
- Click on it to enter the Storage Bucket.
- You can scroll down to upload files or leave them empty.
- Navigate to the Home screen of the OCI console (or any other page).
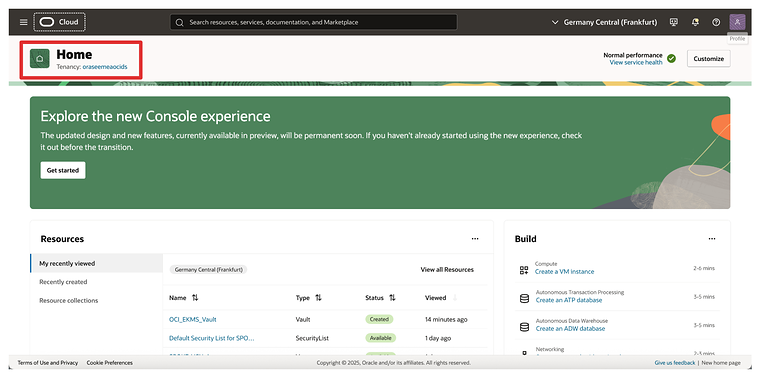
Once the bucket is created, all data stored in it will be encrypted using the external key managed by CipherTrust Manager. This ensures that OCI relies on your key infrastructure for access and control, enabling complete Hold Your Own Key (HYOK) capabilities.
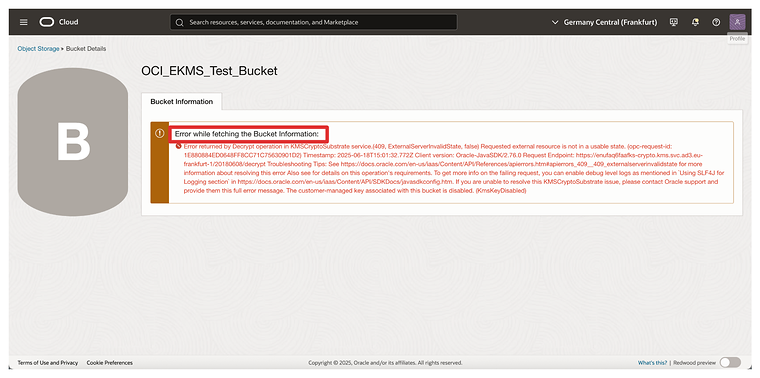
Suppose the external key becomes unavailable (e.g., disabled or blocked in CTM). In that case, access to the bucket and its contents will be denied—offering a powerful control point for your data security posture. This is something we will test in the test step.
STEP 12 - Blocking and Unblocking Oracle Keys and testing the Object Storage Bucket accessibility on CTM and OCI Console
- Official Thales documentation for CTM version 2.19: Blocking Oracle Keys
- Official Thales documentation for CTM version 2.19: Unblocking Oracle Keys
As stated before, one of the key benefits of the Hold Your Own Key (HYOK) model is the ability to retain complete operational control over your encryption keys—including the power to block or unblock them at any time. This section demonstrates how to use CipherTrust Manager (CTM) to control access to an Oracle-managed Object Storage bucket by blocking or unblocking the external key.
Blocking a key effectively restricts access to any OCI resource encrypted with that key without deleting the key or the data. Unblocking restores access.
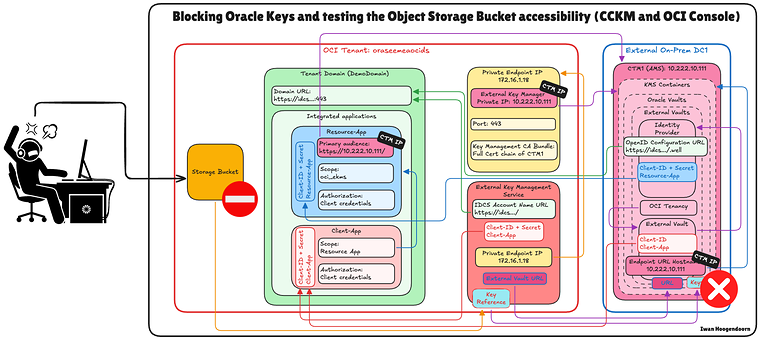
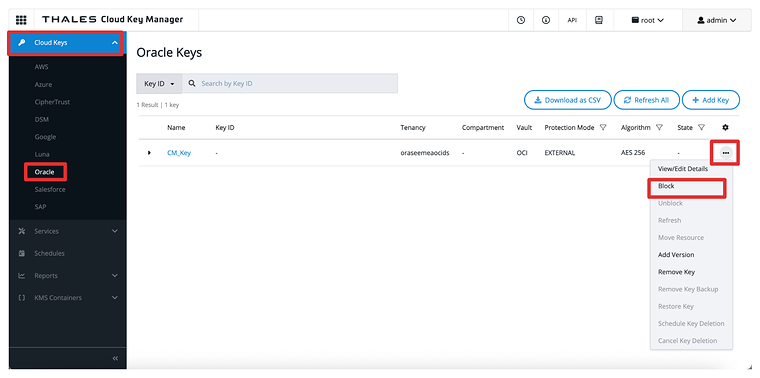
- Open the Cloud Keys menu on the left side (on the CTM).
- Click on Oracle.
- Click on the three dots at the end of the Key we created in one of the previous steps.
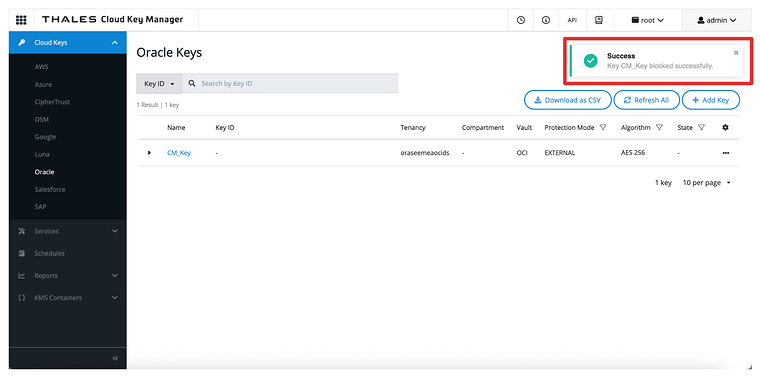
- Select Block.
- Select Block.
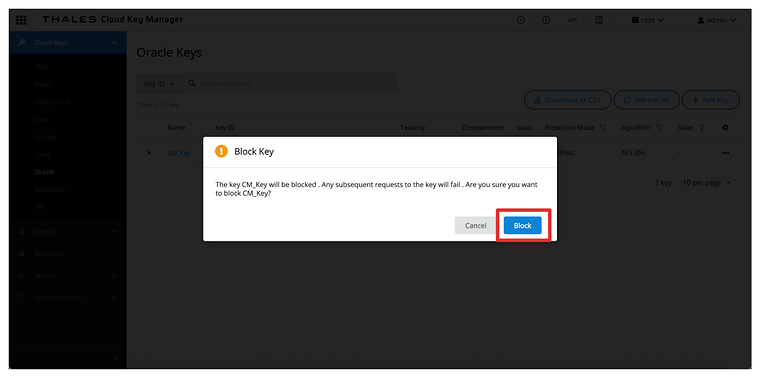
- Notice that the key is now Blocked in the CTM.
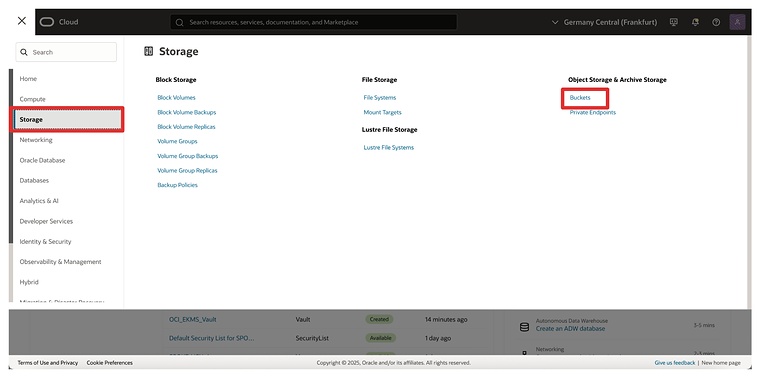
In the OCI Console, navigate to Storage > Buckets.
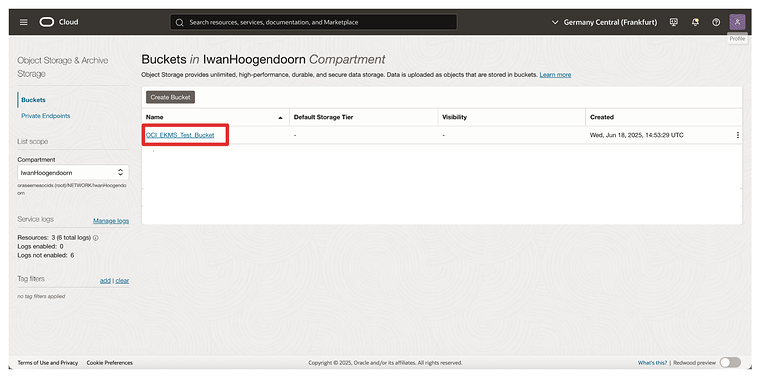
- Click on the storage bucket we created earlier to enter the bucket.
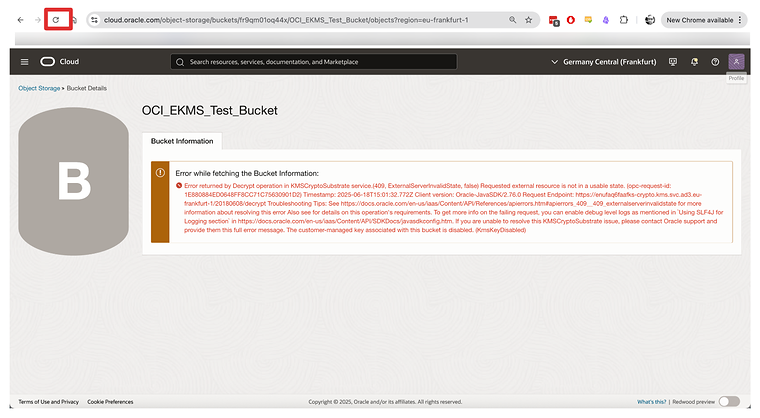
- Notice that you will now have an error and can not access the Storage Bucket or any file uploaded in the bucket.
Now, let’s unblock the Key in CTM again.
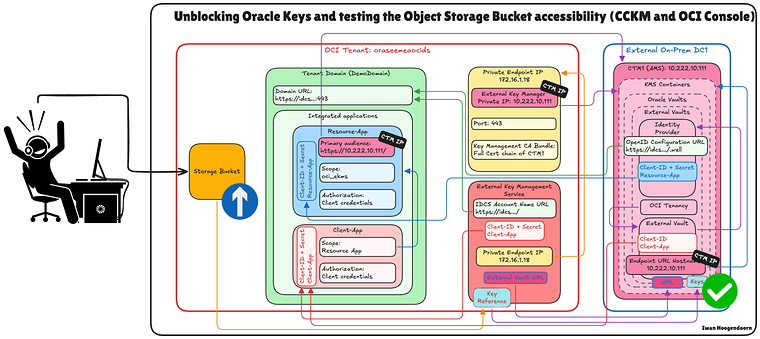
The diagram below illustrates the components and configuration set up in this step.
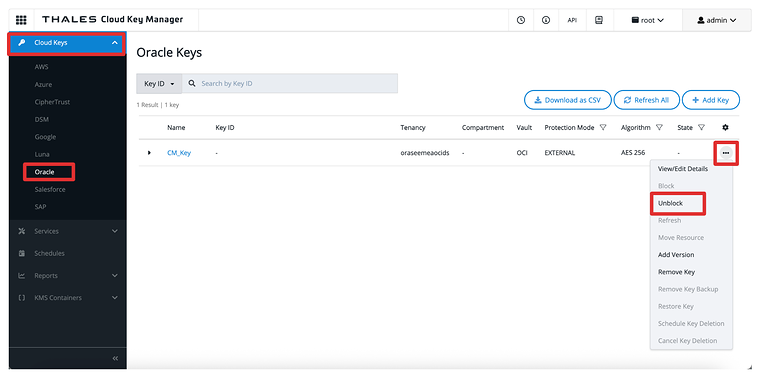
- Open the Cloud Keys menu on the left side (on the CTM).
- Click on Oracle.
- Click on the three dots at the end of the Key we created in one of the previous steps.
- Select Unblock.
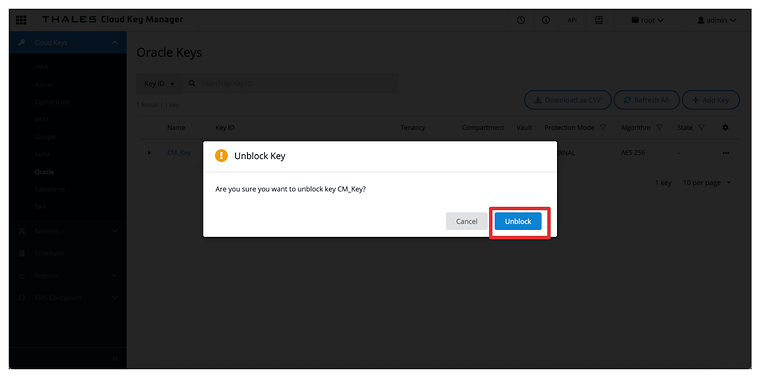
- Select Unblock.
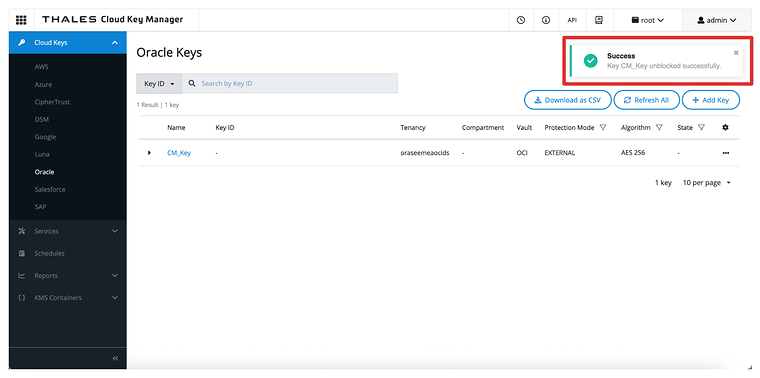
- Notice that the key is now unblocked in the CTM.
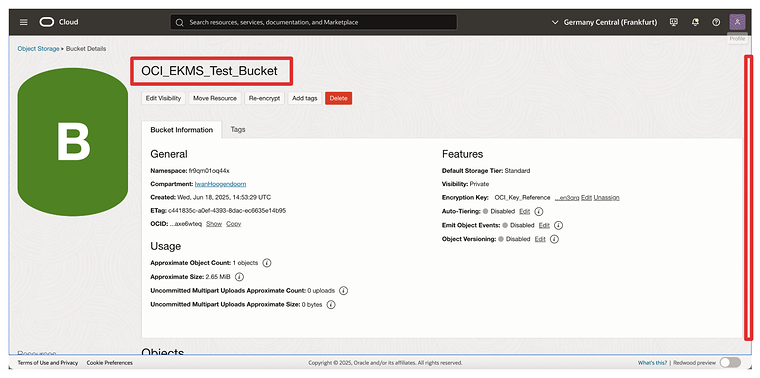
- Navigate back to the Storage Bucket from the OCI console, or just hit the browser refresh button if you are still on that page.
- Notice that you can not reaccess the Storage Bucket with the unblocked.
This capability provides a powerful mechanism for emergency response, regulatory compliance, and data sovereignty enforcement—ensuring you maintain complete control over when and how your data is accessible in Oracle Cloud.
Conclusion
In this tutorial, we completed setting up Oracle Hold Your Own Key (HYOK) using Thales CipherTrust Manager without relying on the API Gateway option. By following the steps—from configuring identity integrations and networking to deploying external vaults and keys—you’ve enabled a secure and compliant key management architecture where you maintain complete control over your encryption keys.
This setup ensures that Oracle Cloud Infrastructure (OCI) services like Object Storage use your externally managed keys for encryption operations while the key material remains entirely under your governance. You’ve also seen how powerful HYOK can be, with the ability to block and unblock access to cloud resources simply by toggling key status within CipherTrust Manager.
By not using the API Gateway, you’ve simplified the architecture while still enforcing a firm security boundary via private networking and OAuth-based identity trust.
You now have a production-ready HYOK implementation that supports enterprise security policies, regulatory compliance, and data sovereignty requirements—putting you in complete control of your cloud encryption strategy.
Originally published on the old wiki at /index.php/Set_up_Oracle_Hold_your_Own_Key_(HYOK)_with_the_CipherTrust_Manager_(without_API_Gateway_option).