In this tutorial, I am going to explain how to create multiple Kubernetes Clusters using Oracle Kubernetes Engine (OKE) and I will be deploying these clusters in three different countries (regions). To speed up the deployment, and to deploy the Kubernetes Clusters consistently with the least amount of configuration mistakes I am using Terraform and some custom bash scripts.
I have also deployed single clusters (manually) using the “quick create” method and the “custom create” method before.
This tutorial is an update based on this tutorial written by Ali Mukadam.
The Steps
- STEP 01: Determine the Topology (Star vs. Mesh)
- STEP 02: Prepare your environment for authenticating and running Terraform scripts
- STEP 03: Create Terraform scripts/files
- STEP 04: Run terraform apply and 3 OKE clusters along with the necessary resources (VCN, subnets, DRGs, RPCs etc,) will be created
- STEP 05: Establish RPC connections
- STEP 06: Use the OCI Network Visualizer to verify the RPC connections
- STEP 07: Use the bastion and operator to check if your connectivity is working
- STEP 08: Delete (destroy) the OKE clusters using Terraform
STEP 01 - Determine the Topology -Star vs Mesh-
I am building these Kubernetes Clusters to deploy a container-based application that is deployed across all regions. To allow communication between these Kubernetes Clusters we need to have some form of network communication. For now, this is out of the scope of this tutorial, but we need to make some architectural decisions upfront. One of these decisions is to determine if we want to allow direct communication between all regions or if we want to use one region as the hub for all communication and the others as a spoke.
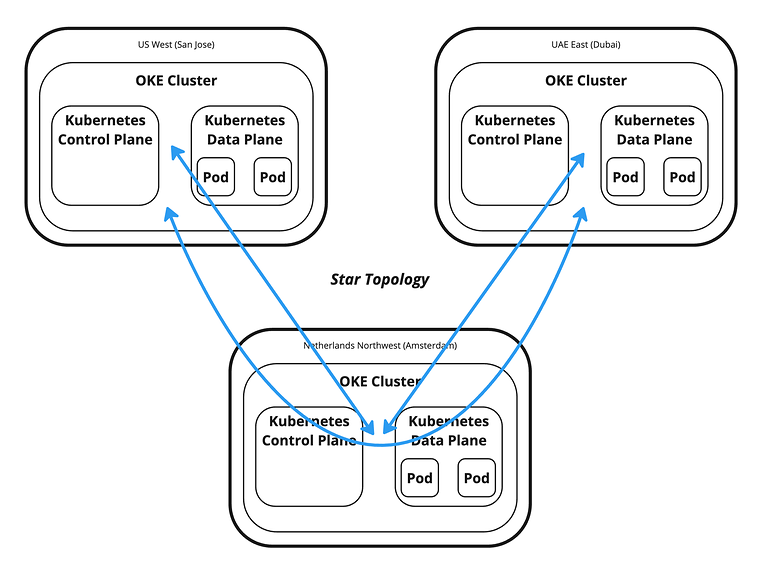
In the picture below you will see a picture of a Star Topology. The Star Topology allows communication between the regions using one single hub region. So if the Kubernetes Clusters in San Jose wants to communicate with the Kubernetes Clusters in Dubai, it will use Amsterdam as a transit hub.
In the picture below you will see a picture of a Mesh Topology. The Mesh Topology allows direct communication to and from all regions (Kubernetes Clusters). So if the Kubernetes Clusters in San Jose wants to communicate with the Kubernetes Clusters in Dubai, it will do this directly.
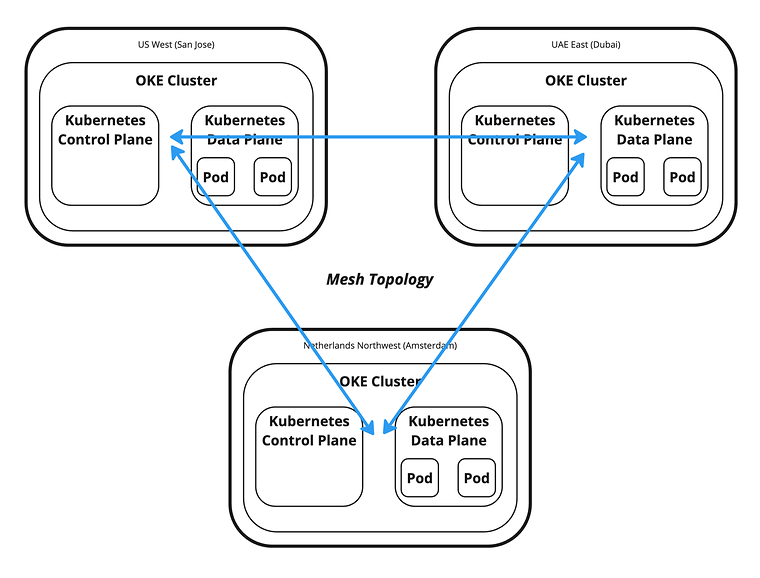
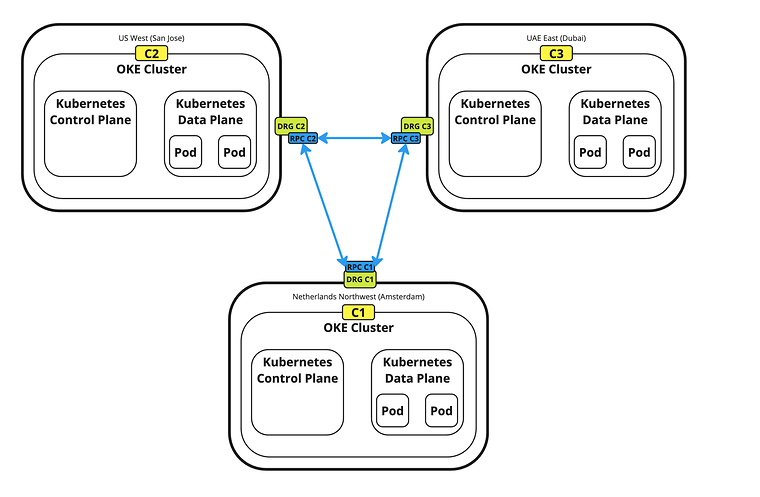
In this tutorial, we are going to build a mesh topology, and this connectivity will be done using the Dynamic Routing Gateways (RPC), and Remote Peering Connections (RPC).
STEP 02 - Prepare your environment for authenticating and running Terraform scripts
Before we can start using Terraform we first need to prepare our environment.
To use Terraform you need to open a terminal (in my case I am using the OS X terminal application).

1. Issue the following command to verify if Terraform is installed, added to your PATH, and what the version is.
Last login: Thu Apr 4 08:50:38 on ttys000iwhooge@iwhooge-mac ~ % terraform -vzsh: command not found: terraformiwhooge@iwhooge-mac ~ %2. Here you can see that the command is not found, and this means that either Terraform is not installed, or that it is not added to the PATH variable.

In my case, Terraform is not installed so we need to install it.
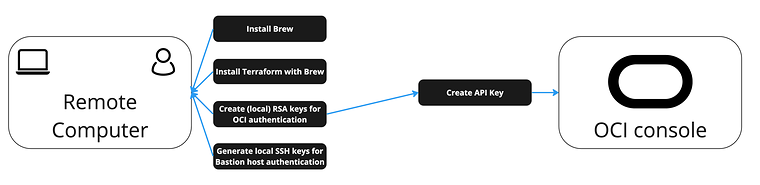
Below you can see the sub-steps of what is required for this tutorial to make everything work as described. You will notice that it is not only installing Terraform but there are multiple steps required to deploy the Terraform application and to prepare the environment for our full end-to-end scripting solution to deploy three Kubernetes Clusters in three different regions.
The sub-steps:
2.1. Install Brew
2.2. Install Terraform using Brew
2.3. Create (local) RSA keys for OCI authentication
2.4. Generate local SSH keys for Bastion host authentication
2.5. Create an API key in the OCI console and add the public key to your OCI account
2.6. Collect the required information on your OCI Cloud environment
The picture below shows you what to do where.
2-1 - Install Brew
Terraform can be installed using different methods. I prefer to install Terraform using Homebrew.
Homebrew is a package manager for MacOS (and Linux) that can be used to install applications and their required dependencies, a bit like apt or yum.
Let’s first Install brew.
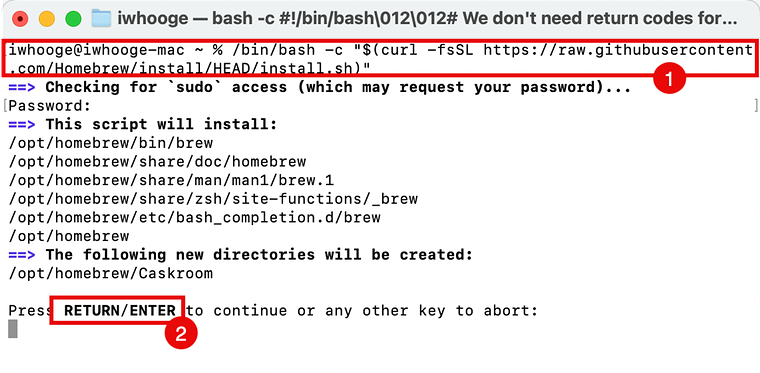
1. Issue the following command to install Homebrew.
iwhooge@iwhooge-mac ~ % /bin/bash -c "$(curl -fsSL https://raw.githubusercontent.com/Homebrew/install/HEAD/install.sh)"==> Checking for `sudo` access (which may request your password)...Password:==> This script will install:/opt/homebrew/bin/brew/opt/homebrew/share/doc/homebrew/opt/homebrew/share/man/man1/brew.1/opt/homebrew/share/zsh/site-functions/_brew/opt/homebrew/etc/bash_completion.d/brew/opt/homebrew==> The following new directories will be created:/opt/homebrew/Caskroom
Press RETURN/ENTER to continue or any other key to abort:==> /usr/bin/sudo /bin/mkdir -p /opt/homebrew/Caskroom==> /usr/bin/sudo /bin/chmod ug=rwx /opt/homebrew/Caskroom==> /usr/bin/sudo /usr/sbin/chown iwhooge /opt/homebrew/Caskroom==> /usr/bin/sudo /usr/bin/chgrp admin /opt/homebrew/Caskroom==> /usr/bin/sudo /usr/sbin/chown -R iwhooge:admin /opt/homebrew==> Downloading and installing Homebrew...remote: Enumerating objects: 8902, done.remote: Counting objects: 100% (4704/4704), done.remote: Compressing objects: 100% (931/931), done.remote: Total 8902 (delta 3862), reused 4508 (delta 3719), pack-reused 4198Receiving objects: 100% (8902/8902), 4.72 MiB - 11.67 MiB/s, done.Resolving deltas: 100% (5474/5474), completed with 597 local objects.From https://github.com/Homebrew/brew * [new branch]            analytics_command_run_test_bot -> origin/analytics_command_run_test_bot * [new branch]            brew_runtime_error_restore -> origin/brew_runtime_error_restore * [new branch]            bump_skip_repology -> origin/bump_skip_repology * [new branch]            bye-byebug         -> origin/bye-byebug * [new branch]            dependabot/bundler/Library/Homebrew/json_schemer-2.2.1 -> origin/dependabot/bundler/Library/Homebrew/json_schemer-2.2.1 * [new branch]            load-internal-cask-json-v3 -> origin/load-internal-cask-json-v3   392cc15a7d..2fe08b139e  master             -> origin/master * [new branch]            neon-proxy-5201    -> origin/neon-proxy-5201 * [new branch]            strict-parser      -> origin/strict-parser * [new tag]               4.2.10             -> 4.2.10 * [new tag]               4.2.11             -> 4.2.11 * [new tag]               4.2.12             -> 4.2.12 * [new tag]               4.2.13             -> 4.2.13 * [new tag]               4.2.15             -> 4.2.15 * [new tag]               4.2.16             -> 4.2.16 * [new tag]               4.2.7              -> 4.2.7 * [new tag]               4.2.8              -> 4.2.8 * [new tag]               4.2.9              -> 4.2.9remote: Enumerating objects: 15, done.remote: Counting objects: 100% (9/9), done.remote: Total 15 (delta 9), reused 9 (delta 9), pack-reused 6Unpacking objects: 100% (15/15), 2.23 KiB - 104.00 KiB/s, done.From https://github.com/Homebrew/brew * [new tag]               4.2.14     -> 4.2.14Reset branch 'stable'==> Updating Homebrew...Updated 2 taps (homebrew/core and homebrew/cask).==> Installation successful!
==> Homebrew has enabled anonymous aggregate formulae and cask analytics.Read the analytics documentation (and how to opt-out) here:  https://docs.brew.sh/AnalyticsNo analytics data has been sent yet (nor will any be during this install run).
==> Homebrew is run entirely by unpaid volunteers. Please consider donating:  https://github.com/Homebrew/brew#donations
==> Next steps:- Run these two commands in your terminal to add Homebrew to your PATH:    (echo; echo 'eval "$(/opt/homebrew/bin/brew shellenv)"') >> /Users/iwhooge/.zprofile    eval "$(/opt/homebrew/bin/brew shellenv)"- Run brew help to get started- Further documentation:    https://docs.brew.sh
iwhooge@iwhooge-mac ~ %
2. Press RETURN/ENTER to continue the installation.
1. Notice that the installation is completed and successful.
2. Copy the additional commands to add Homebrew to your PATH variable.
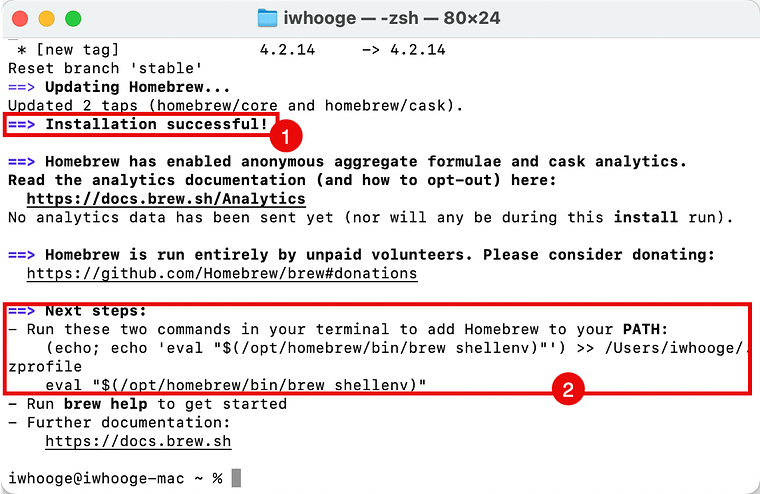
- Issue the copied command to add Homebrew to your PATH variable.
iwhooge@iwhooge-mac ~ % (echo; echo 'eval "$(/opt/homebrew/bin/brew shellenv)"') >> /Users/iwhooge/.zprofile eval "$(/opt/homebrew/bin/brew shellenv)"
2-2 - Install Terraform using Brew
Now that we have Homebrew installed we now use Homebrew to install the Terraform Package.
- Issue the following command to install the Terraform Package.
iwhooge@iwhooge-mac ~ % brew install terraform
==> Downloading https://ghcr.io/v2/homebrew/core/terraform/manifests/1.5.7######################################################################### 100.0%==> Fetching terraform==> Downloading https://ghcr.io/v2/homebrew/core/terraform/blobs/sha256:f43afa7c######################################################################### 100.0%==> Pouring terraform--1.5.7.arm64_sonoma.bottle.tar.gz🍺  /opt/homebrew/Cellar/terraform/1.5.7: 6 files, 69.7MB==> Running `brew cleanup terraform`...Disable this behavior by setting HOMEBREW_NO_INSTALL_CLEANUP.Hide these hints with HOMEBREW_NO_ENV_HINTS (see `man brew`).iwhooge@iwhooge-mac ~ %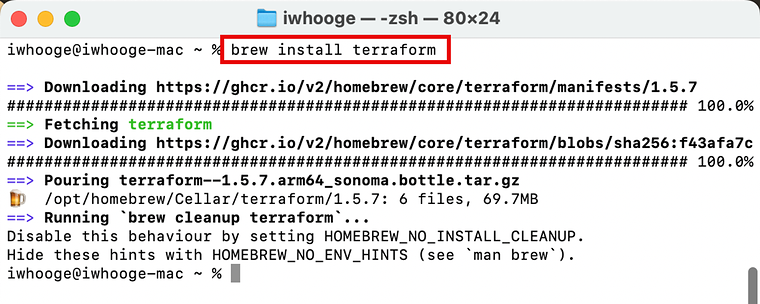
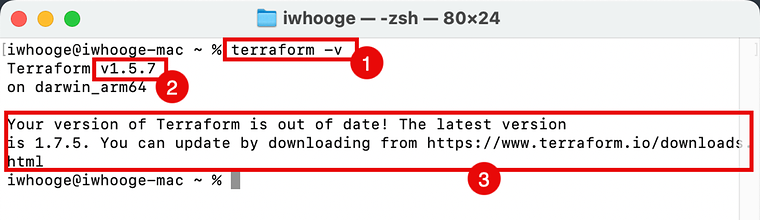
1. Issue the following command to verify if Terraform is installed and also to verify what version is installed.
iwhooge@iwhooge-mac ~ % terraform -vTerraform v1.5.7on darwin_arm64
Your version of Terraform is out of date! The latest versionis 1.7.5. You can update by downloading from https://www.terraform.io/downloads.htmliwhooge@iwhooge-mac ~ %
2. Notice that we Homebrew installed Terraform version 1.5.7.
3. Also, notice that this is an old version and that we can upgrade we need to go to this website for more information.
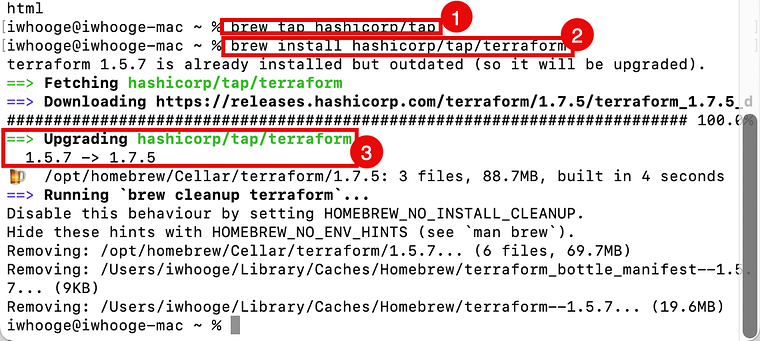
 1. To upgrade Terraform we need to add the Hashicorp (Homebrew) repository to Homebrew. We do this by issuing the command below.
iwhooge@iwhooge-mac ~ % brew tap hashicorp/tap2. Issue the following command to install Terraform from the Hasicorp repository.
iwhooge@iwhooge-mac ~ % brew install hashicorp/tap/terraformterraform 1.5.7 is already installed but outdated (so it will be upgraded).==> Fetching hashicorp/tap/terraform==> Downloading https://releases.hashicorp.com/terraform/1.7.5/terraform_1.7.5_d######################################################################### 100.0%==> Upgrading hashicorp/tap/terraform 1.5.7 -> 1.7.5🍺 /opt/homebrew/Cellar/terraform/1.7.5: 3 files, 88.7MB, built in 4 seconds==> Running `brew cleanup terraform`...Disable this behaviour by setting HOMEBREW_NO_INSTALL_CLEANUP.Hide these hints with HOMEBREW_NO_ENV_HINTS (see `man brew`).Removing: /opt/homebrew/Cellar/terraform/1.5.7... (6 files, 69.7MB)Removing: /Users/iwhooge/Library/Caches/Homebrew/terraform_bottle_manifest--1.5.7... (9KB)Removing: /Users/iwhooge/Library/Caches/Homebrew/terraform--1.5.7... (19.6MB)iwhooge@iwhooge-mac ~ %3. Notice that Terraform is being upgraded from 1.5.7 to the new 1.7.5 version.
1. Issue the following command to verify if the Terraform version is now the latest one.
iwhooge@iwhooge-mac ~ % terraform -vTerraform v1.7.5on darwin_arm64iwhooge@iwhooge-mac ~ %2. Notice that the new version is 1.7.5.

2-3 - Create -local- RSA keys for OCI authentication
To allow authentication with OCI using an API key, we need to generate a new private and public key for this purpose only.
1. Issue this command to change the directory to your home directory.
2. Issue this command to verify if you ate in your home directory.
3. Verify if your home directory is correct.
4. Issue this command to create a new directory that will contain the information to authenticate with OCI.
5. Issue this command to generate a private RSA key.
6. Issue this command to make the private key file readable.
7. Issue this command to generate a public RSA key (from the private key).
8. Verify that the key writing is completed.
9. Issue this command to look at the content of the private RSA key.
10. Verify the content of the private RSA key.
11. Issue this command to look at the content of the public RSA key.
12. Verify the content of the public RSA key.
iwhooge@iwhooge-mac ~ % cd ~/
iwhooge@iwhooge-mac ~ % pwd/Users/iwhooge
iwhooge@iwhooge-mac ~ % mkdir .oci
iwhooge@iwhooge-mac ~ % openssl genrsa -out ~/.oci/4-4-2023-rsa-key.pem 2048Generating RSA private key, 2048 bit long modulus.........................................................................................................................................+++++......+++++e is 65537 (0x10001)
iwhooge@iwhooge-mac ~ % chmod 600 ~/.oci/4-4-2023-rsa-key.pem
iwhooge@iwhooge-mac ~ % openssl rsa -pubout -in ~/.oci/4-4-2023-rsa-key.pem -out ~/.oci/4-4-2023-rsa-key-public.pemwriting RSA key
iwhooge@iwhooge-mac ~ % cat ~/.oci/4-4-2023-rsa-key.pem-----BEGIN RSA PRIVATE KEY-----MIIEpQIBAAKCAQEA52+LJ+gp3MAJGtXTeQ/dmqq6Xh1zufK0yurLt/0w/DuxqEsLRT7x+Znz6EOVLx34Ul27QnHk7bhXaDCuwInnaOTOiS97AnLuFM08tvFksglnJssAJsszfTzUMNf0w4wtuLsJ5oRaPbVUa01TIm6HdwKAloIKYSn6z8gcvfLLItkyvPRoXXXw3yip+Yxr1YN3LjpDbZk4WTagKWoVQzp5nrfZlyU7ToZcMpUn/fIUsI=-----END RSA PRIVATE KEY-----
iwhooge@iwhooge-mac ~ % cat ~/.oci/4-4-2023-rsa-key-public.pem-----BEGIN PUBLIC KEY-----MIIBIjANBgkqhkiG9w0BAQEFAAOCAQ8AMIIBCgKCAQEA52+LJ+gp3MAJGtXTeQ/dXXXmtHVtjLM1ftjYlaRSG5Xl/xdKMC8LH0bxpy3XXzLmDrYCP3LrhrIG8Xmuzsji6HwTQIDAQAB-----END PUBLIC KEY-----iwhooge@iwhooge-mac ~ %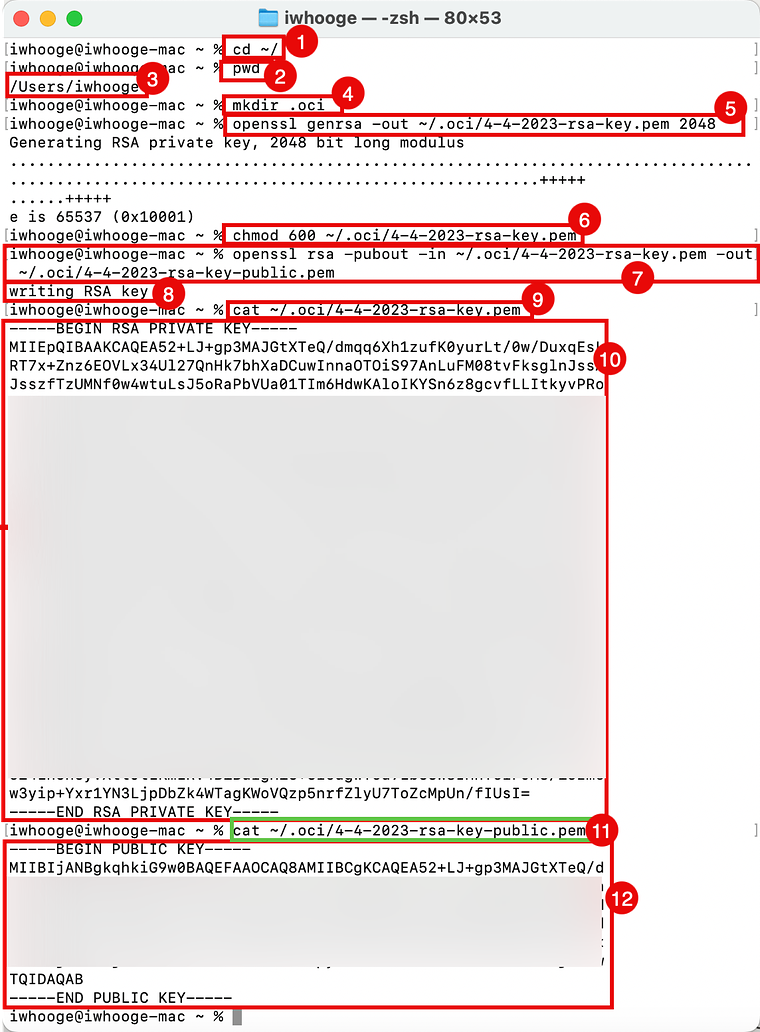
2-4 - Generate local SSH keys for Bastion host authentication
We also need to create local SSH keys to authenticate with the Bastion host. This is another key that we are using for authentication with the OCI console (API).
1. Issue this command to change the directory to your SSH directory.
2. Issue this command to verify if you already have a public and private SSH key that can be used.
3. Notice that I do not have any SSH key-pair so In my case I will generate a new SSH key-pair. 4. Issue this command to generate a new SSH key-pair.
5. Leave the passphrase empty and press ENTER.
6. Leave the passphrase empty and press ENTER again.
7. Notice that the new SSH key pair is saved in the provided locations.
iwhooge@iwhooge-mac ~ % cd ~/.ssh/
iwhooge@iwhooge-mac .ssh % ls -l -atotal 16drwx------   4 iwhooge  staff   128 Feb  8 12:48 .drwxr-x---+ 30 iwhooge  staff   960 Apr  4 11:03 ..-rw-------@  1 iwhooge  staff  2614 Feb 28 11:49 known_hosts-rw-------@  1 iwhooge  staff  1773 Feb  8 12:48 known_hosts.old
iwhooge@iwhooge-mac .ssh % ssh-keygen -t rsaGenerating public/private rsa key pair.Enter file in which to save the key (/Users/iwhooge/.ssh/id_rsa):Enter passphrase (empty for no passphrase):Enter same passphrase again:Your identification has been saved in /Users/iwhooge/.ssh/id_rsaYour public key has been saved in /Users/iwhooge/.ssh/id_rsa.pubThe key fingerprint is:SHA256:2E7jD5Cvt0C3pArp+u5Q3BWDBDwfbtxp5T6eez75DPc iwhooge@iwhooge-macThe key's randomart image is:+---[RSA 3072]----+XXX+----[SHA256]-----+iwhooge@iwhooge-mac .ssh %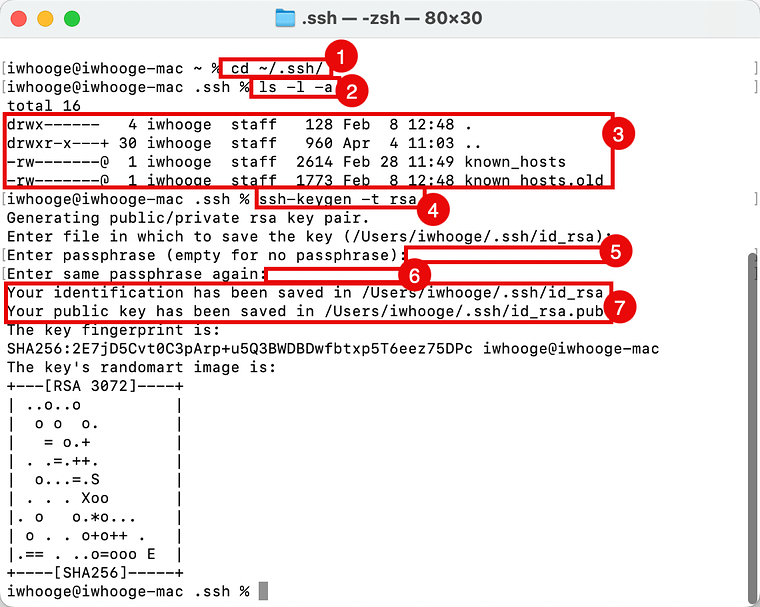
2-5 - Create an API key in the OCI console and add the public key to your OCI account
Now that we have the RSA key from step 2.3 we can use that public key (from step 2.3) to create an API key in the OCI console, for OCI authentication.
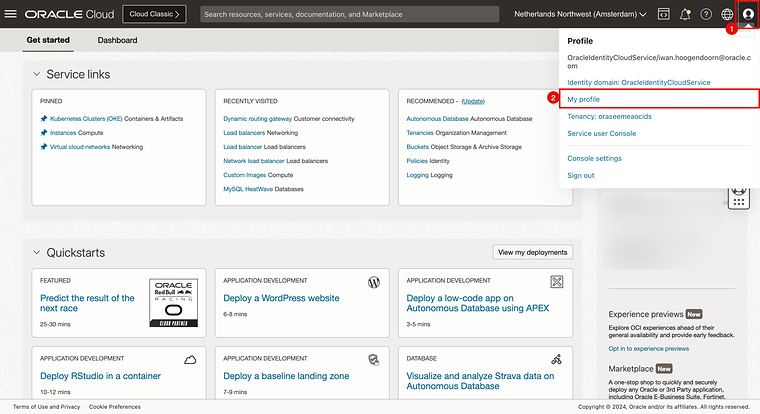
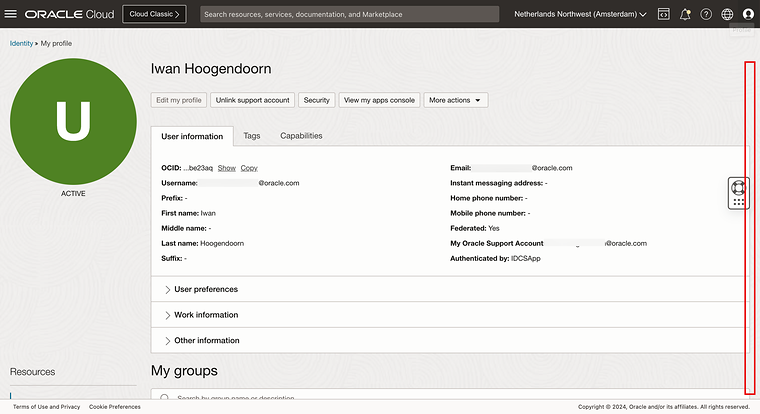
1. Click on the profile button in the upper right corner.
2. Select My Profile.
- Scroll down.
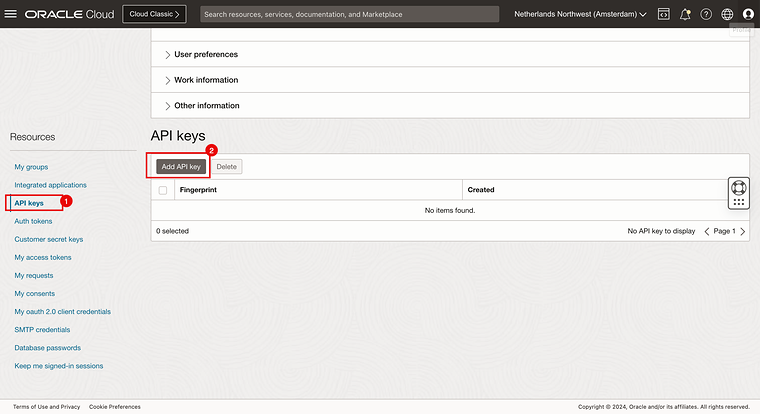
1. Select API Keys.
2. Click on the Add API key button.
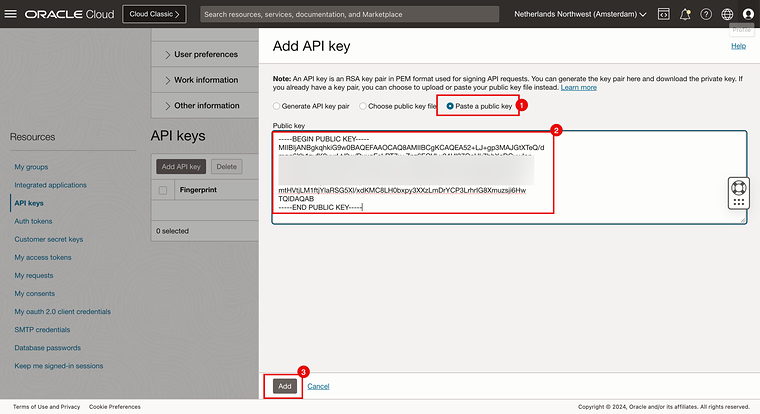
1. Select Paste in the public key.
2. Paste the public key (from step 2.3).
3. Click on Add.
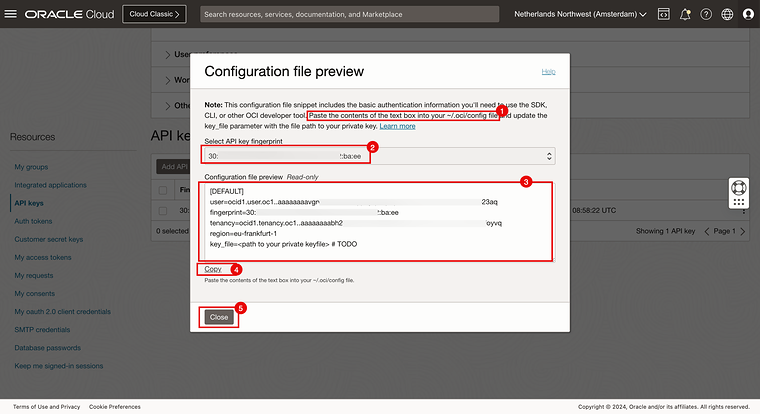
1. Notice the path and file that you need to paste the generated API authentication configuration in.
2. Notice the API key fingerprint for the API key you just created.
3. Notice the API authentication configuration.
4. Click on Copy.
5. Click on Close.
- Paste the API authentication configuration in a temporary text file.
[DEFAULT]user=ocid1.user.oc1..aaaaaaaavgrXXX23aqfingerprint=30:XXX:ba:eetenancy=ocid1.tenancy.oc1..aaaaaaaabh2XXXvqregion=eu-frankfurt-1key_file=<path to your private keyfile> # TODO- Update the last line of the API authentication configuration and add the correct path of your private key file (that you created in step 2.3).
[DEFAULT]user=ocid1.user.oc1..aaaaaaaavgrXXX23aqfingerprint=30:XXX:ba:eetenancy=ocid1.tenancy.oc1..aaaaaaaabh2XXXvqregion=eu-frankfurt-1key_file=~/.oci/4-4-2023-rsa-key.pem- Create an OCI API authentication configuration file.
iwhooge@iwhooge-mac ~ % nano ~/.oci/configiwhooge@iwhooge-mac ~ %
- Copy the API authentication configuration in the file. - Use the CONTROL + X keys to exit this file
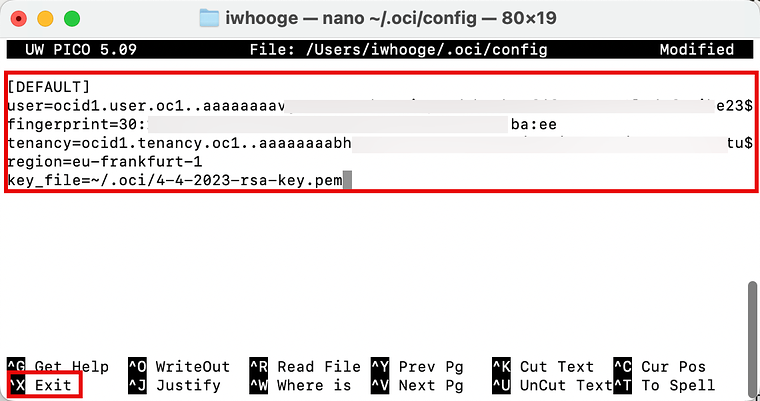
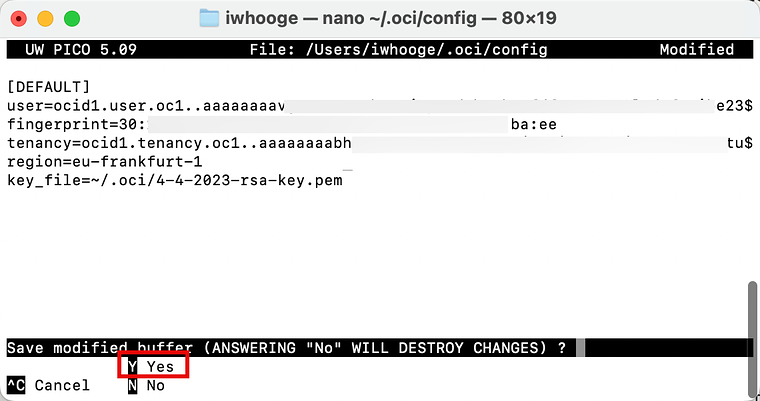
- Type in Y to save the file.
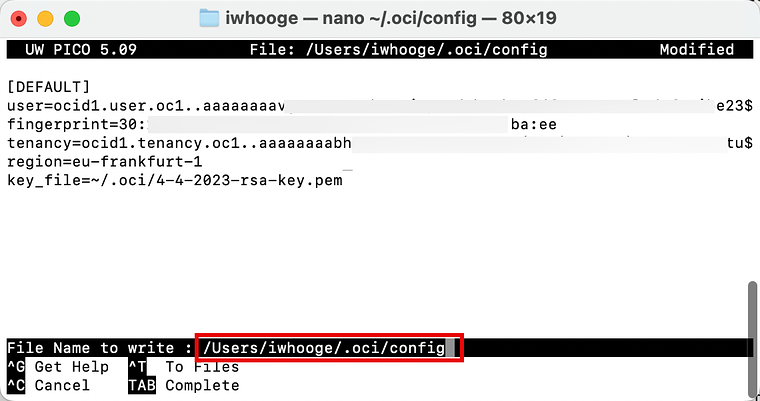
- Confirm the file that you want to use to save the API authentication configuration.
- When the file is saved successfully you will return to the terminal prompt.

2-6 - Collect the required information on your OCI Cloud environment
Now we need to collect some information that we also need in our own Terraform files for OCI authentication using the API.
Most of the information is already provided in the API authentication configuration file we just created so we can get this information from there.
Save (Paste) it on a temporary note for later usage.
| Tenancy OCID | ocid1.tenancy.oc1..aaaaaaaabh2XXXvq |
|---|---|
| User OCID | ocid1.user.oc1..aaaaaaaavgrXXX23aq |
| Fingerprint | 30:XXX:ba:ee |
| Region | eu-frankfurt-1 |
| Private Key Path | ~/.oci/4-4-2023-rsa-key.pem |
| Compartment OCID | ocid1.compartment.oc1..aaaaaaaabgXXXnuq |
The only thing that we require that was not provided in the API authentication configuration file is the Compartment OCID.
1. We can find the compartment OCID by Navigating to Identity > Compartments > Compartment Details (and select the compartment where you need to OCID).
2. Click on Copy to copy the compartment OCID. Save (Paste) it on a temporary note for later usage.
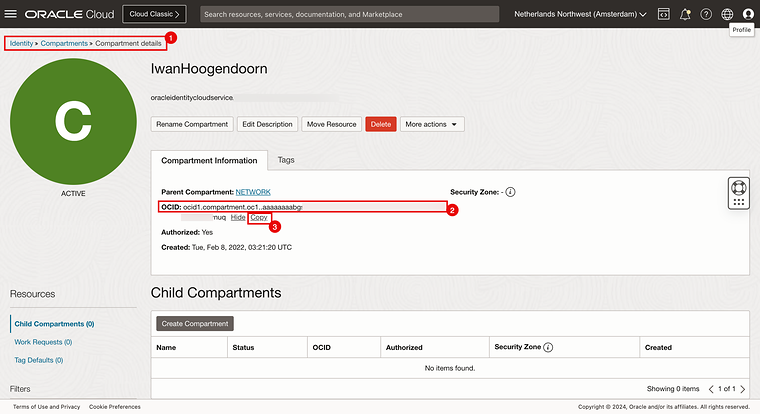
This is the compartment in which you will deploy your Kubernetes Clusters.
STEP 03 - Create Terraform scripts and files
Now that we have prepared our local machine (Terraform, RSA, and SSH Keys, prepared the OCI environment (API), and collected all the required information we need to authenticate using Terraform with OCI we can now start creating the Terraform Scripts.
But before we start we first need to verify if we are subscribed to the regions that we are deploying our Kubernetes clusters on.
I am using the following three regions for my deployment:
- Amsterdam
- San Jose
- Dubai
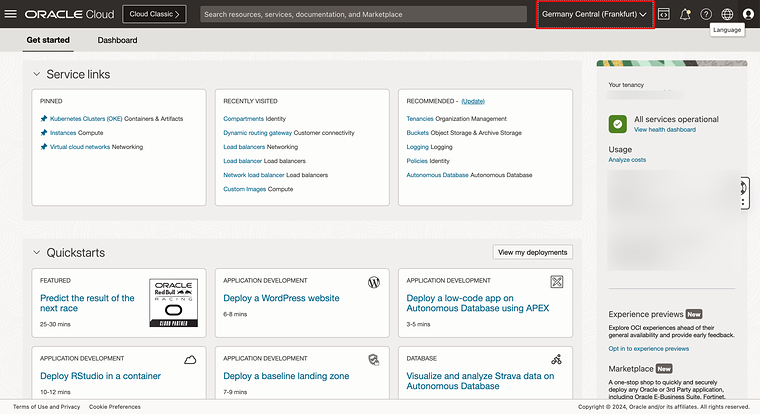
- Click on the region selection menu.
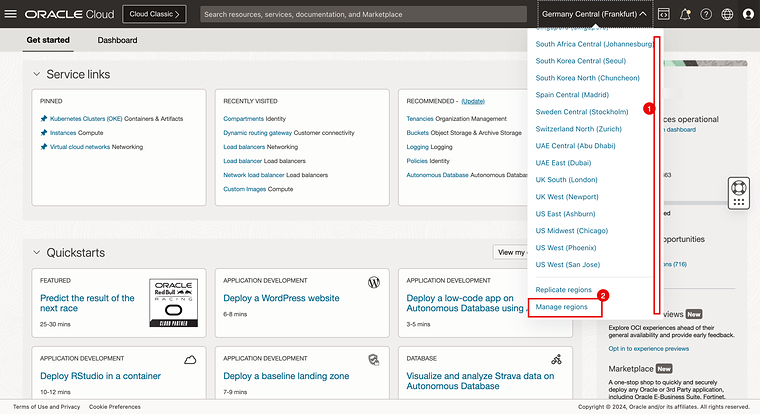
1. Scroll down.
2. Click on Manage Regions.
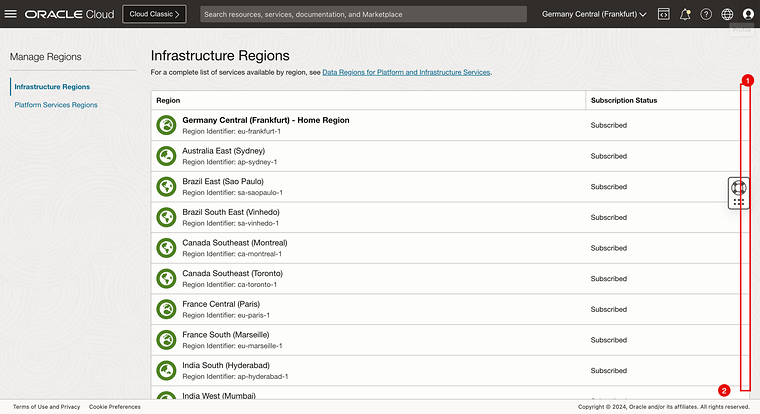
1. Scroll down.
2. Click on the arrow to see the next 10 items.
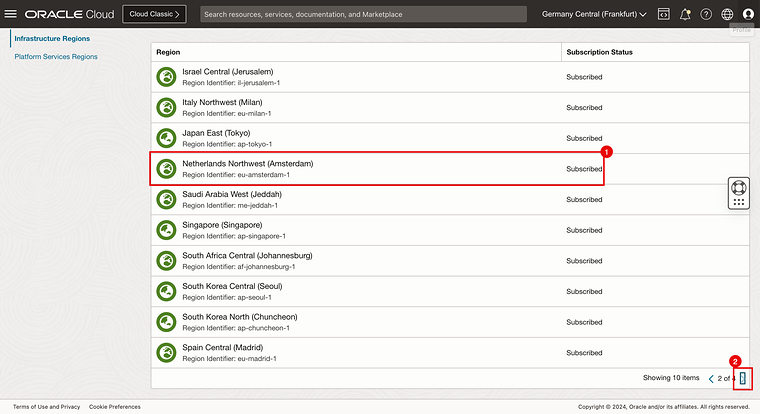
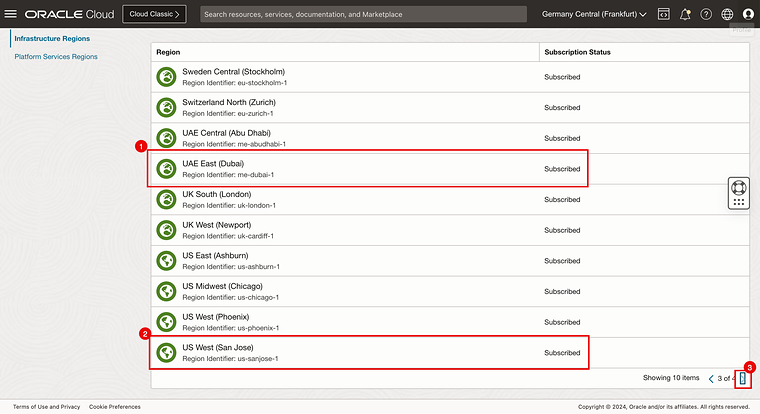
1. Notice that we are subscribed to Amsterdam.
2. Click on the arrow to see the next 10 items.
1. Notice that we are subscribed to Dubai.
2. Notice that we are subscribed to San Jose.
3. Click on the arrow to see the next 10 items.
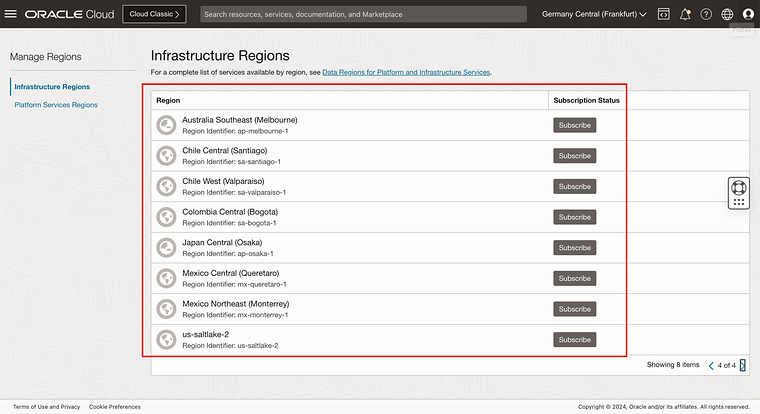
- Notice that there are a few regions that we are not subscribed to, so if we wanted to deploy one of our Kubernetes clusters to Bogota for example we first need to subscribe to the Bogota region. For now, this is not needed as we are already subscribed to the regions we need.
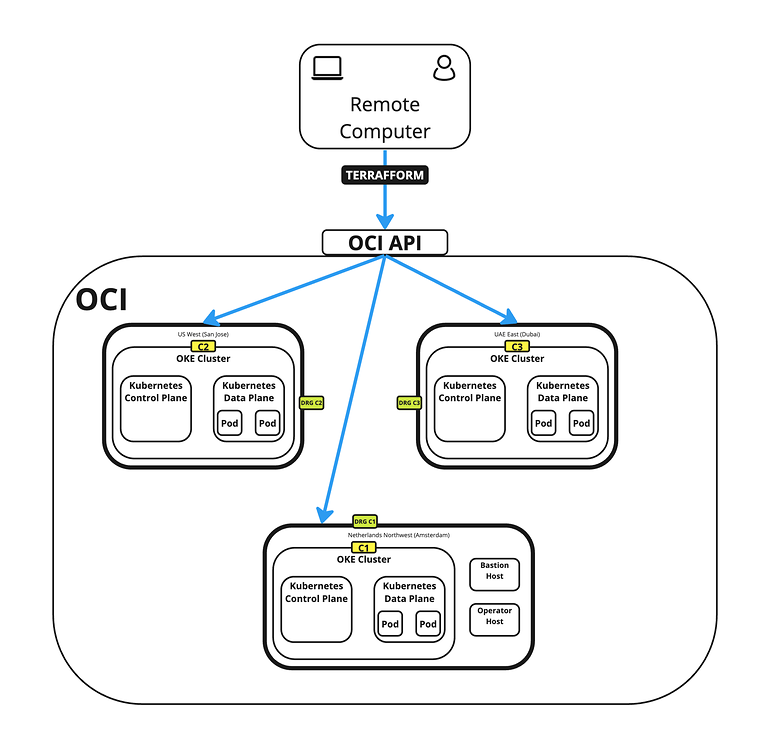
Below you will see a picture that illustrates what we are trying to achieve with Terraform.
- We are using the remote computer with Terraform.
- This remote computer will authenticate with OCI.
- After authentication, we will use Terraform to deploy the following three Kubernetes clusters using the Oracle Kubernetes Engine (OKE).
- c1 = Amsterdam
- c2 = San Jose
- c3 = Dubai
I have used the aliases (identifiers) c1, c2, and c3 to make is easier to name components in OCI and so that it is easier to recognize the clusters based on the name instead of a uniquely generated name.
- Issue this command to make sure you are in your home directory
iwhooge@iwhooge-mac ~ % pwd/Users/iwhooge- Issue this command to create a new directory named “terraform-multi-oke” and also create a “scripts” directory inside that new “terraform-multi-oke” directory.
iwhooge@iwhooge-mac ~ % mkdir terraform-multi-okeiwhooge@iwhooge-mac ~ % mkdir terraform-multi-oke/scripts- Issue this command to verify if the “terraform-multi-oke” directory is created.
iwhooge@iwhooge-mac ~ % ls -ltotal 0drwx------@ 5 iwhooge staff 160 Jan 2 06:25 Applicationsdrwx------+ 4 iwhooge staff 128 Mar 27 08:15 Desktopdrwx------@ 10 iwhooge staff 320 Mar 29 08:39 Documentsdrwx------@ 90 iwhooge staff 2880 Apr 3 14:16 Downloadsdrwx------@ 93 iwhooge staff 2976 Mar 16 15:49 Librarydrwx------ 5 iwhooge staff 160 Feb 14 08:18 Moviesdrwx------+ 4 iwhooge staff 128 Feb 21 20:00 Musicdrwxr-xr-x@ 6 iwhooge staff 192 Feb 9 08:36 Oracle Contentdrwx------+ 7 iwhooge staff 224 Feb 28 12:03 Picturesdrwxr-xr-x+ 4 iwhooge staff 128 Dec 30 16:31 Publicdrwxr-xr-x 2 iwhooge staff 64 Apr 4 12:39 terraform-multi-oke- Issue this command to change the path to the new “terraform-multi-oke” directory that was just created, and make sure that the directory is empty.
iwhooge@iwhooge-mac ~ % cd terraform-multi-okeiwhooge@iwhooge-mac terraform-multi-oke % ls -ltotal 0iwhooge@iwhooge-mac terraform-multi-oke %- We are now going to create some files inside the “terraform-multi-oke” directory and the “terraform-multi-oke/scripts” directory. - When you have created all the files your files and folder structure should look something like this:
iwhooge@iwhooge-mac terraform-multi-oke % tree.├── c1.tf├── c2.tf├── c3.tf├── contexts.tf├── locals.tf├── outputs.tf├── providers.tf├── scripts│ ├── cloud-init.sh│ ├── generate_kubeconfig.template.sh│ ├── kubeconfig_set_credentials.template.sh│ ├── set_alias.template.sh│ └── token_helper.template.sh├── templates.tf├── terraform.tfstate├── terraform.tfstate.backup├── terraform.tfvars├── variables.tf└── versions.tfI have stored the files in my GitHub repository, so you can get the content from there by cloning the repository.
The only file you need to update is “terraform.tfvars”.
Update the “terraform.tfvars” file with the parameters you have collected in step 2.6.
# =====================================================================# START - UPDATE THIS SECTION WITH OWN PARAMETERS
# providerapi_fingerprint = "<use your own API fingerprint>"
api_private_key_path = "<use your own OCI RSA private key path>"
home_region = "<use your own home region>" # Use short form e.g. ashburn from location column https://docs.oracle.com/en-us/iaas/Content/General/Concepts/regions.htm
tenancy_id = "<use your own Tenancy OCID>"
user_id = "<use your own User OCID>"
compartment_id = "<use your own Compartement OCID>"
# sshssh_private_key_path = "<use your own SSH private key path>"ssh_public_key_path  = "<use your own SSH public key path>"
# END - UPDATE THIS SECTION WITH OWN PARAMETERS# =====================================================================terraform.tfvars (add or remove clusters here, just make sure when you are adding clusters you also use unique CIDR blocks)
clusters = { c1 = { region = "amsterdam", vcn = "10.1.0.0/16", pods = "10.201.0.0/16", services = "10.101.0.0/16", enabled = true } c2 = { region = "bogota", vcn = "10.2.0.0/16", pods = "10.202.0.0/16", services = "10.102.0.0/16", enabled = true } c3 = { region = "sanjose", vcn = "10.3.0.0/16", pods = "10.203.0.0/16", services = "10.103.0.0/16", enabled = true }}contexts.tf (add or remove clusters in the depends_on parameter)
resource "null_resource" "set_contexts" {  depends_on = [module.c1, module.c2, module.c3]  for_each   = local.all_cluster_ids  connection {    host        = local.operator_ip    private_key = file(var.ssh_private_key_path)    timeout     = "40m"    type        = "ssh"    user        = "opc"
    bastion_host        = local.bastion_ip    bastion_user        = "opc"    bastion_private_key = file(var.ssh_private_key_path)  }
providers.tf (add or remove clusters as a provider, make sure you alter the region and alias parameters)
provider "oci" {  fingerprint         = var.api_fingerprint  private_key_path    = var.api_private_key_path  region              = lookup(local.regions,var.home_region)  tenancy_ocid        = var.tenancy_id  user_ocid           = var.user_id  alias               = "home"  ignore_defined_tags = ["Oracle-Tags.CreatedBy", "Oracle-Tags.CreatedOn"]}
provider "oci" {  fingerprint         = var.api_fingerprint  private_key_path    = var.api_private_key_path  region              = lookup(local.regions,lookup(lookup(var.clusters,"c1"),"region"))  tenancy_ocid        = var.tenancy_id  user_ocid           = var.user_id  alias               = "c1"  ignore_defined_tags = ["Oracle-Tags.CreatedBy", "Oracle-Tags.CreatedOn"]}
provider "oci" {  fingerprint         = var.api_fingerprint  private_key_path    = var.api_private_key_path  region              = lookup(local.regions,lookup(lookup(var.clusters,"c2"),"region"))  tenancy_ocid        = var.tenancy_id  user_ocid           = var.user_id  alias               = "c2"  ignore_defined_tags = ["Oracle-Tags.CreatedBy", "Oracle-Tags.CreatedOn"]}
provider "oci" {  fingerprint         = var.api_fingerprint  private_key_path    = var.api_private_key_path  region              = lookup(local.regions,lookup(lookup(var.clusters,"c3"),"region"))  tenancy_ocid        = var.tenancy_id  user_ocid           = var.user_id  alias               = "c3"  ignore_defined_tags = ["Oracle-Tags.CreatedBy", "Oracle-Tags.CreatedOn"]}
I have stored the files in my GitHub repository, so you can get the content from there by cloning the repository.
STEP 04 - Run terraform apply and 3 OKE clusters along with the necessary resources -VCN and subnets and DRGs and RPCs etc - will be created
Now that we have the Terraform Scripts in place with the correct parameters it is time to execute the scripts and build our environment consisting of three Kubernetes clusters in three different regions.
We do this by issuing the following commands:
- `terraform init`
- `terraform plan`
- `terraform apply`
- Issue this command to change the directory to the “terraform-multi-oke” directory.
Last login: Fri Apr 5 09:01:47 on ttys001iwhooge@iwhooge-mac ~ % cd terraform-multi-oke
- Issue this command to initialize Terraform and to download the required Terraform Modules to deploy the Terraform scripts.
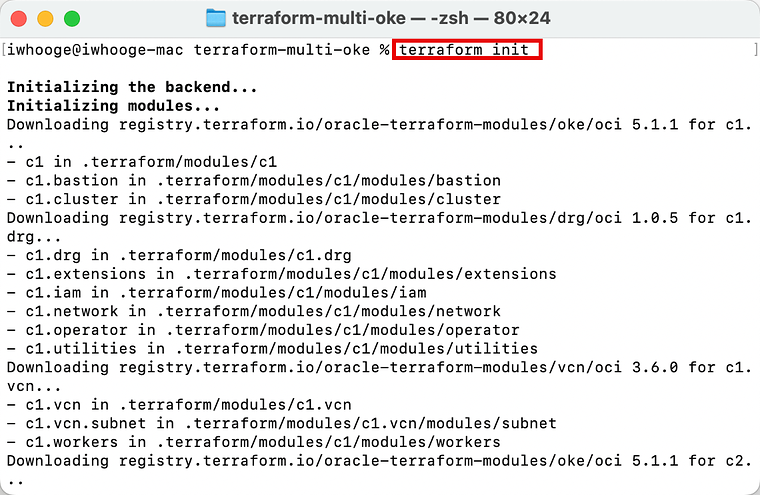
- When the init is successfully you will see a message “Terraform has been successfully initialized.
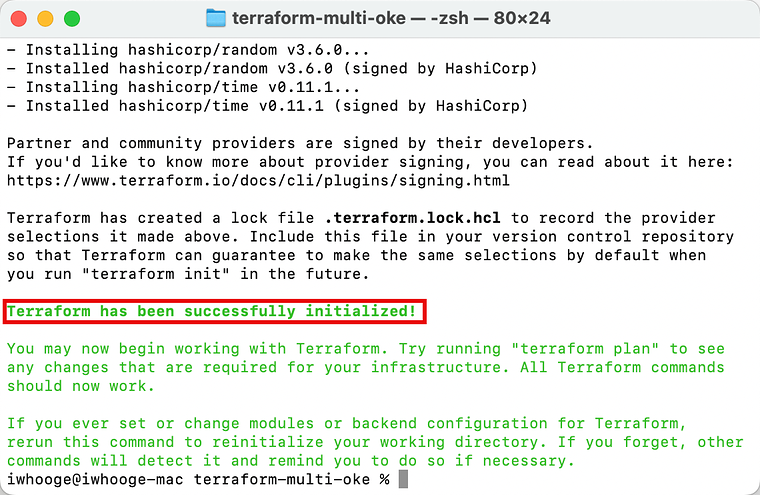
- Issue this command to plan Terraform to do a pre-check if your Terraform code is valid, and verify what will be deployed (This is not the real deployment yet).
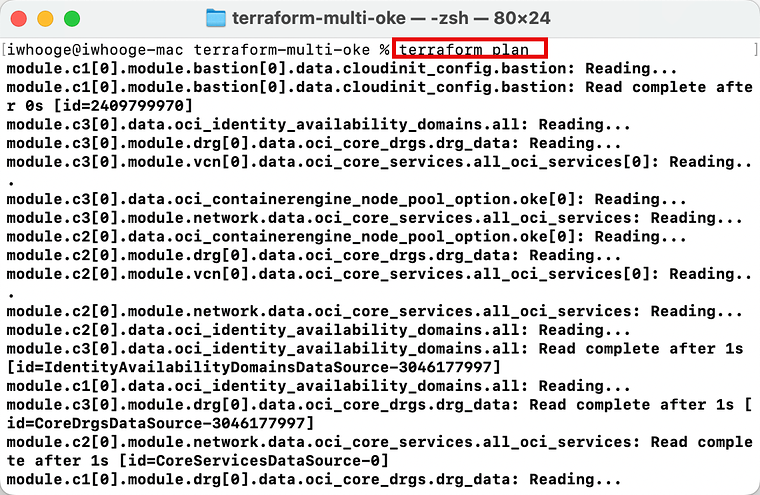
- Notice that Terraform will add 229 new resources in OCI, and these objects are all related to the three Kubernetes clusters we are planning to deploy.
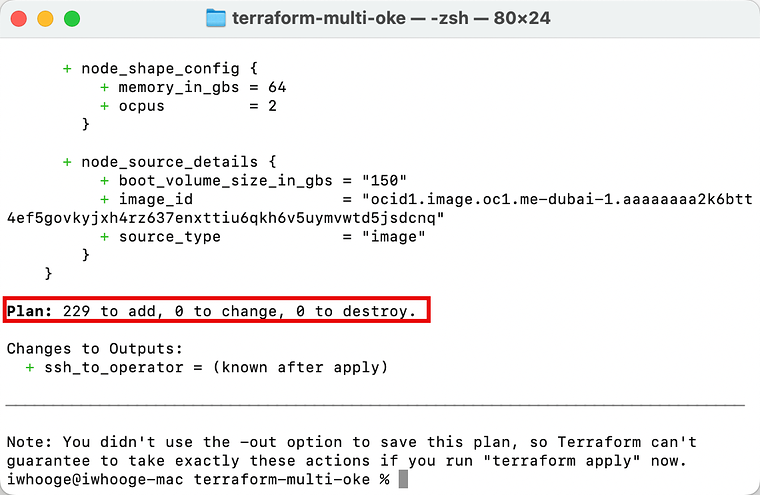
- Issue this command to apply Terraform and deploy our tree Kubernetes clusters now.
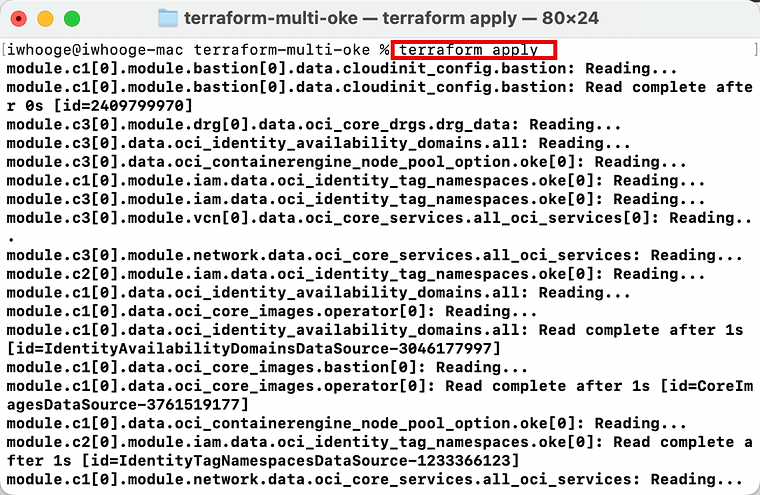
- Enter “yes” to approve the deployment.
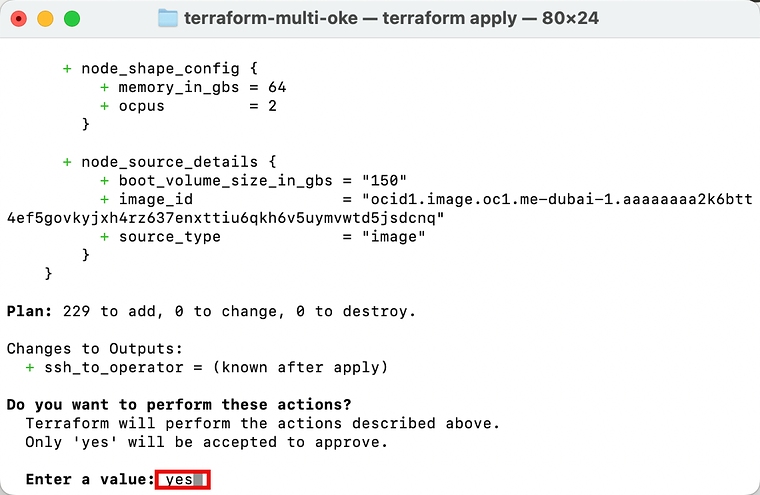
It will take around 30 minutes for the Terraform script to finish.
1. Notice that the “apply” is completed and that 229 new resources are added. 2. Copy the output “ssh” command to SSH to the bastion and operator host to perform management on your Kubernetes Clusters.
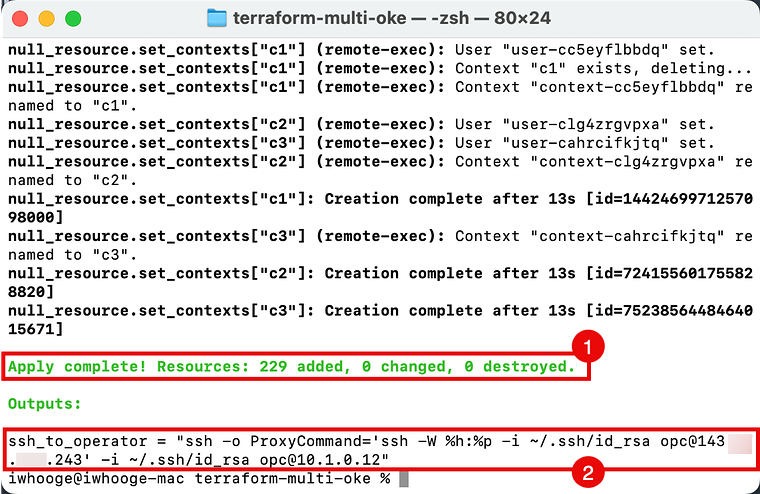
1. Issue the SSH command to log in to the Kubernetes operator host.
2. Type “yes” to continue (for the bastion host).
3. Type “yes” to continue again (for the operator host).
4. Notice that you are now logged in to the operator.
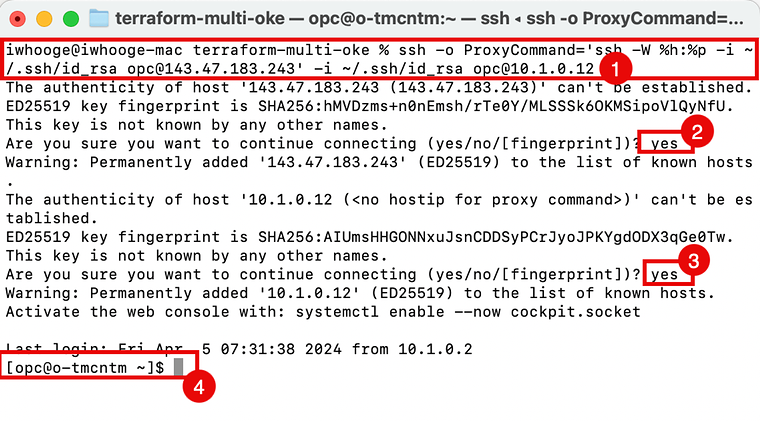
iwhooge@iwhooge-mac terraform-multi-oke % ssh -o ProxyCommand='ssh -W %h:%p -i ~/.ssh/id_rsa opc@143.47.183.243' -i ~/.ssh/id_rsa opc@10.1.0.12The authenticity of host '143.47.183.243 (143.47.183.243)' can't be established.ED25519 key fingerprint is SHA256:hMVDzms+n0nEmsh/rTe0Y/MLSSSk6OKMSipoVlQyNfU.This key is not known by any other names.Are you sure you want to continue connecting (yes/no/[fingerprint])? yesWarning: Permanently added '143.47.183.243' (ED25519) to the list of known hosts.The authenticity of host '10.1.0.12 (<no hostip for proxy command>)' can't be established.ED25519 key fingerprint is SHA256:AIUmsHHGONNxuJsnCDDSyPCrJyoJPKYgdODX3qGe0Tw.This key is not known by any other names.Are you sure you want to continue connecting (yes/no/[fingerprint])? yesWarning: Permanently added '10.1.0.12' (ED25519) to the list of known hosts.Activate the web console with: systemctl enable --now cockpit.socket
Last login: Fri Apr  5 07:31:38 2024 from 10.1.0.2[opc@o-tmcntm ~]$
The picture below illustrates what we currently have deployed with Terraform.
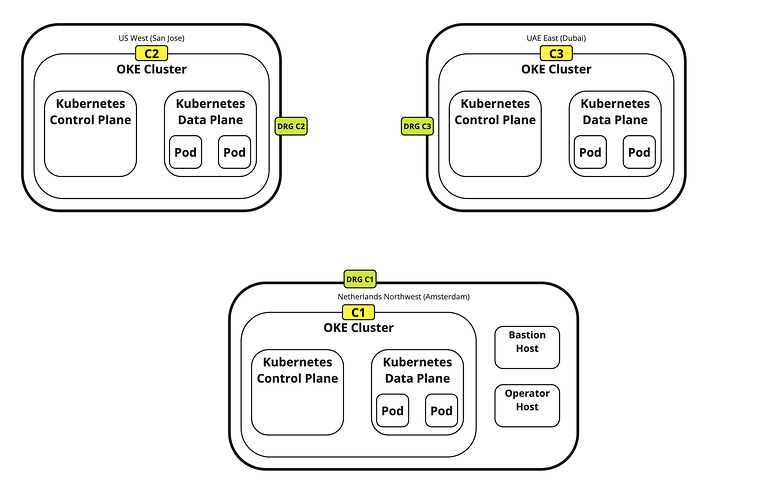
- Issue this command to verify the deployed (and running) Kubernetes clusters from the operator host.
[opc@o-tmcntm ~]$ kubectxc1c2c3[opc@o-tmcntm ~]$
The picture below illustrates where you are setting up the SSH connection to the bastion host and from the bastion host to the operator host.
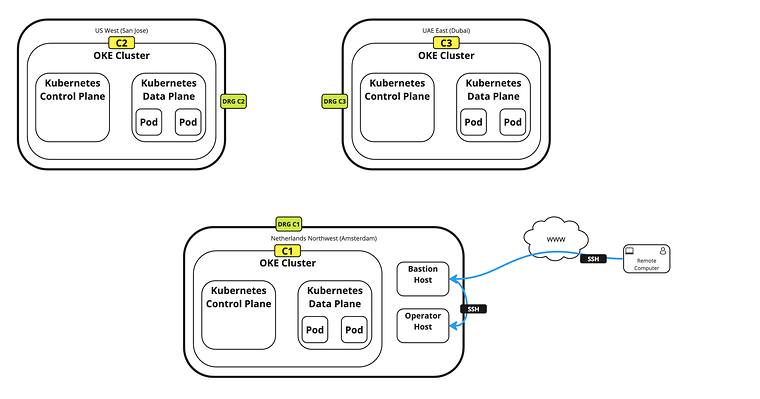
Now that we have deployed the three Kubernetes clusters in the different regions let’s quickly take a look at the deployed resources from a high level in the OCI console.
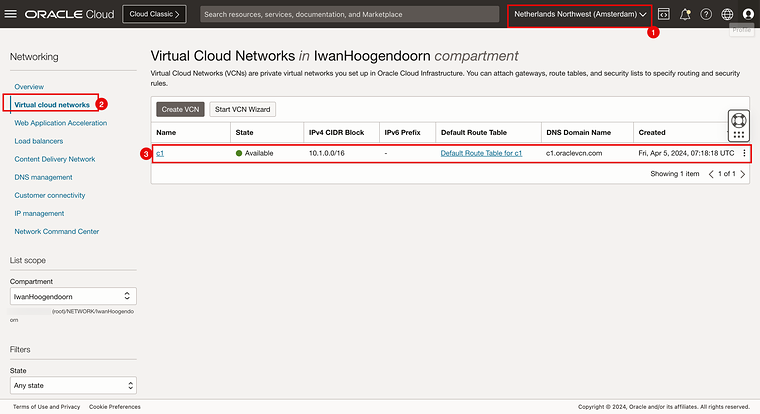
OCI Console Verification -Amsterdam-
1. Select Amsterdam as the region.
2. Go to Networking > VCN.
3. Review that the c1 VCN is created here.
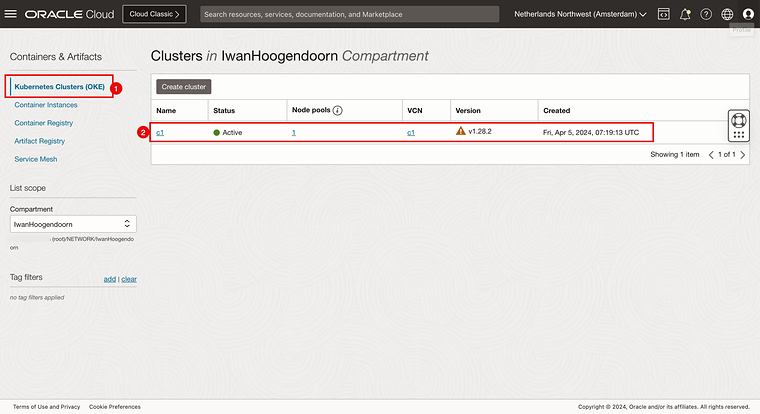
1. Go to Developer Services > Kubernetes Clusters (OKE).
2. Review that the c1 Kubernetes Cluster is created here.
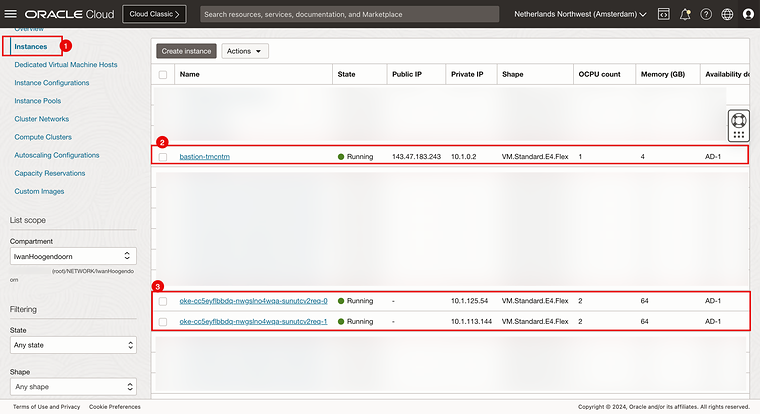
1. Go to Compute > Instances.
2. Review that the bastion host and the two worker nodes belonging to the c1 Kubernetes cluster are created here.
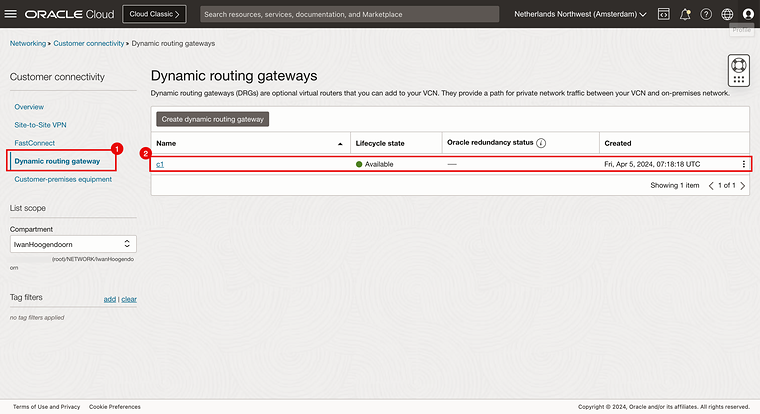
1. Go to Networking > Customer Connectivity> Dynamic Routing Gateway.
2. Review that the Dynamic Routing Gateway is created here.
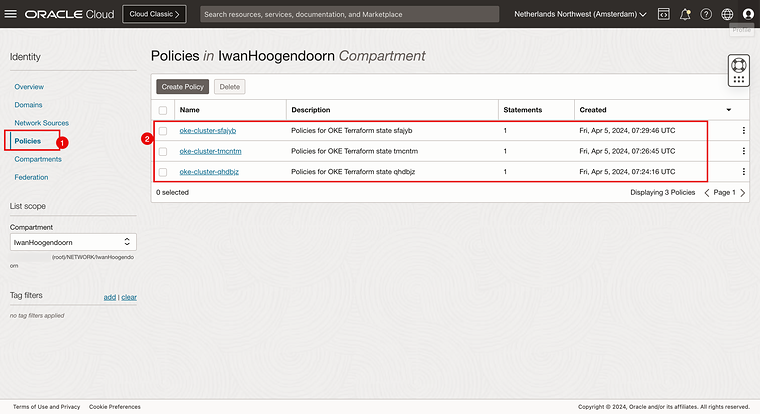
1. Go to Identity > Policies.
2. Review that three Identity Policies are created here.
OCI Console Verification -San Jose-
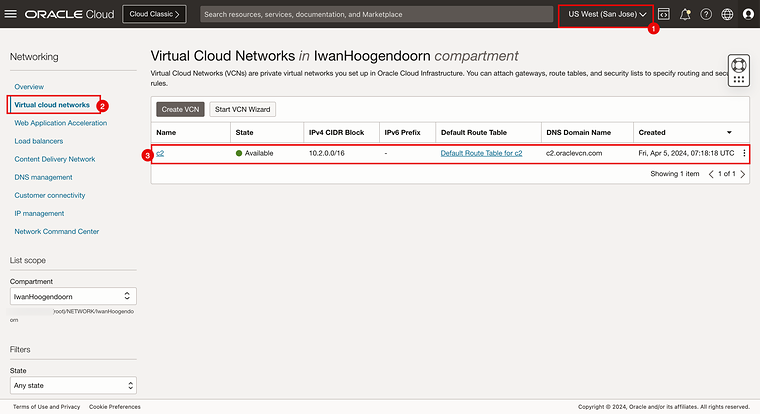
1. Select San Jose as the region.
2. Go to Networking > VCN.
3. Review that the c2 VCN is created here.
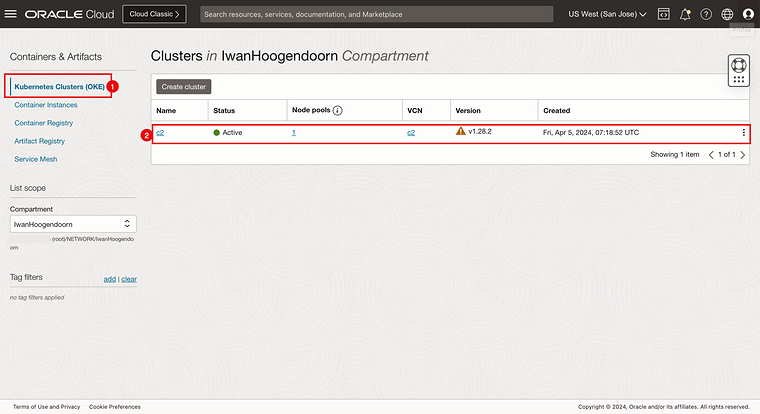
1. Go to Developer Services > Kubernetes Clusters (OKE).
2. Review that the c2 Kubernetes Cluster is created here.
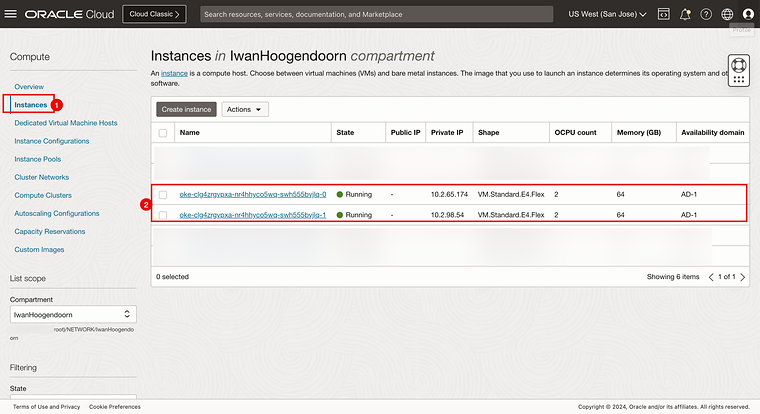
1. Go to Compute > Instances.
2. Review that the two worker nodes belonging to the c2 Kubernetes cluster are created here.
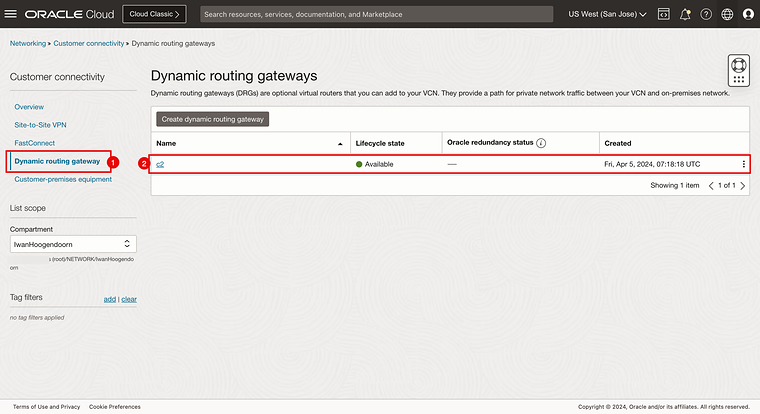
1. Go to Networking > Customer Connectivity> Dynamic Routing Gateway.
2. Review that the Dynamic Routing Gateway is created here.
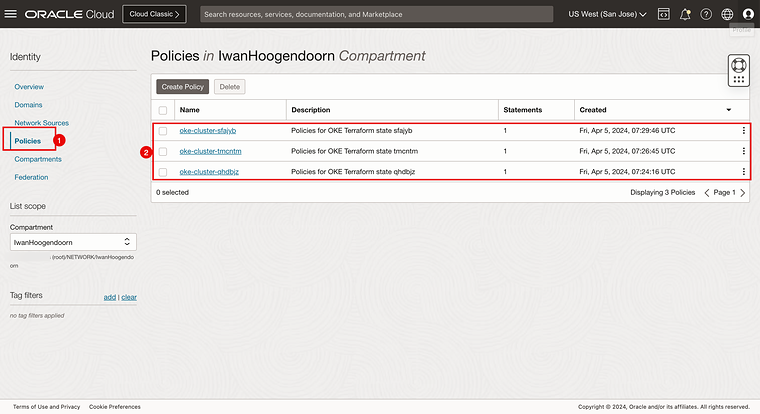
1. Go to Identity > Policies.
2. Review that three Identity Policies are created here.
OCI Console Verification -Dubai-
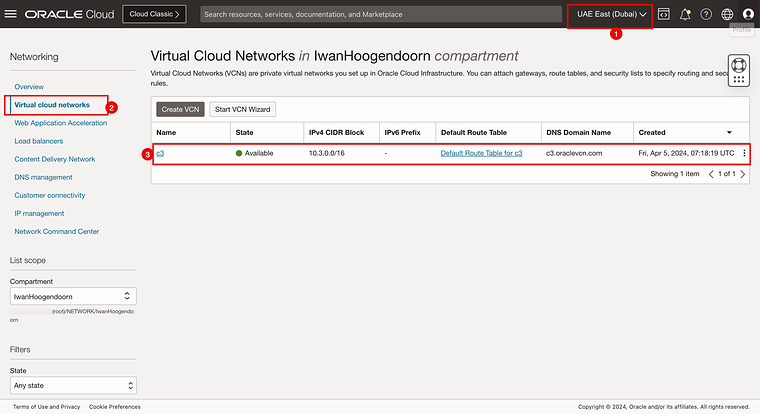
1. Select Dubai as the region.
2. Go to Networking > VCN.
3. Review that the c3 VCN is created here.
1. Go to Developer Services > Kubernetes Clusters (OKE).
2. Review that the c3 Kubernetes Cluster is created here.

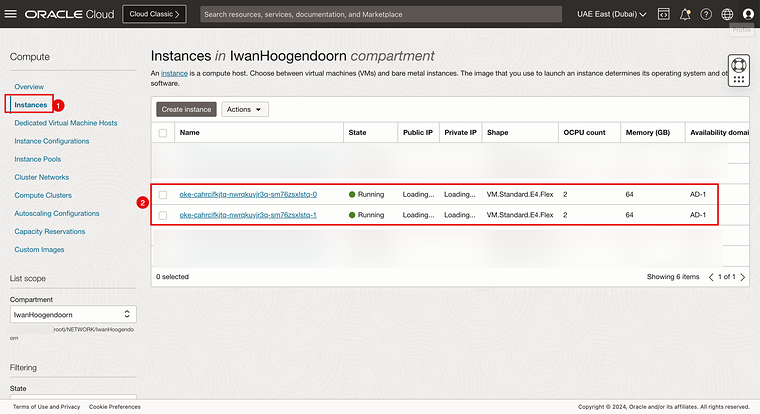
1. Go to Compute > Instances.
2. Review that the two worker nodes belonging to the c3 Kubernetes cluster are created here.
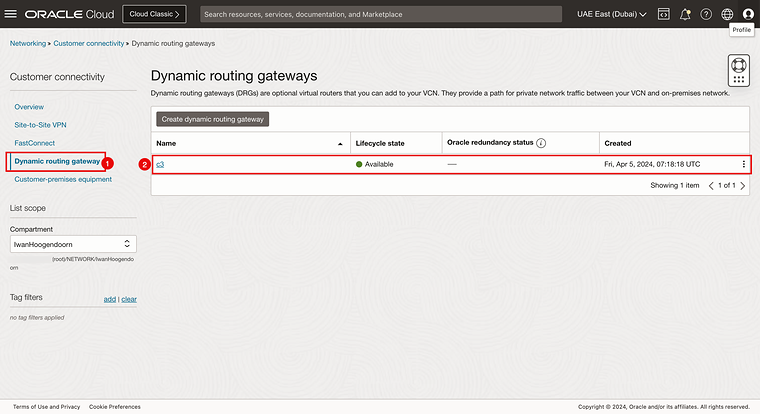
1. Go to Networking > Customer Connectivity> Dynamic Routing Gateway.
2. Review that the Dynamic Routing Gateway is created here.
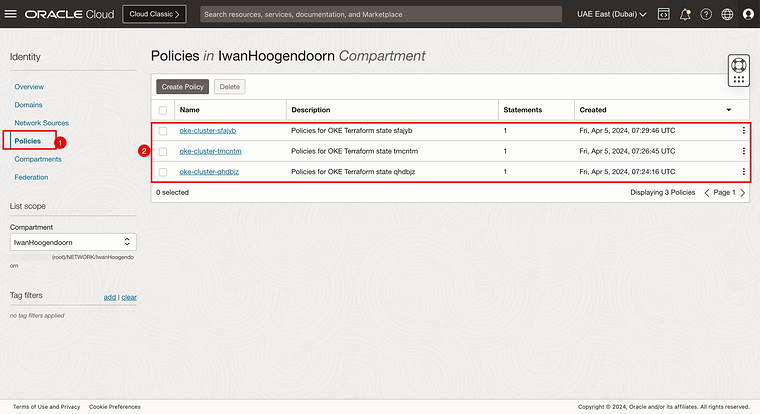
1. Go to Identity > Policies.
2. Review that three Identity Policies are created here.
STEP 05 - Establish RPC connections
When the terraform deployment is completed you need to establish the connections between the various Remote Peering connection attachments (RPC attachment).
Let’s first review these in the different regions.
Remote Peering connection attachments - Amsterdam
- Make sure you are connected to the Amsterdam Region.
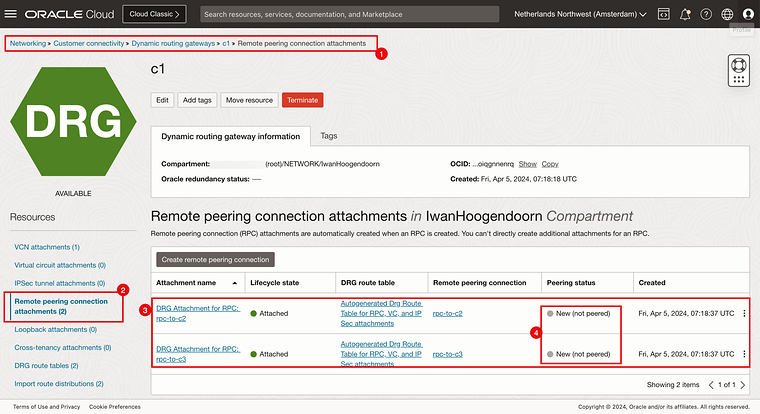
- When you browse Networking > Customer Connectivity > Dynamic Routing Gateways > c1.
- Click on Remote peering connection attachments.
- Notice that there are two Remote peering connection attachments configured.
- Notice that both Remote peering connection attachments are new and not peered.
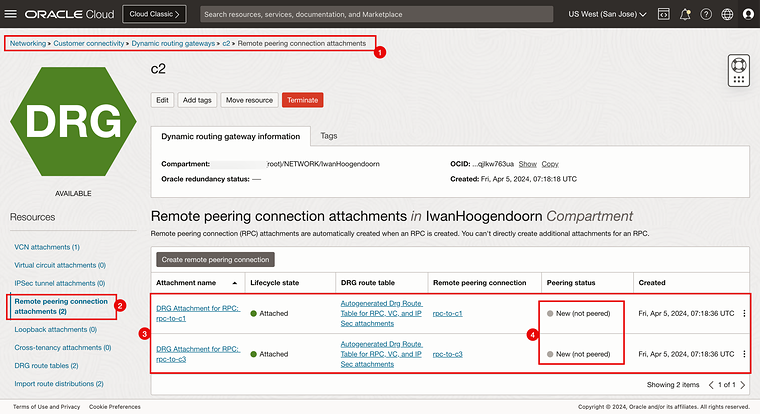
Remote Peering connection attachments - San Jose
- Make sure you are connected to the San Jose Region.
- When you browse Networking > Customer Connectivity > Dynamic Routing Gateways > c2.
- Click on Remote peering connection attachments.
- Notice that there are two Remote peering connection attachments configured.
- Notice that both Remote peering connection attachments are new and not peered.
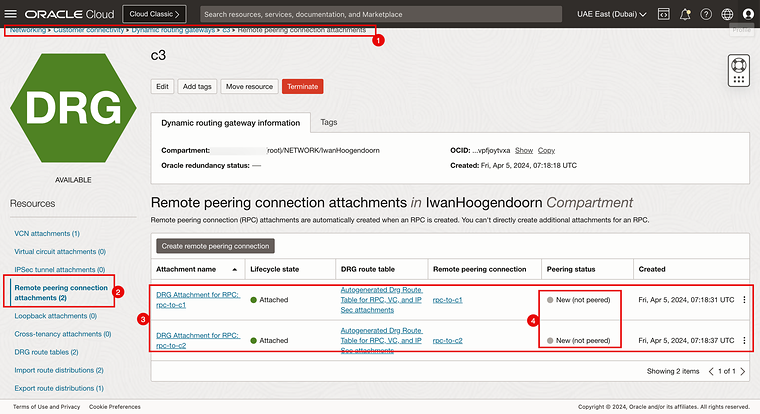
Remote Peering connection attachments - Dubai
- Make sure you are connected to the Dubai Region.
- When you browse Networking > Customer Connectivity > Dynamic Routing Gateways > c3.
- Click on Remote peering connection attachments.
- Notice that there are two Remote peering connection attachments configured.
- Notice that both Remote peering connection attachments are new and not peered.
Collect All the RPC OCIDs
- To configure the RPC Peering connections between all regions we need to collect the OCID of these RPC Peering connection attachments.
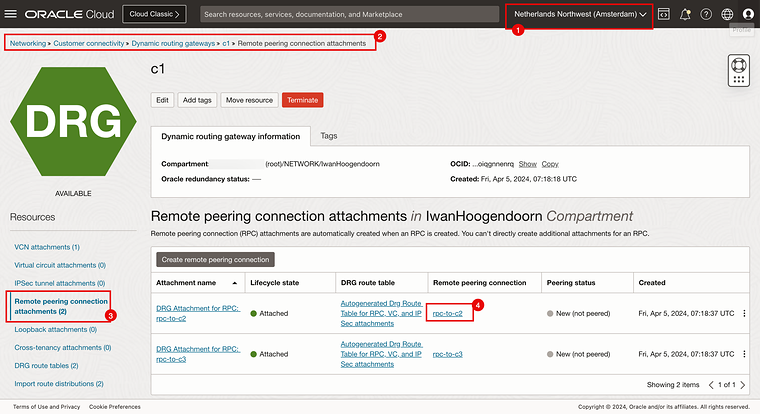
- Make sure you are connected to the Amsterdam Region.
- When you browse Networking > Customer Connectivity > Dynamic Routing Gateways > c1.
- Click on Remote peering connection attachments.
- Click on the Remote peering connection (rpc-to-c2).
- Click on Show.
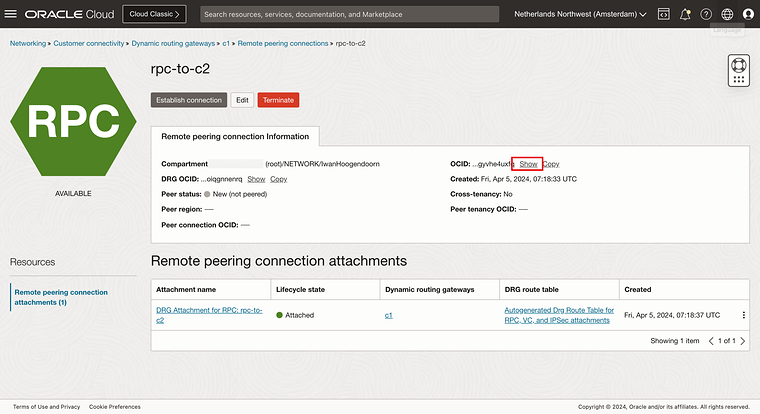
- Click on Copy.
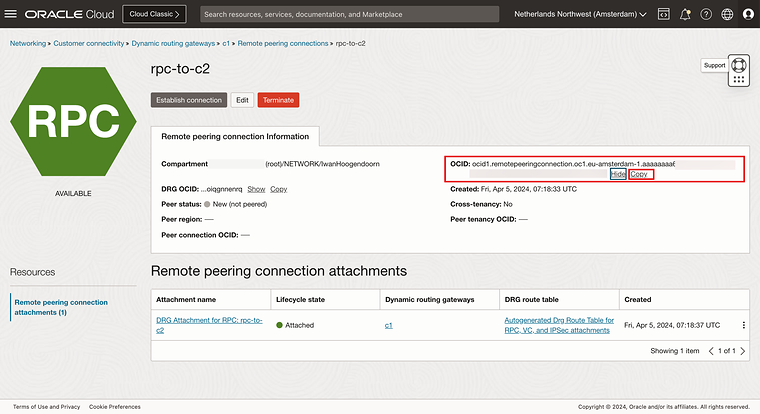
Repeat the process and do this for ALL Remote peering connections on ALL Regions on ALL Dynamic Routing Gateways and paste them in a spreadsheet (or notepad).
We collected the following Remote peering connection OCIDs:
c1 DRG RPC’s
| Local RPC | Local RPC OCID | Remote RPC |
|---|---|---|
| C1: rpc-to-c2 | ocid1.remotepeeringconnection.oc1.eu-amsterdam-1.aaaaaaaa65nyXXXuxfq | C2: rpc-to-c1 |
| C1: rpc-to-c3 | ocid1.remotepeeringconnection.oc1.eu-amsterdam-1.aaaaaaaa7tdoXXXXs4ya | C3: rpc-to-c1 |
c2 DRG RPC’s
| Local RPC | Local RPC OCID | Remote RPC |
|---|---|---|
| C2: rpc-to-c1 | ocid1.remotepeeringconnection.oc1.us-sanjose-1.aaaaaaaajtq7rXXXvmya | C1: rpc-to-c2 |
| C2: rpc-to-c3 | ocid1.remotepeeringconnection.oc1.us-sanjose-1.aaaaaaaar6hdvXXXen2a | C3: rpc-to-c2 |
c3 DRG RPC’s
| Local RPC | Local RPC OCID | Remote RPC |
|---|---|---|
| C3: rpc-to-c1 | ocid1.remotepeeringconnection.oc1.me-dubai-1.aaaaaaaapw4fsXXXcosq | C1: rpc-to-c3 |
| C3: rpc-to-c2 | ocid1.remotepeeringconnection.oc1.me-dubai-1.aaaaaaaazun6pXXXs5tq | C2: rpc-to-c3 |
Create the PRC Peerings
- Configure the peering on C1 to C2 and C3
-
- This will automatically configure the peering for C1 on the C2 and C3 side
- Configure the peering on C2 to C3
-
- This will automatically configure the peering for C2 on the C3 side
Let’s first configure the C1 Peerings (Amsterdam).
- This will automatically configure the peering for C2 on the C3 side
The picture below shows what RPCs we are configuring first.
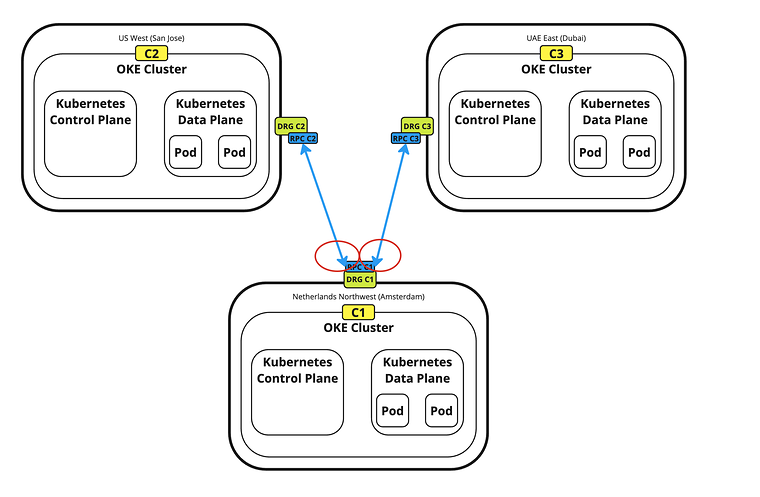
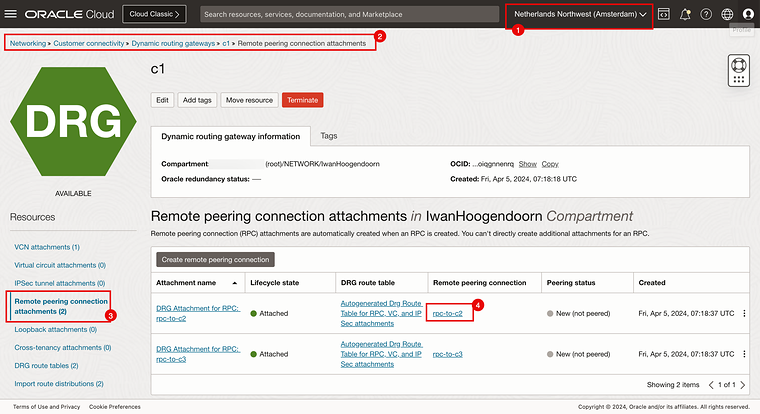
1. Make sure you are connected to the Amsterdam Region.
2. When you browse Networking > Customer Connectivity > Dynamic Routing Gateways > c1.
3. Click on Remote peering connection attachments.
4. Click on the first Remote peering connection attachment (rpc-to-c2).
-
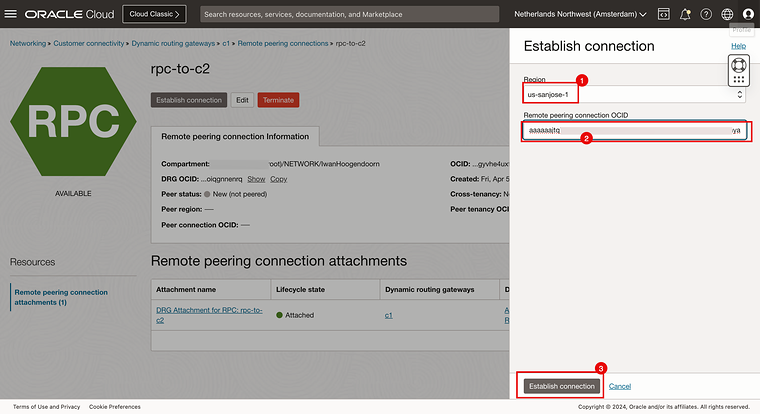
- Here you will configure the connection towards San Jose.
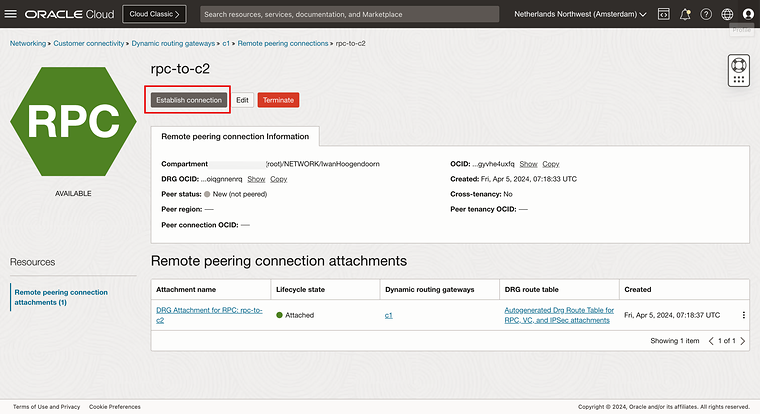
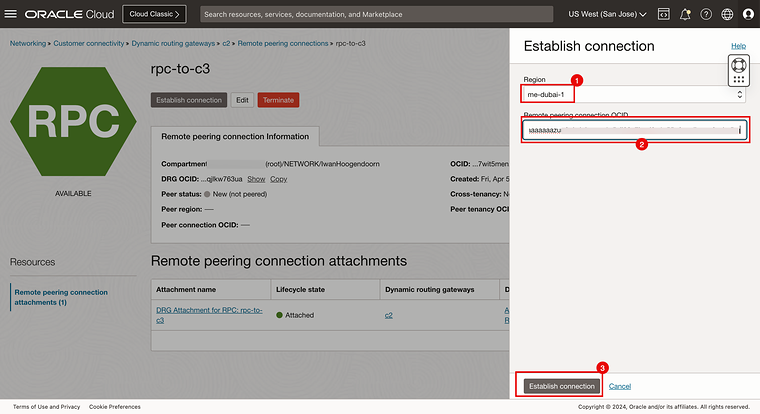
- Click on the Establish Connection button.
1. Select the San Jose Region.
2. Paste in the OCID that you collected earlier (of the San Jose side that is created for c1 (Amsterdam).
3. Click on Establish Connection.
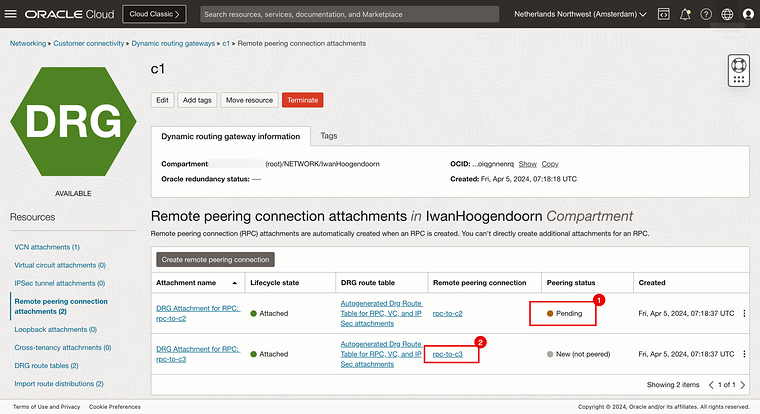
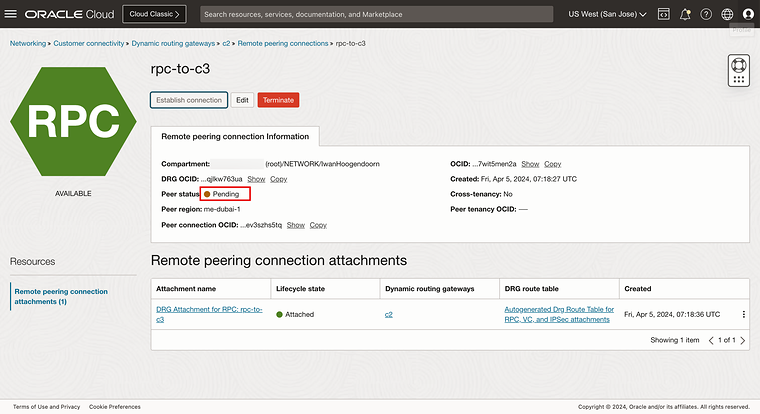
1. The Peering status will change to Pending, and it will take a minute before the peering to complete.
2. Click on the second Remote peering connection attachment (rpc-to-c3).
-
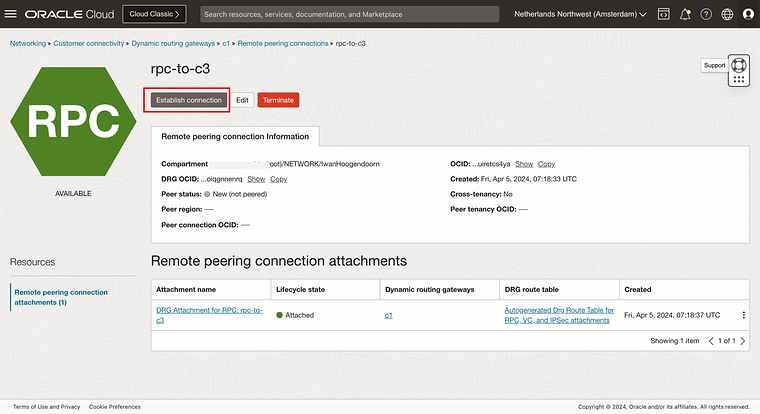
- Here you will configure the connection towards Dubai.
 - Click on the Establish Connection button.
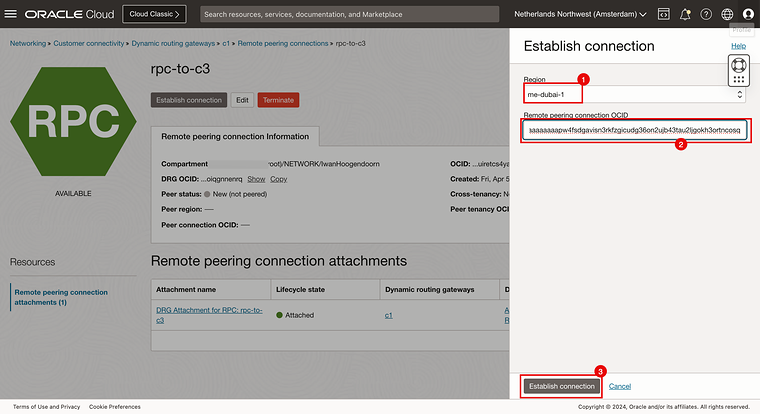
1. Select the Dubai Region.
2. Paste in the OCID that you collected earlier (of the Dubai side that is created for c1 (Amsterdam).
3. Click on Establish Connection.
Finally, we configure the C2 Peering (San Jose).
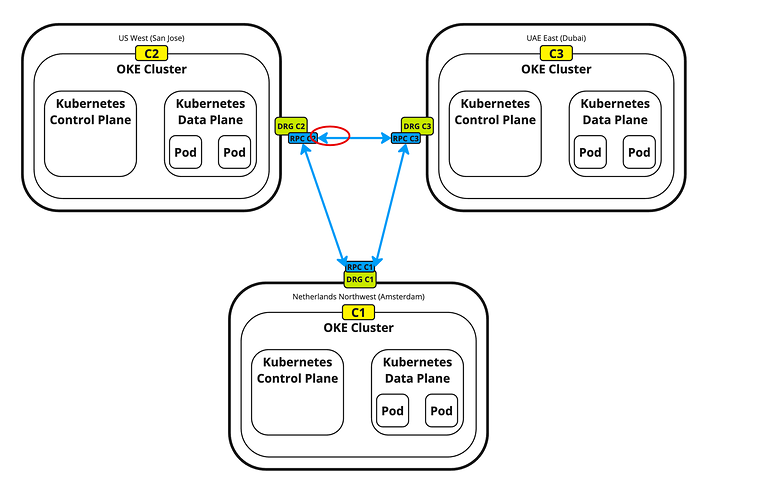
The picture below shows what RPCs we are configuring now.
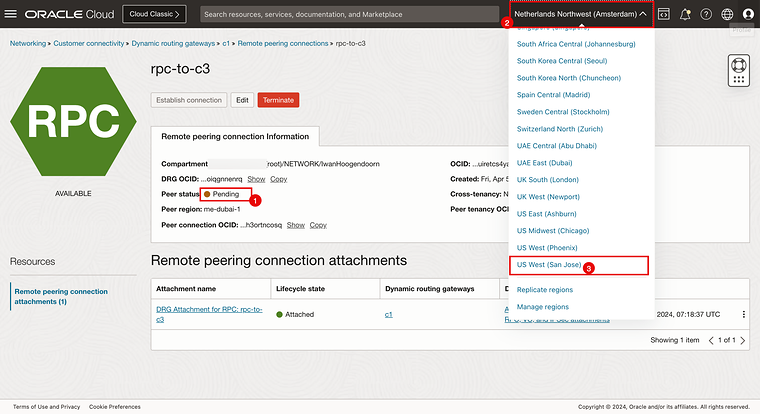
1. The Peering status will change to Pending, and it will take a minute before the peering to complete.
2. Click on the regions menu and switch from the Amsterdam region to the San Jose region.
3. Select the San Jose region.
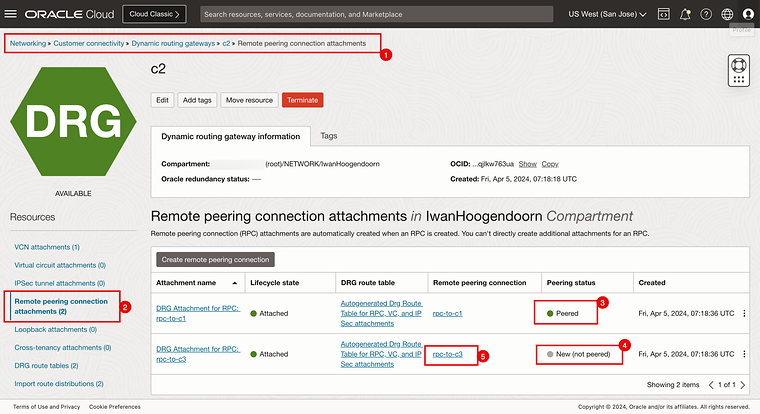
1. When you browse to Networking > Customer Connectivity > Dynamic Routing Gateways > c2.
2. Click on Remote peering connection attachments.
3. Notice that the connection between Amsterdam and San Jose is now Peered.
-
- This was done from the Amsterdam side.
- Notice that the Peering status from San Jose (c2) to Dubai (c3) is still New.
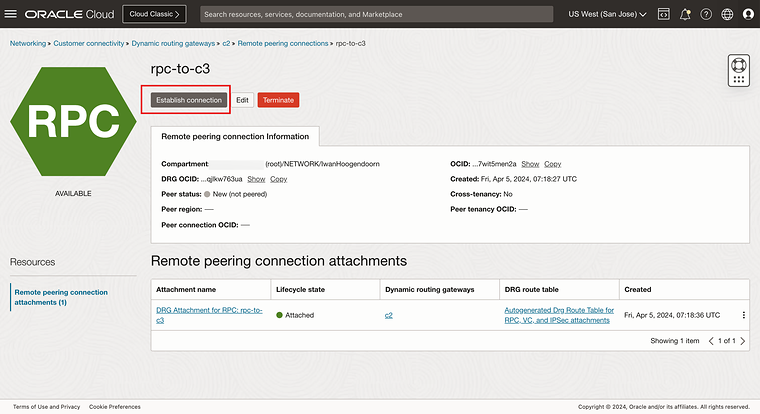
- Click on the second Remote peering connection attachment (rpc-to-c3).
-
- Here you will configure the connection towards Dubai.
- Click on the Establish Connection button.
1. Select the Dubai Region.
2. Paste in the OCID that you collected earlier (of the Dubai side that is created for c2 (San Jose).
3. Click on Establish Connection.
- The Peering status will change to Pending, and it will take a minute before the peering to complete.
At this point we now have a full mesh RPC peering as the picture illustrates below.
Let’s do a quick verification if all connections are peered successfully.
1. Make sure you are connected to the San Jose Region.
2. When you browse Networking > Customer Connectivity > Dynamic Routing Gateways > c1.
3. Click on Remote peering connection attachments.
4. Notice that both Remote peering connection attachments have the Peered status.
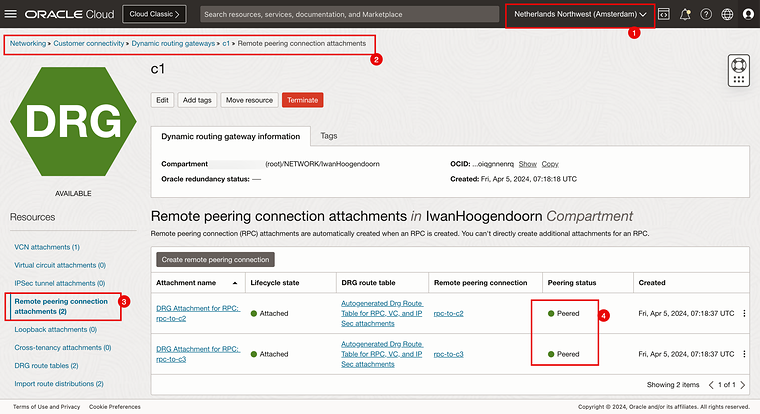
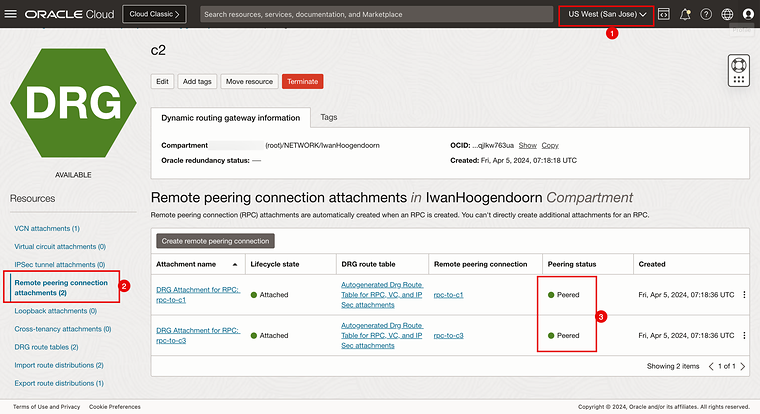
1. Make sure you are connected to the San Jose Region.
2. When you browse Networking > Customer Connectivity > Dynamic Routing Gateways > c2.
3. Click on Remote peering connection attachments.
4. Notice that both Remote peering connection attachments have the Peered status.
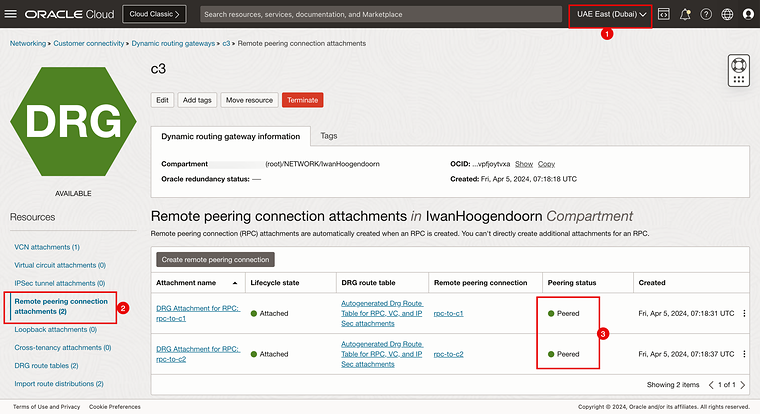
1. Make sure you are connected to the Dubai Region.
2. When you browse Networking > Customer Connectivity > Dynamic Routing Gateways > c3.
3. Click on Remote peering connection attachments.
4. Notice that both Remote peering connection attachments have the Peered status.
STEP 06 - Use the OCI Network visualizer to verify the RPC connections
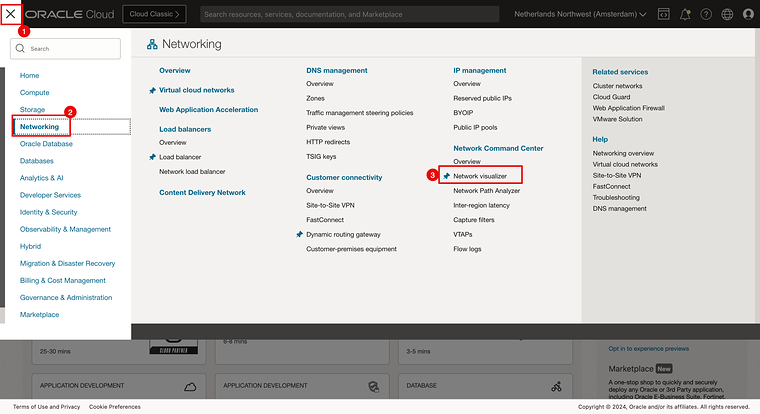
We can do an additional check to see if the Remote Peerings have been configured correctly by using the Network visualizer.
1. Click on the hamburger menu in the upper left corner.
2. Click on Networking.
3. Click on Network Visualizer.
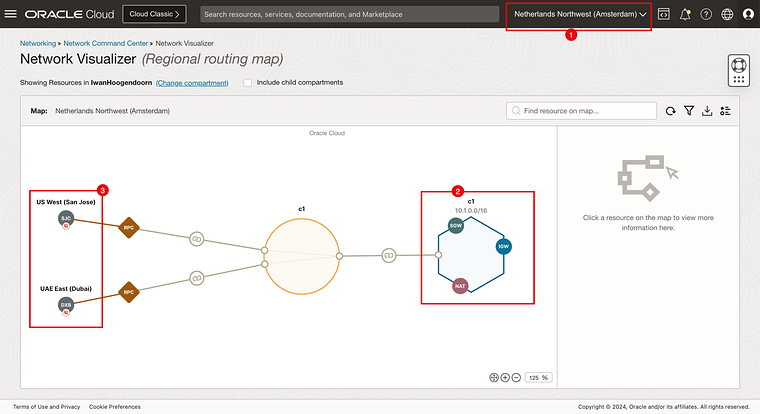
1. Make sure you are connected to the Amsterdam Region.
2. Notice that the Amsterdam Region is c1.
3. Notice the connections from Amsterdam to San Jose and Dubai.
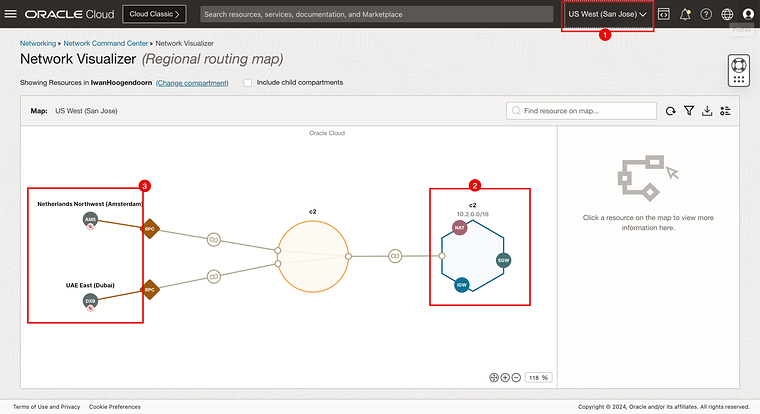
1. Make sure you are connected to the San Jose Region.
2. Notice that the San Jose Region is c2.
3. Notice the connections from San Jose to Amsterdam and Dubai.
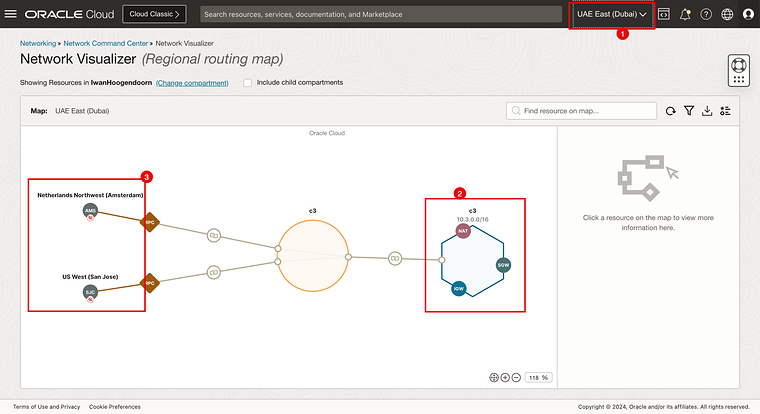
1. Make sure you are connected to the Dubai region.
2. Notice that the Dubai Region is c3.
3. Notice the connections from Dubai to Amsterdam and San Jose.
STEP 07 - Use the bastion and operator to check if your connectivity is working
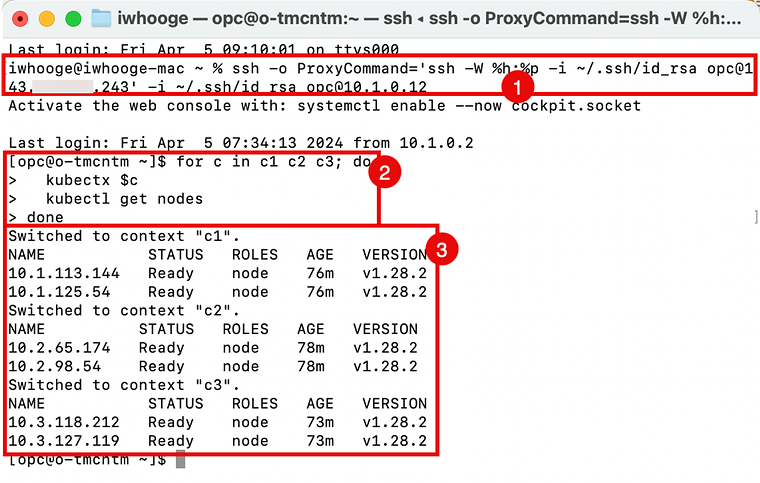
Now that we have created the Kubernetes clusters (on all three different regions) and connected the regions using the Remote Peering Connections (RPC) we can now use the operator host to verify if the operator can manage the Kubernetes clusters.
1. Issue this command (that was provided in step after the `terraform plan` command finished the deployment)
Last login: Fri Apr 5 09:10:01 on ttys000iwhooge@iwhooge-mac ~ % ssh -o ProxyCommand='ssh -W %h:%p -i ~/.ssh/id_rsa opc@143.47.183.243' -i ~/.ssh/id_rsa opc@10.1.0.12Activate the web console with: systemctl enable --now cockpit.socketLast login: Fri Apr 5 07:34:13 2024 from 10.1.0.2[opc@o-tmcntm ~]$2. Issue this command that will do a “for loop” and iterate through each Kubernetes Cluster (c1, c2, and c3) and retrieve the status of the worker nodes.
[opc@o-tmcntm ~]$ for c in c1 c2 c3; do> kubectx $c> kubectl get nodes> doneSwitched to context "c1".NAME STATUS ROLES AGE VERSION10.1.113.144 Ready node 76m v1.28.210.1.125.54 Ready node 76m v1.28.2Switched to context "c2".NAME STATUS ROLES AGE VERSION10.2.65.174 Ready node 78m v1.28.210.2.98.54 Ready node 78m v1.28.2Switched to context "c3".NAME STATUS ROLES AGE VERSION10.3.118.212 Ready node 73m v1.28.210.3.127.119 Ready node 73m v1.28.2[opc@o-tmcntm ~]$This is the command that you need to paste in the terminal (after you connect to the operator host.
for c in c1 c2 c3; do kubectx $c kubectl get nodesdone3. Notice the output of ALL the nodes of ALL the Kubernetes clusters that were deployed using the Terraform script.
You can also use the for loop, to perform other commands like `kubectl get all -n kube-system` for example.
for c in c1 c2 c3; do kubectx $c kubectl get all -n kube-systemdoneBelow you will see the output where I have issued the command `kubectl get all -n kube-system` with the for loop.
[opc@o-tmcntm ~]$ for c in c1 c2 c3; do>   kubectx $c>   kubectl get all -n kube-system> doneSwitched to context "c1".NAME                                       READY   STATUS    RESTARTS       AGEpod/coredns-844b4886f-8b4k6                1/1     Running   0              118mpod/coredns-844b4886f-g8gbm                1/1     Running   0              122mpod/csi-oci-node-5xzdg                     1/1     Running   0              119mpod/csi-oci-node-nsdg4                     1/1     Running   1 (118m ago)   119mpod/kube-dns-autoscaler-74f78468bf-l9644   1/1     Running   0              122mpod/kube-flannel-ds-5hsp7                  1/1     Running   0              119mpod/kube-flannel-ds-wk7xl                  1/1     Running   0              119mpod/kube-proxy-gpvv2                       1/1     Running   0              119mpod/kube-proxy-vgtf7                       1/1     Running   0              119mpod/proxymux-client-nt59j                  1/1     Running   0              119mpod/proxymux-client-slk9j                  1/1     Running   0              119m
NAME               TYPE        CLUSTER-IP   EXTERNAL-IP   PORT(S)                  AGEservice/kube-dns   ClusterIP   10.101.5.5   <none>        53/UDP,53/TCP,9153/TCP   122m
NAME                                      DESIRED   CURRENT   READY   UP-TO-DATE   AVAILABLE   NODE SELECTOR                                 AGEdaemonset.apps/csi-oci-node               2         2         2       2            2           <none>                                        122mdaemonset.apps/kube-flannel-ds            2         2         2       2            2           <none>                                        122mdaemonset.apps/kube-proxy                 2         2         2       2            2           beta.kubernetes.io/os=linux                   122mdaemonset.apps/node-termination-handler   0         0         0       0            0           oci.oraclecloud.com/oke-is-preemptible=true   122mdaemonset.apps/nvidia-gpu-device-plugin   0         0         0       0            0           <none>                                        122mdaemonset.apps/proxymux-client            2         2         2       2            2           node.info.ds_proxymux_client=true             122m
NAME                                  READY   UP-TO-DATE   AVAILABLE   AGEdeployment.apps/coredns               2/2     2            2           122mdeployment.apps/kube-dns-autoscaler   1/1     1            1           122m
NAME                                             DESIRED   CURRENT   READY   AGEreplicaset.apps/coredns-844b4886f                2         2         2       122mreplicaset.apps/kube-dns-autoscaler-74f78468bf   1         1         1       122mSwitched to context "c2".NAME                                       READY   STATUS    RESTARTS       AGEpod/coredns-84bd9cd884-4fqvr               1/1     Running   0              120mpod/coredns-84bd9cd884-lmgz2               1/1     Running   0              124mpod/csi-oci-node-4zl9l                     1/1     Running   0              122mpod/csi-oci-node-xjzfd                     1/1     Running   1 (120m ago)   122mpod/kube-dns-autoscaler-59575f8674-m6j2z   1/1     Running   0              124mpod/kube-flannel-ds-llhhq                  1/1     Running   0              122mpod/kube-flannel-ds-sm6fg                  1/1     Running   0              122mpod/kube-proxy-7ppw8                       1/1     Running   0              122mpod/kube-proxy-vqfgb                       1/1     Running   0              122mpod/proxymux-client-cnkph                  1/1     Running   0              122mpod/proxymux-client-k5k6n                  1/1     Running   0              122m
NAME               TYPE        CLUSTER-IP   EXTERNAL-IP   PORT(S)                  AGEservice/kube-dns   ClusterIP   10.102.5.5   <none>        53/UDP,53/TCP,9153/TCP   124m
NAME                                      DESIRED   CURRENT   READY   UP-TO-DATE   AVAILABLE   NODE SELECTOR                                 AGEdaemonset.apps/csi-oci-node               2         2         2       2            2           <none>                                        124mdaemonset.apps/kube-flannel-ds            2         2         2       2            2           <none>                                        124mdaemonset.apps/kube-proxy                 2         2         2       2            2           beta.kubernetes.io/os=linux                   124mdaemonset.apps/node-termination-handler   0         0         0       0            0           oci.oraclecloud.com/oke-is-preemptible=true   124mdaemonset.apps/nvidia-gpu-device-plugin   0         0         0       0            0           <none>                                        124mdaemonset.apps/proxymux-client            2         2         2       2            2           node.info.ds_proxymux_client=true             124m
NAME                                  READY   UP-TO-DATE   AVAILABLE   AGEdeployment.apps/coredns               2/2     2            2           124mdeployment.apps/kube-dns-autoscaler   1/1     1            1           124m
NAME                                             DESIRED   CURRENT   READY   AGEreplicaset.apps/coredns-84bd9cd884               2         2         2       124mreplicaset.apps/kube-dns-autoscaler-59575f8674   1         1         1       124mSwitched to context "c3".NAME                                       READY   STATUS    RESTARTS   AGEpod/coredns-56c7ffc89c-jt85k               1/1     Running   0          115mpod/coredns-56c7ffc89c-lsqcg               1/1     Running   0          121mpod/csi-oci-node-gfswn                     1/1     Running   0          116mpod/csi-oci-node-xpwbp                     1/1     Running   0          116mpod/kube-dns-autoscaler-6b69bf765c-fxjvc   1/1     Running   0          121mpod/kube-flannel-ds-2sqbk                  1/1     Running   0          116mpod/kube-flannel-ds-l7sdz                  1/1     Running   0          116mpod/kube-proxy-4qcmb                       1/1     Running   0          116mpod/kube-proxy-zcrk4                       1/1     Running   0          116mpod/proxymux-client-4lgg7                  1/1     Running   0          116mpod/proxymux-client-zbcrg                  1/1     Running   0          116m
NAME               TYPE        CLUSTER-IP   EXTERNAL-IP   PORT(S)                  AGEservice/kube-dns   ClusterIP   10.103.5.5   <none>        53/UDP,53/TCP,9153/TCP   121m
NAME                                      DESIRED   CURRENT   READY   UP-TO-DATE   AVAILABLE   NODE SELECTOR                                 AGEdaemonset.apps/csi-oci-node               2         2         2       2            2           <none>                                        122mdaemonset.apps/kube-flannel-ds            2         2         2       2            2           <none>                                        121mdaemonset.apps/kube-proxy                 2         2         2       2            2           beta.kubernetes.io/os=linux                   121mdaemonset.apps/node-termination-handler   0         0         0       0            0           oci.oraclecloud.com/oke-is-preemptible=true   121mdaemonset.apps/nvidia-gpu-device-plugin   0         0         0       0            0           <none>                                        122mdaemonset.apps/proxymux-client            2         2         2       2            2           node.info.ds_proxymux_client=true             122m
NAME                                  READY   UP-TO-DATE   AVAILABLE   AGEdeployment.apps/coredns               2/2     2            2           121mdeployment.apps/kube-dns-autoscaler   1/1     1            1           121m
NAME                                             DESIRED   CURRENT   READY   AGEreplicaset.apps/coredns-56c7ffc89c               2         2         2       121mreplicaset.apps/kube-dns-autoscaler-6b69bf765c   1         1         1       121m[opc@o-tmcntm ~]$
STEP 08 - Delete (destroy) the OKE clusters using Terraform
Because we used Terraform for our deployment we can also very easily use Terraform to delete the complete deployment.
We do this by issuing the following commands:
- `terraform destroy`
- Issue this command to delete all resources that are related to the three Kubernetes clusters that we previously deployed. - terraform destroy
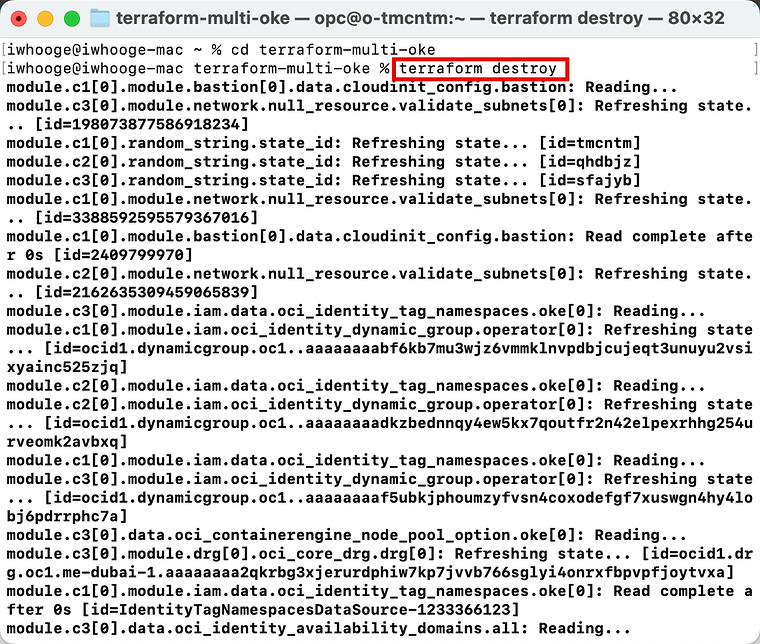
- Enter “yes” to approve the destroy (delete).
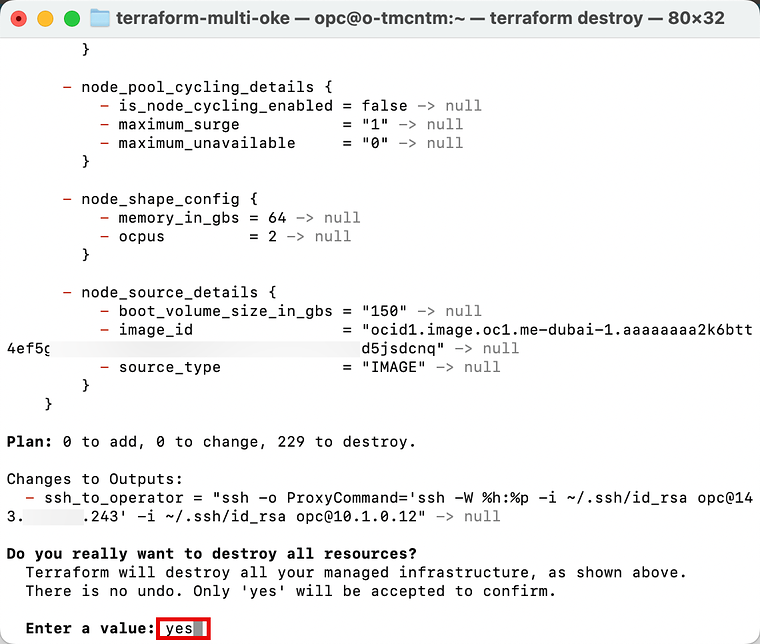
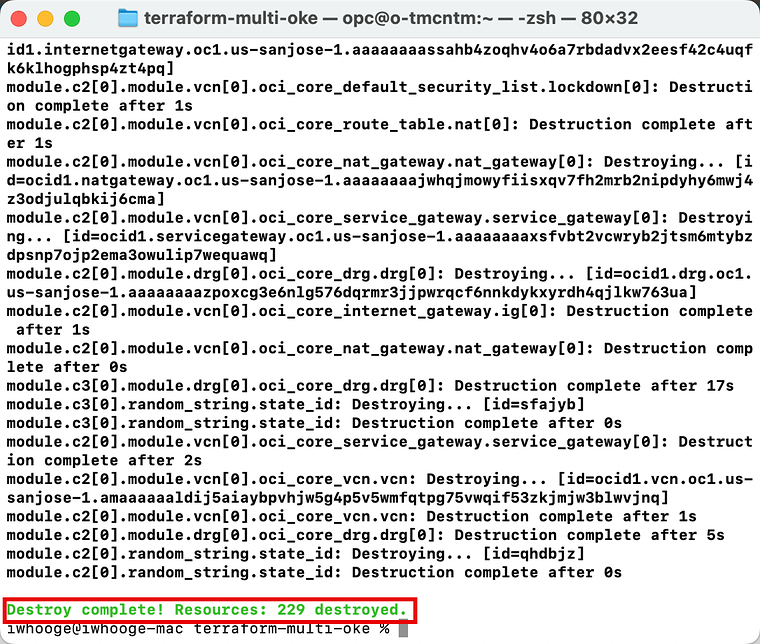
It will take a few minutes for the Terraform script to finish.
- Notice that the “destroy” is completed and that all 229 resources are destroyed.
Conclusion
In this tutorial, we have prepared our local computer with the tools to perform actions with Terraform against the OCI environment. We also prepared the OCI environment to accept authentication requests from our local computer that we needed for our Terraform executions. We then created some Terraform scripts and Shell scripts that allowed us to deploy three Kubernetes clusters on the Oracle Kubernetes Engine (OKE) in three different regions. We then made sure that the clusters in the three regions were able to communicate with each other by configuring Remote Peering Connections on the DRG.
Originally published on the old wiki at /index.php/Use_Terraform_to_Deploy_Multiple_Kubernetes_Clusters_across_different_OCI_Regions_using_OKE_and_Create_a_Full_Mesh_Network_using_RPC.