A VRF Tier-0 Gateway is a Gateway that is configured as a child object to a Parent Tier-0 Gateway. This means that you can configure multiple “mini Tier-0 Gateways” inside a Parent Tier-0 Gateway. In this wiki article, I will show you how to configure VRF Lite using NSX-T with two separate tenants.
The Network Diagrams
My starting point
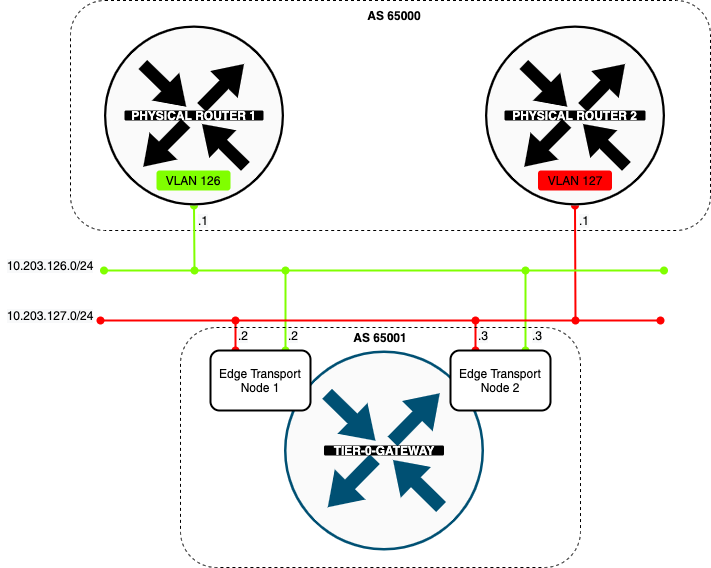
In the diagram below you see that I have one Tier-0 Gateway already configured and this Tier-0 Gateway has two uplink VLANs (VLAN 126 + 127). The Tier-0 Gateway has peers to Layer-3 BGP peers on the physical network.
My endresult
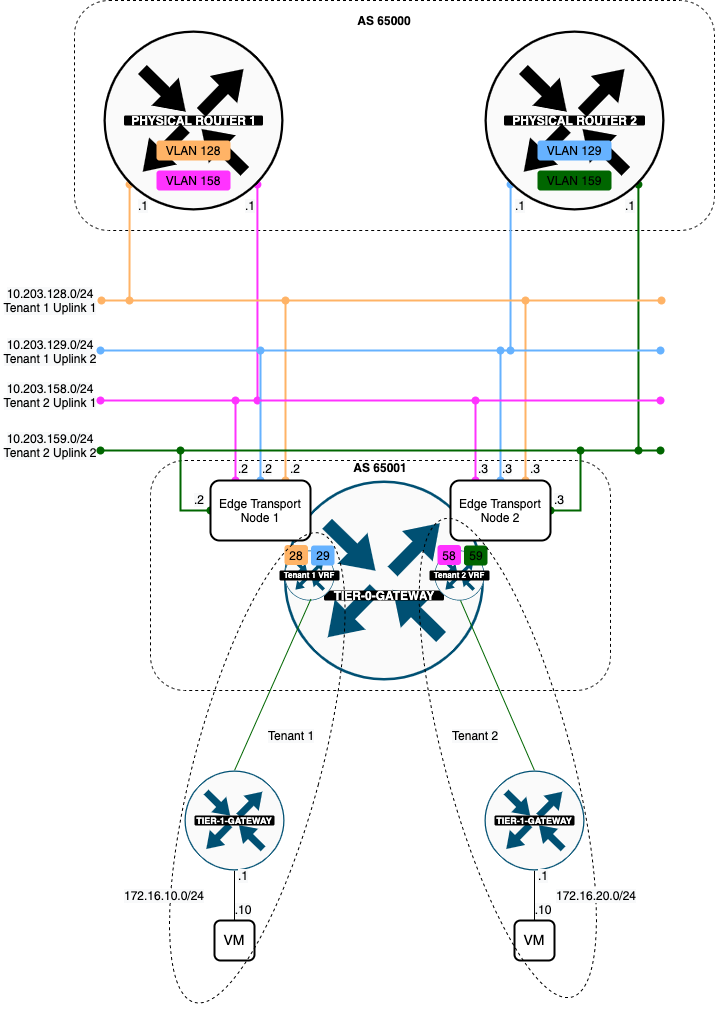
When I am finished with the VRF Lite configuration I have added two VRF enabled Tier-0 Gateway representing two separate tenants. Both tenants will each have a dedicated pair of uplink VLANs. Tenant 1 is using VLAN 128 + 129 and Tenant 2 is using VLAN 158 + 159.
The high–level steps
In this wiki, the high level following steps will be discussed:
- STEP 1: Create a Parent Tier-0 Gateway
- STEP 2: Create the VLAN Segments for the Uplink networks (for the tenants)
- STEP 3: Create the VRF enabled Tier-0 Gateways (for the tenants)
- STEP 4: Create the uplink interfaces on the VRF enabled Tier-0 Gateways (for the tenants)
- STEP 5: Configure the Vyatta Router(s) with the interface IP addresses and BGP for the Tenants
- STEP 6: Configure BGP on the VRF enabled Tier-0 Gateways (for the tenants)
- STEP 7: Create Tier-1 Gateways and attach these to the VRF enabled Gateways
- STEP 8: Create Test (Overlay) Segments for each tenant
- STEP 9: Enable Route Adverting and Route Redistribution
- STEP 10: Create test Virtual Machines per Tenant to perform some ping tests
- STEP 11: Perform some verification steps using CLI on the Edge Transport Nodes
- STEP 12: Perform some verification steps using Traceflow on the NSX-T GUI
- STEP 13: Perform some verification steps using the Network Topology Map on the NSX-T GUI
- STEP 14: Configure Route leaking between the two tenants (Inter-VRF-Routing)
The configuration steps
STEP 1» Create a Parent Tier–0 Gateway
I already preconfigured this part and here are the screenshots with the current configuration of the initial Parent Tier-0 Gateway.
The VLAN Segments for the Uplink networks
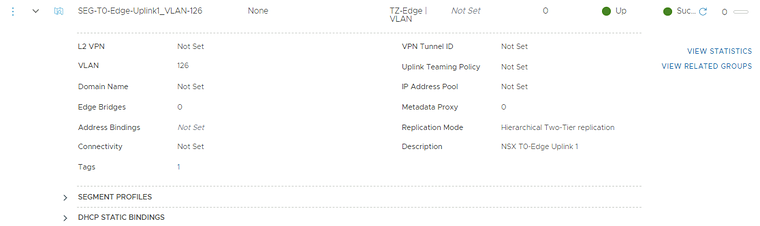
This is the NSX-T Segment that was created for the first BGP uplink for the parent Tier-0 Gateway transporting VLAN 126.
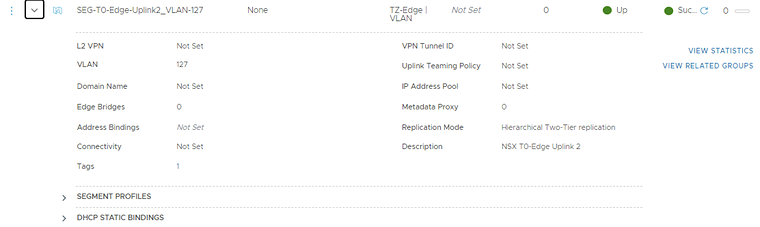
This is the NSX-T Segment that was created for the second BGP uplink for the parent Tier-0 Gateway transporting VLAN 127.
The Tier–0 Parent Gateway
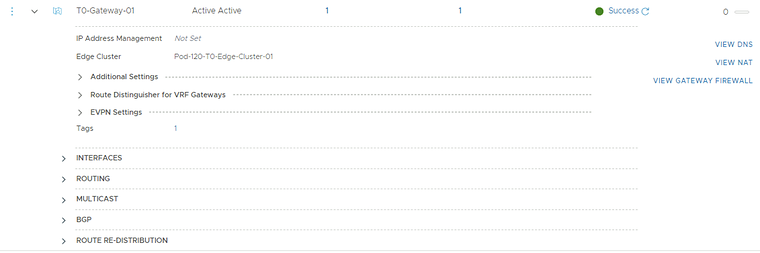
This is the parent Tier-0 Gateway that was created that will initially be the “host” for theVRF enabled Tier-0 Gateways.
The uplink interfaces for the Tier–0 Parent Gateway
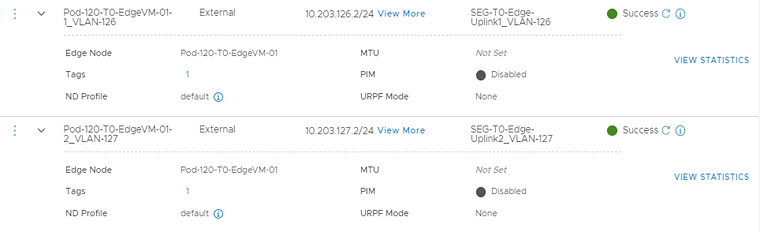
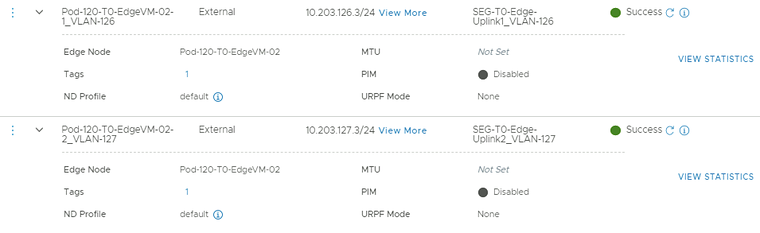
On the parent Tier-0 Gateway, I needed to configure four uplinks in total, two uplink interfaces on the first Edge Transport Node, and two uplink interfaces on the second Edge Transport Node.
These are the uplink interfaces that are configured for the first Edge Transport Node.
These are the uplink interfaces that are configured for the second Edge Transport Node.
The BGP configuration for the Tier–0 Parent Gateway
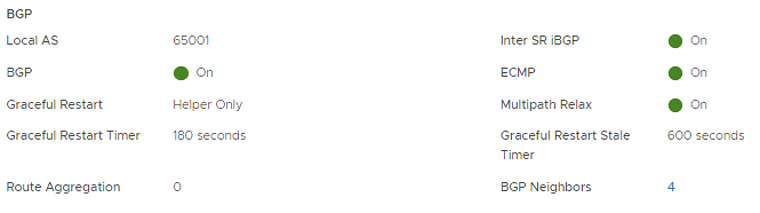
This is the BGP configuration on the parent Tier-0 Gateway.
This is the configuration for the first BGP peer that travels across VLAN 126.

This is the configuration for the second BGP peer that travels across VLAN 127.

The BGP configuration on the Vyatta Gateway〈s〉
I have used a virtual Vyatta Router that I have configured peering to. The configuration for the interfaces and BGP on the “physical” side is below.
set interfaces ethernet eth1 vif 126 address '10.203.126.1/24'set interfaces ethernet eth1 vif 126 description 'NSX Edge Uplink #1'set interfaces ethernet eth1 vif 126 mtu '1500'
set interfaces ethernet eth1 vif 127 address '10.203.127.1/24'set interfaces ethernet eth1 vif 127 description 'NSX Edge Uplink #2'set interfaces ethernet eth1 vif 127 mtu '1500'
set protocols bgp 65000 neighbor 10.203.126.2 address-family ipv4-unicast default-originateset protocols bgp 65000 neighbor 10.203.126.2 description 'Pod-120-T0-EdgeVM-01-1'set protocols bgp 65000 neighbor 10.203.126.2 remote-as '65001'set protocols bgp 65000 neighbor 10.203.126.3 address-family ipv4-unicast default-originateset protocols bgp 65000 neighbor 10.203.126.3 description 'Pod-120-T0-EdgeVM-02-1'set protocols bgp 65000 neighbor 10.203.126.3 remote-as '65001'
set protocols bgp 65000 neighbor 10.203.127.2 address-family ipv4-unicast default-originateset protocols bgp 65000 neighbor 10.203.127.2 description 'Pod-120-T0-EdgeVM-01-2'set protocols bgp 65000 neighbor 10.203.127.2 remote-as '65001'set protocols bgp 65000 neighbor 10.203.127.3 address-family ipv4-unicast default-originateset protocols bgp 65000 neighbor 10.203.127.3 description 'Pod-120-T0-EdgeVM-02-2'set protocols bgp 65000 neighbor 10.203.127.3 remote-as '65001'
STEP 2» Create the VLAN Segments for the Uplink networks 〈for the tenants〉
For the VRF enabled Tier-0 Gateways I need to create dedicated uplink interfaces.
TENANT 1
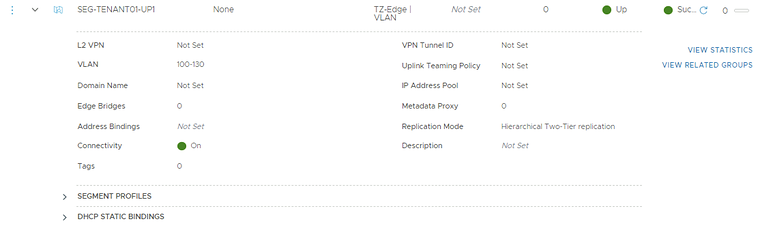
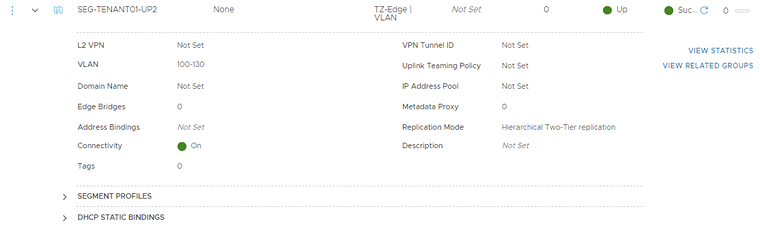
For tenant 1 I am going to create a trunk interface that allows multiple VLANs through the trunk. VLAN 128 + 129 needs to be in this range as these VLANS are used for the BGP uplink for the first tenant VRF enabled Tier-0 Gateway.
| Segment Name | VLAN Range | Uplink Teaming Policy | Transport Zone |
|---|---|---|---|
| SEG-TENANT01-UP1 | 100-130 | none | TZ-Edge |
| SEG-TENANT01-UP2 | 100-130 | none | TZ-Edge |
This is the creation of the first (trunked) uplink for the first tenant.
This is the creation of the second (trunked) uplink for the first tenant.
TENANT 2
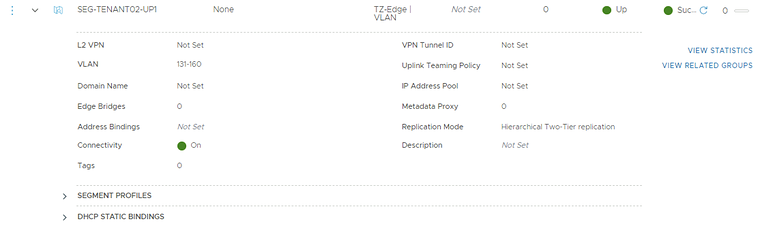
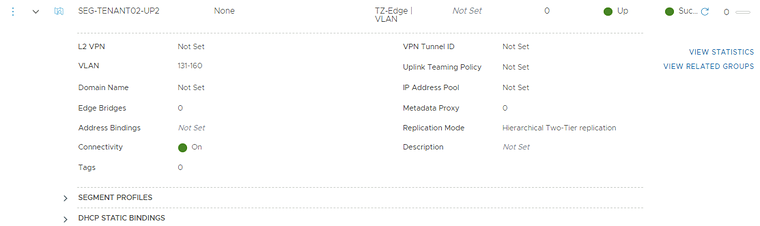
For tenant 2 I am going to create a trunk interface that allows multiple VLANs through the trunk. VLAN 158 + 159 needs to be in this range as these VLANS are used for the BGP uplink for the second tenant VRF enabled Tier-0 Gateway.
| Segment Name | VLAN Range | Uplink Teaming Policy | Transport Zone |
|---|---|---|---|
| SEG-TENANT02-UP1 | 131-160 | none | TZ-Edge |
| SEG-TENANT02-UP2 | 131-160 | none | TZ-Edge |
This is the creation of the first (trunked) uplink for the second tenant.
This is the creation of the second (trunked) uplink for the second tenant.
STEP 3» Create the VRF enabled Tier–0 Gateways 〈for the tenants〉
I now need to create the actual VRF enabled Tier-0 Gateways for both tenants.
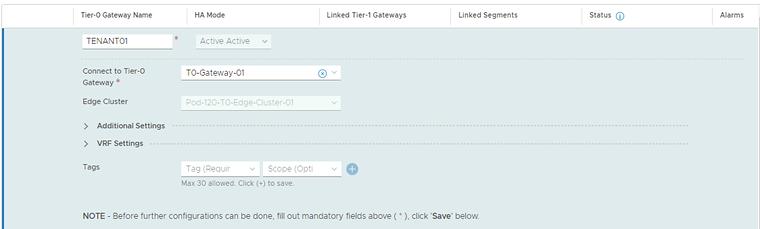
TENANT 1
Here I create the VRF enabled Tier-0 Gateway for the first tenant.
TENANT 2
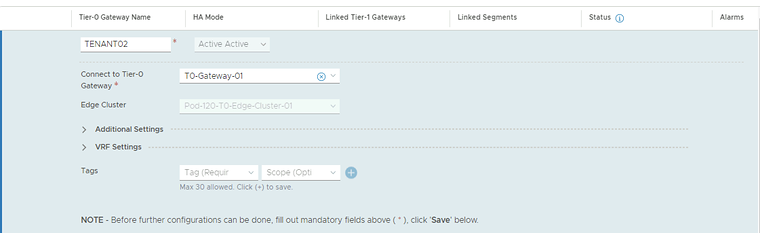
Here I create the VRF enabled Tier-0 Gateway for the second tenant.
Tier–0 Gateway Overview
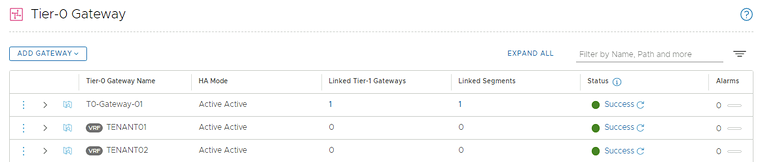
This is an overview of all the (VRF enabled) Tier-0 Gateways.
STEP 4» Create the uplink interfaces on the VRF enabled Tier–0 Gateways 〈for the tenants〉
Now that the VRF enabled Tier-0 Gateways are present I am going to configure the uplinks on both VRF enabled Tier-0 Gateways.
TENANT 1
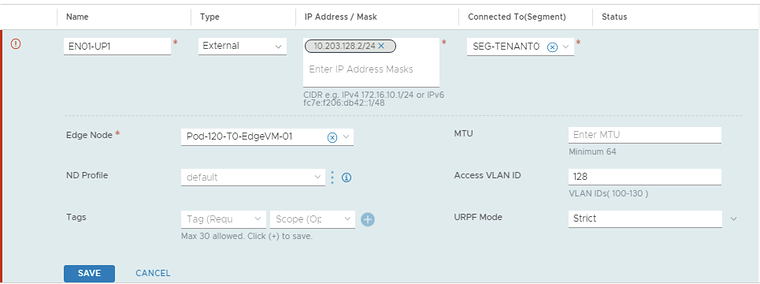
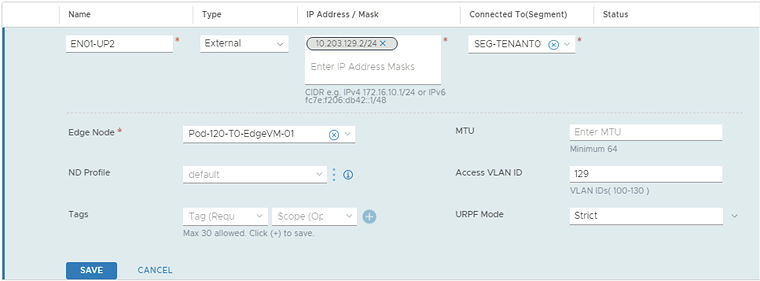
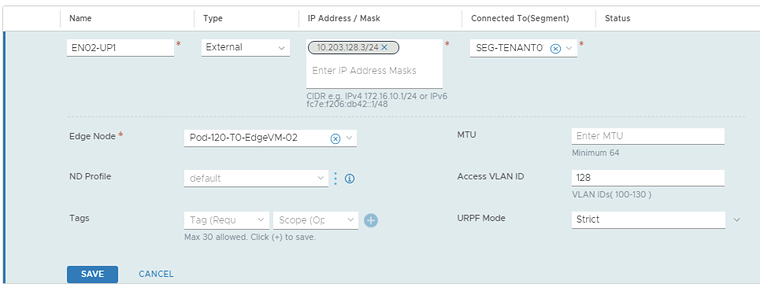
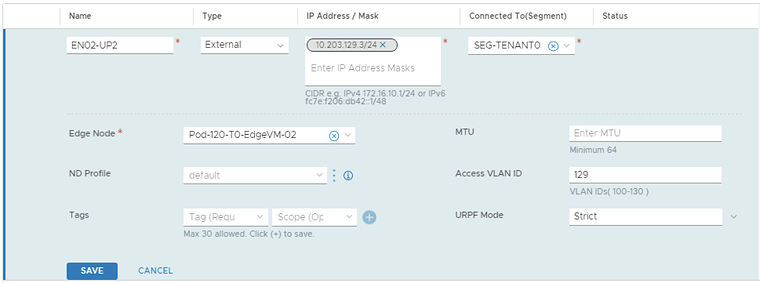
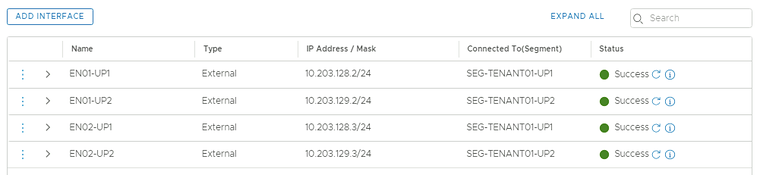
In the table below I have captured the configuration parameters used for the configuration.
| VRF Name | Interface Name | IP address | Segment Name | VLAN-ID |
|---|---|---|---|---|
| TENANT01 | EN01-UP1 | 10.203.128.2/24 | SEG-TENANT01-UP1 | 128 |
| TENANT01 | EN01-UP2 | 10.203.129.2/24 | SEG-TENANT01-UP2 | 129 |
| TENANT01 | EN02-UP1 | 10.203.128.3/24 | SEG-TENANT01-UP1 | 128 |
| TENANT01 | EN02-UP2 | 10.203.129.3/24 | SEG-TENANT01-UP2 | 129 |
This is the configuration for the first uplink dedicated to the first Edge Transport Node.
This is the configuration for the second uplink dedicated to the first Edge Transport Node.
This is the configuration for the first uplink dedicated to the second Edge Transport Node.
This is the configuration for the second uplink dedicated to the second Edge Transport Node.
This is an overview of all the uplink interfaces that are configured for both Edge Transport Nodes.
TENANT 2
In the table below I have captured the configuration parameters used for the configuration.
| VRF Name | Interface Name | IP address | Segment Name | VLAN-ID |
|---|---|---|---|---|
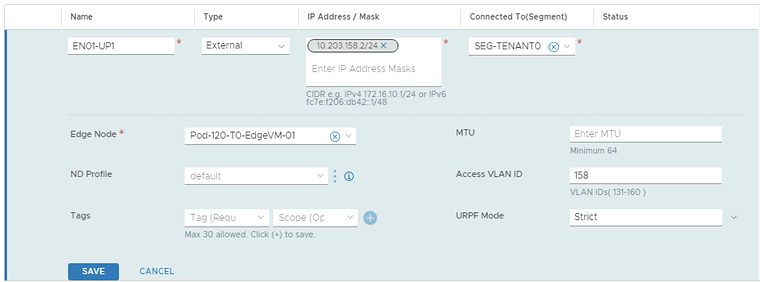
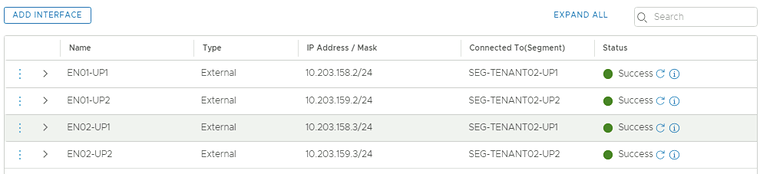
| TENANT02 | EN01-UP1 | 10.203.158.2/24 | SEG-TENANT02-UP1 | 158 |
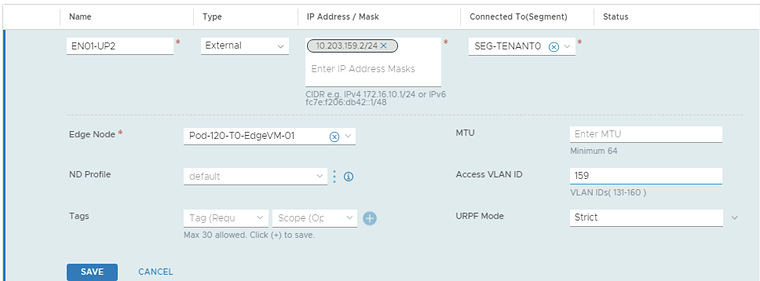
| TENANT02 | EN01-UP2 | 10.203.159.2/24 | SEG-TENANT02-UP2 | 159 |
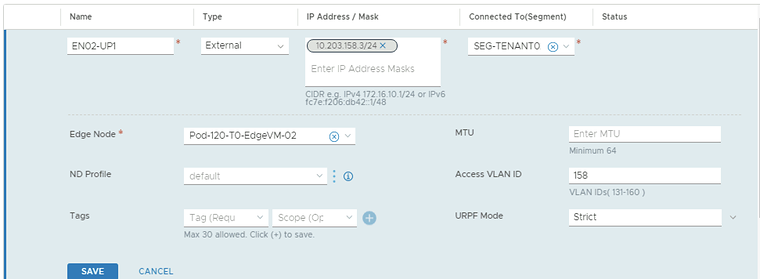
| TENANT02 | EN02-UP1 | 10.203.158.3/24 | SEG-TENANT02-UP1 | 158 |
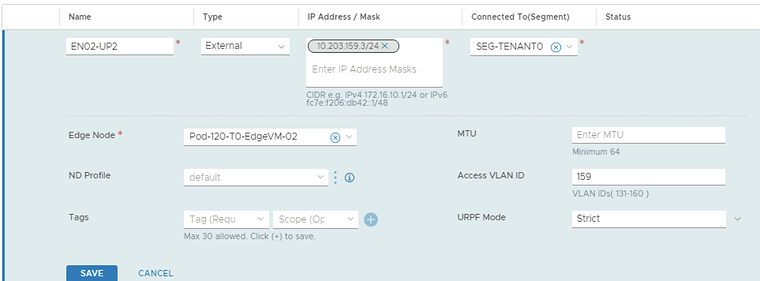
| TENANT02 | EN02-UP2 | 10.203.159.3/24 | SEG-TENANT02-UP2 | 159 |
This is the configuration for the first uplink dedicated to the first Edge Transport Node.
This is the configuration for the second uplink dedicated to the first Edge Transport Node.
This is the configuration for the first uplink dedicated to the second Edge Transport Node.
This is the configuration for the second uplink dedicated to the second Edge Transport Node.
This is an overview of all the uplink interfaces that are configured for both Edge Transport Nodes.
STEP 5» Configure the Vyatta Router〈s〉 with the interface IP addresses and BGP for the Tenants
I have used a virtual Vyatta Router that I have configured peering to. The configuration for the interfaces and BGP on the “VRF” sides is below.
configure
set interfaces ethernet eth1 vif 128 address '10.203.128.1/24'set interfaces ethernet eth1 vif 128 description 'BGP Uplink 1 Tenant 1'set interfaces ethernet eth1 vif 128 mtu '1500'set interfaces ethernet eth1 vif 129 address '10.203.129.1/24'set interfaces ethernet eth1 vif 129 description 'BGP Uplink 2 Tenant 1'set interfaces ethernet eth1 vif 129 mtu '1500'set interfaces ethernet eth1 vif 158 address '10.203.158.1/24'set interfaces ethernet eth1 vif 158 description 'BGP Uplink 1 Tenant 2'set interfaces ethernet eth1 vif 158 mtu '1500'set interfaces ethernet eth1 vif 159 address '10.203.159.1/24'set interfaces ethernet eth1 vif 159 description 'BGP Uplink 2 Tenant 2'set interfaces ethernet eth1 vif 159 mtu '1500'
set protocols bgp 65000 neighbor 10.203.128.2 address-family ipv4-unicast default-originateset protocols bgp 65000 neighbor 10.203.128.2 description 'TEN1-T0-EdgeVM-01-1'set protocols bgp 65000 neighbor 10.203.128.2 remote-as '65001'set protocols bgp 65000 neighbor 10.203.128.3 address-family ipv4-unicast default-originateset protocols bgp 65000 neighbor 10.203.128.3 description 'TEN1-T0-EdgeVM-02-1'set protocols bgp 65000 neighbor 10.203.128.3 remote-as '65001'set protocols bgp 65000 neighbor 10.203.129.2 address-family ipv4-unicast default-originateset protocols bgp 65000 neighbor 10.203.129.2 description 'TEN1-T0-EdgeVM-01-2'set protocols bgp 65000 neighbor 10.203.129.2 remote-as '65001'set protocols bgp 65000 neighbor 10.203.129.3 address-family ipv4-unicast default-originateset protocols bgp 65000 neighbor 10.203.129.3 description 'TEN1-T0-EdgeVM-02-2'set protocols bgp 65000 neighbor 10.203.129.3 remote-as '65001'set protocols bgp 65000 neighbor 10.203.158.2 address-family ipv4-unicast default-originateset protocols bgp 65000 neighbor 10.203.158.2 description 'TEN2-T0-EdgeVM-01-1'set protocols bgp 65000 neighbor 10.203.158.2 remote-as '65001'set protocols bgp 65000 neighbor 10.203.158.3 address-family ipv4-unicast default-originateset protocols bgp 65000 neighbor 10.203.158.3 description 'TEN2-T0-EdgeVM-02-1'set protocols bgp 65000 neighbor 10.203.158.3 remote-as '65001'set protocols bgp 65000 neighbor 10.203.159.2 address-family ipv4-unicast default-originateset protocols bgp 65000 neighbor 10.203.159.2 description 'TEN2-T0-EdgeVM-01-2'set protocols bgp 65000 neighbor 10.203.159.2 remote-as '65001'set protocols bgp 65000 neighbor 10.203.159.3 address-family ipv4-unicast default-originateset protocols bgp 65000 neighbor 10.203.159.3 description 'TEN2-T0-EdgeVM-02-2'set protocols bgp 65000 neighbor 10.203.159.3 remote-as '65001'
commitsave
STEP 6» Configure BGP on the VRF enabled Tier–0 Gateways 〈for the tenants〉
Now I am going configure BGP on the VRF enabled Tier-0 Gateways.
TENANT 1
| BGP Neighbor IP address | BGP Remote AS |
|---|---|
| 10.203.128.1 | 65000 |
| 10.203.129.1 | 65000 |
By default (in the NSX-t version I am using for this article = 3.0.1.1) BGP is disabled on the VRF enabled Tier-0 Gateway.
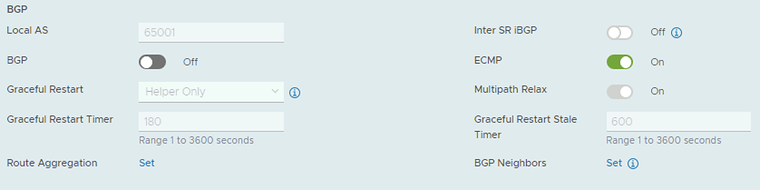
When I try to enable is I am getting the following error message. This message is unfortunately related to a bug.
The workaround for this bug is described below.
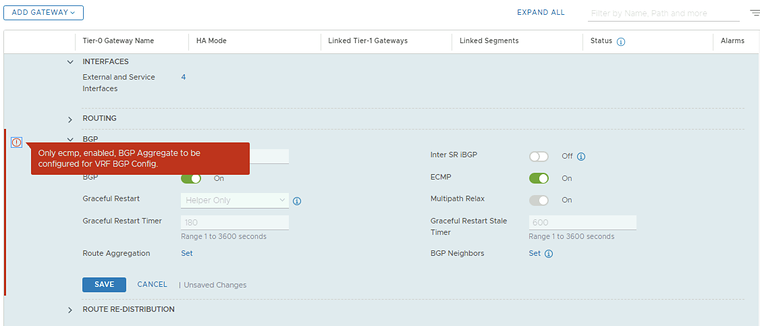
Before I used the workaround to enable BGP on the VRF enabled Tier-0 Gateway I decided to first configure the BGP peers.
This is the BGP configuration for the first BGP peer for the first Tenant using VLAN 128.
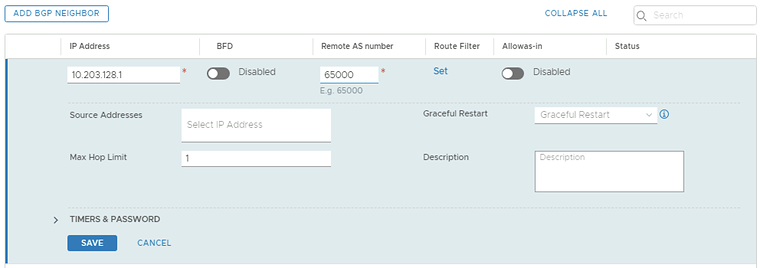
This is the BGP configuration for the second BGP peer for the first Tenant using VLAN 129.
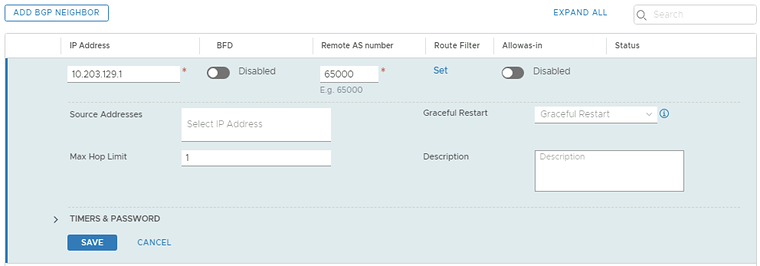
This is a summary of the BGP peering configuration. Notice they are all down and this has to do with the fact that BGP on the first VRF enabled Tier-0 Gateway is not enabled.

Workaround for BGP bug
When you are hitting this bug when you are enabling BGP on a VRF enabled Tier-0 Gateway with the message:
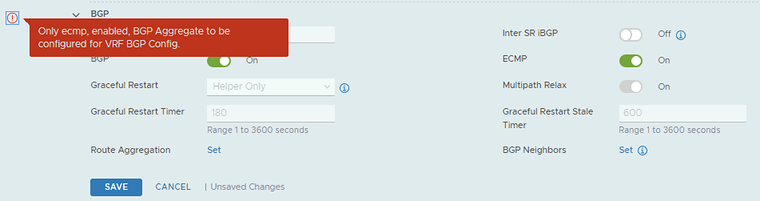
“Only ECMP, enabled, BGP Aggregrate to be configured for VRF BGP Config.”
And BGP can not be enabled through the NSX-T GUI you need to enable BGP using the REST API.
The Rest API call for this can be found in the NSX-T 3.0.0 API Guide.
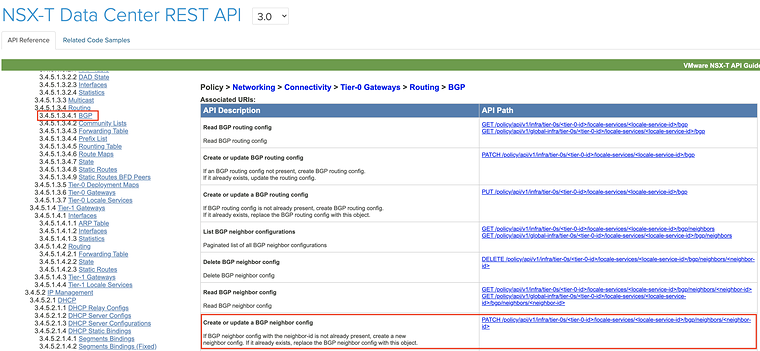
The API URI to enable BGP is:
PATCHhttps://pod-120-nsxt-lm.sddc.lab/policy/api/v1/infra/tier-0s/<tier-0-id>/locale-services/<locale-service-id>/bgp/But before we can execute this REST API call I first need to know the
To find out the
'GEThttps://pod-120-nsxt-lm.sddc.lab/policy/api/v1/infra/tier-0sThis resulted in the following output:
Show output
{ "results": [ { "transit_subnets": [ "100.64.0.0/16" ], "internal_transit_subnets": [ "169.254.0.0/24" ], "ha_mode": "ACTIVE_ACTIVE", "failover_mode": "NON_PREEMPTIVE", "ipv6_profile_paths": [ "/infra/ipv6-ndra-profiles/default", "/infra/ipv6-dad-profiles/default" ], "force_whitelisting": false, "default_rule_logging": false, "disable_firewall": false, "resource_type": "Tier0", "id": "T0-Gateway-01", "display_name": "T0-Gateway-01", "tags": [ { "scope": "SDDC.Lab", "tag": "Auto-Created" } ], "path": "/infra/tier-0s/T0-Gateway-01", "relative_path": "T0-Gateway-01", "parent_path": "/infra", "unique_id": "675e9483-045e-4908-94eb-5f4474388c06", "marked_for_delete": false, "overridden": false, "_create_user": "admin", "_create_time": 1597959370007, "_last_modified_user": "admin", "_last_modified_time": 1597959370074, "_system_owned": false, "_protection": "NOT_PROTECTED", "_revision": 0 }, { "transit_subnets": [ "100.64.0.0/16" ], "internal_transit_subnets": [ "169.254.0.0/24" ], "ha_mode": "ACTIVE_ACTIVE", "failover_mode": "NON_PREEMPTIVE", "ipv6_profile_paths": [ "/infra/ipv6-ndra-profiles/default", "/infra/ipv6-dad-profiles/default" ], "force_whitelisting": false, "default_rule_logging": false, "disable_firewall": false, "vrf_config": { "tier0_path": "/infra/tier-0s/T0-Gateway-01", "marked_for_delete": false, "overridden": false, "_protection": "NOT_PROTECTED" }, "resource_type": "Tier0", "id": "TENANT01", "display_name": "TENANT01", "path": "/infra/tier-0s/TENANT01", "relative_path": "TENANT01", "parent_path": "/infra", "unique_id": "70435935-f34e-44d6-919c-d36e06b62109", "marked_for_delete": false, "overridden": false, "_create_user": "admin", "_create_time": 1598038169130, "_last_modified_user": "admin", "_last_modified_time": 1598038169203, "_system_owned": false, "_protection": "NOT_PROTECTED", "_revision": 0 }, { "transit_subnets": [ "100.64.0.0/16" ], "internal_transit_subnets": [ "169.254.0.0/24" ], "ha_mode": "ACTIVE_ACTIVE", "failover_mode": "NON_PREEMPTIVE", "ipv6_profile_paths": [ "/infra/ipv6-ndra-profiles/default", "/infra/ipv6-dad-profiles/default" ], "force_whitelisting": false, "default_rule_logging": false, "disable_firewall": false, "vrf_config": { "tier0_path": "/infra/tier-0s/T0-Gateway-01", "marked_for_delete": false, "overridden": false, "_protection": "NOT_PROTECTED" }, "resource_type": "Tier0", "id": "TENANT02", "display_name": "TENANT02", "path": "/infra/tier-0s/TENANT02", "relative_path": "TENANT02", "parent_path": "/infra", "unique_id": "a5486158-6ba0-4a79-bed6-777220fdab9d", "marked_for_delete": false, "overridden": false, "_create_user": "admin", "_create_time": 1598038266592, "_last_modified_user": "admin", "_last_modified_time": 1598038266650, "_system_owned": false, "_protection": "NOT_PROTECTED", "_revision": 0 } ], "result_count": 3, "sort_by": "display_name", "sort_ascending": true}This tells me that the
To find out the
'GEThttps://pod-120-nsxt-lm.sddc.lab/policy/api/v1/infra/tier-0s/TENANT01/locale-servicesThis resulted in the following output:
Show output
{ "results": [ { "edge_cluster_path": "/infra/sites/default/enforcement-points/default/edge-clusters/11826748-46da-45a4-9abf-eb53ee87042b", "resource_type": "LocaleServices", "id": "default", "display_name": "default", "path": "/infra/tier-0s/TENANT01/locale-services/default", "relative_path": "default", "parent_path": "/infra/tier-0s/TENANT01", "unique_id": "6ffc2d5c-defd-46a8-aad6-352e1d86c6b9", "marked_for_delete": false, "overridden": false, "_create_user": "admin", "_create_time": 1598038169523, "_last_modified_user": "admin", "_last_modified_time": 1598038169527, "_system_owned": false, "_protection": "NOT_PROTECTED", "_revision": 0 } ], "result_count": 1, "sort_by": "display_name", "sort_ascending": true}This tells me that the
So I first performed a “GET” to find out what the JSON syntax and status of the BGP protocol was using the following API call:
'GEThttps://pod-120-nsxt-lm.sddc.lab/policy/api/v1/infra/tier-0s/TENANT01/locale-services/default/bgpThis resulted in the following output:
Show output
{ "enabled": false, "ecmp": true, "resource_type": "BgpRoutingConfig", "id": "bgp", "display_name": "bgp", "path": "/infra/tier-0s/TENANT01/locale-services/default/bgp", "relative_path": "bgp", "parent_path": "/infra/tier-0s/TENANT01/locale-services/default", "unique_id": "c14d888b-951c-4ed2-8a6e-36d5bd185cd7", "marked_for_delete": false, "overridden": false, "_create_user": "admin", "_create_time": 1598038169569, "_last_modified_user": "admin", "_last_modified_time": 1598038169574, "_system_owned": false, "_protection": "NOT_PROTECTED", "_revision": 0}Then I changed the following:
"enabled": false,to
"enabled": true,And I executed the following API call:
PATCHhttps://pod-120-nsxt-lm.sddc.lab/policy/api/v1/infra/tier-0s/TENANT01/locale-services/default/bgpusing the following JSON code:
Show output
{ "enabled": true, "ecmp": true, "resource_type": "BgpRoutingConfig", "id": "bgp", "display_name": "bgp", "path": "/infra/tier-0s/TENANT01/locale-services/default/bgp", "relative_path": "bgp", "parent_path": "/infra/tier-0s/TENANT01/locale-services/default", "unique_id": "c14d888b-951c-4ed2-8a6e-36d5bd185cd7", "marked_for_delete": false, "overridden": false, "_create_user": "admin", "_create_time": 1598038169569, "_last_modified_user": "admin", "_last_modified_time": 1598038169574, "_system_owned": false, "_protection": "NOT_PROTECTED", "_revision": 0}And once executed I received a Status: 200 OK:
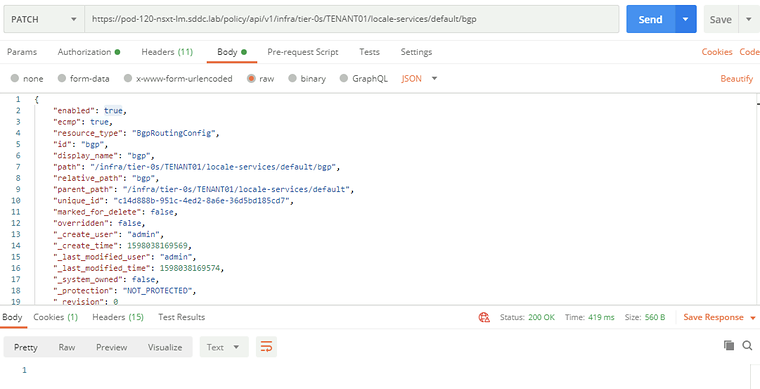
Now when I take a look in the GUI I see that the BGP switch is now turned on:
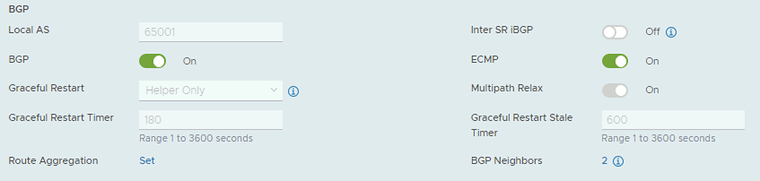
And my BGP peers that were down before because BGP could not be enabled are now up:

TENANT 2
| BGP Neighbor IP address | BGP Remote AS |
|---|---|
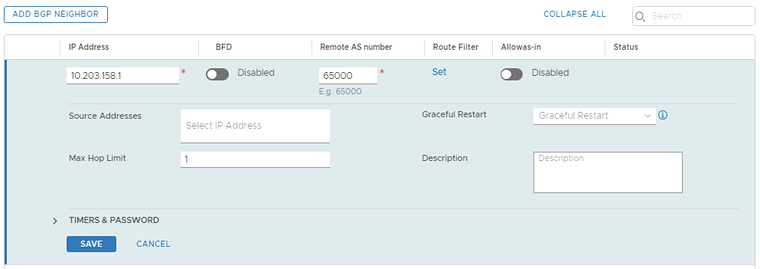
| 10.203.158.1 | 65000 |
| 10.203.159.1 | 65000 |
By default, BGP is disabled (for TENANT02) on the VRF Enabled Tier-0 Gateway like you have seen with the configuration of the VRF Enabled Tier-0 Gateway for TENANT01 above.
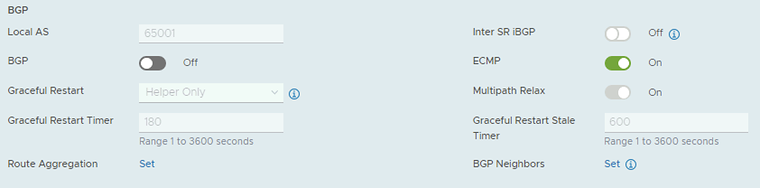
I hit the same bug again.
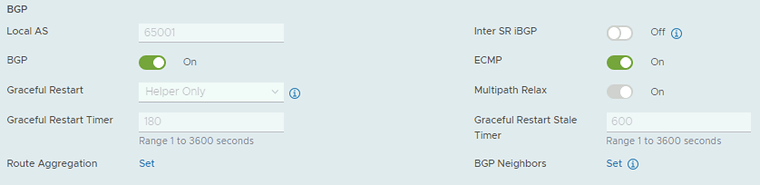
After I used the workaround I have described above BGP was enabled successfully.
This is the BGP configuration for the first BGP peer for the second Tenant using VLAN 158.
This is the BGP configuration for the second BGP peer for the second Tenant using VLAN 159.
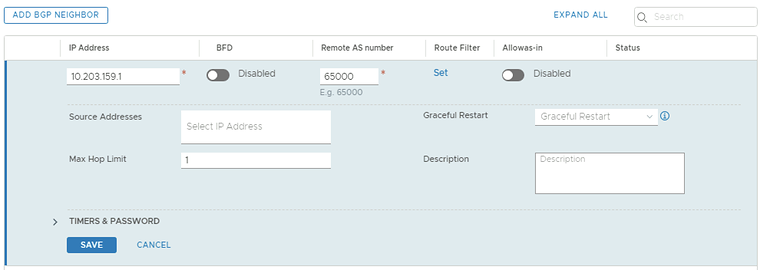
This is a summary of the BGP peering configuration. Notice they are all up and this has to do with the fact that BGP was enabled on the second VRF enabled Tier-0 Gateway by using the workaround before I configured the BGP peers.

STEP 7» Create Tier–1 Gateways and attach these to the VRF enabled Gateways
Here I am creating dedicated Tier-1 Gateways that I will attach to the VRF enabled Tier-0 Gateways.
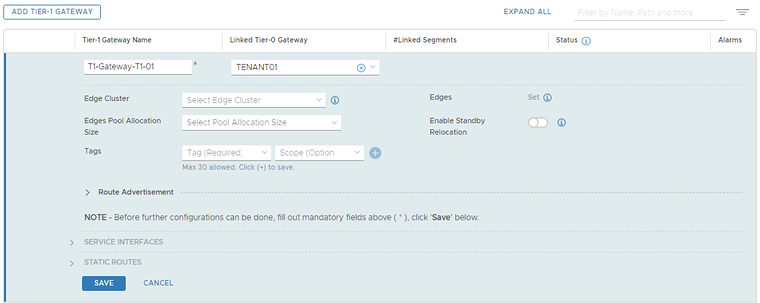
TENANT 1
This is the dedicated Tier-1 Gateway for the first tenant.
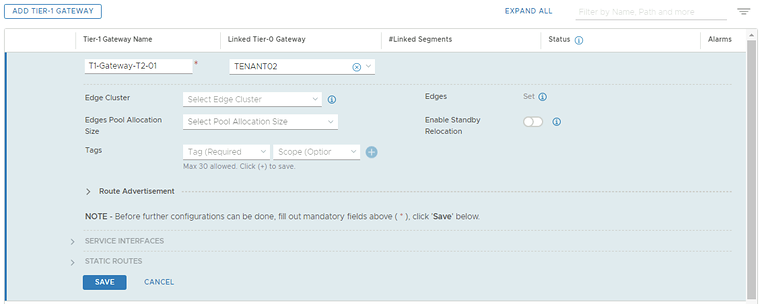
TENANT 2
This is the dedicated Tier-1 Gateway for the second tenant.
Tier–1 Gateway Summary
This is a summary of all the Tier-1 Gateways.

STEP 8» Create Test 〈Overlay〉 Segments for each tenant
I have created two additional overlay segments that are going to be attached to the Tier-1 Gateways so I can attach two VMs to these segments to simulate end-to-end networking.
TENANT 1
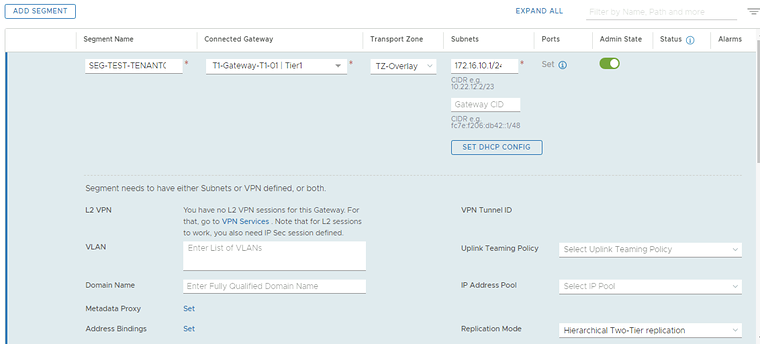
In the table below I have captured the configuration parameters used for the configuration.
| Segment Name | Connected Gateway | Transport Zone | IP Address |
|---|---|---|---|
| SEG-TEST-TENANT01 | T1-Gateway-T1-01 | TZ-Overlay - Overlay | 172.16.10.1/24 |
Here I create the test overlay segment for the first tenant.
TENANT 2
In the table below I have captured the configuration parameters used for the configuration.
| Segment Name | Connected Gateway | Transport Zone | IP Address |
|---|---|---|---|
| SEG-TEST-TENANT02 | T1-Gateway-T1-02 | TZ-Overlay - Overlay | 172.16.20.1/24 |
Here I create the test overlay segment for the second tenant.
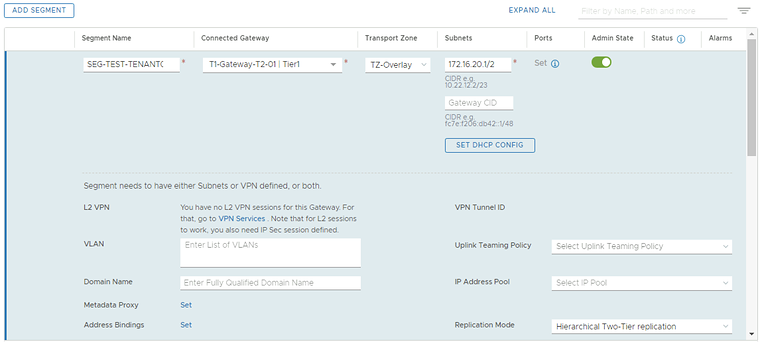
STEP 9» Enable Route Adverting and Route Redistribution
To make sure the physical network will receive the routes of the specific tenants I need to enable route advertising for the connected networks on the Tier-1 Gateways, and I need to configure route redistribution on the VRF enabled Tier-0 Gateway so make sure that the routes that are learned from the Tier-1 Gateway are (re)advertised to the physical network.
TENANT 1
Route Advertisement on Tier–1 Gateway
First I enabled route advertisement on the Tier-1 Gateway for the connected segments.
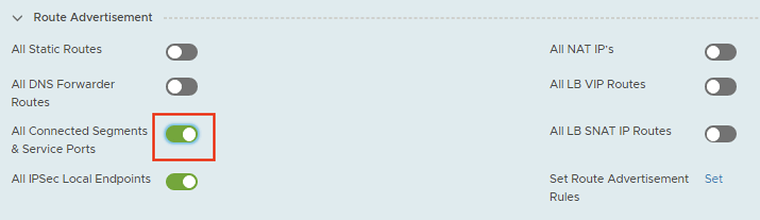
Route Redistribution on VRF enabled Tier–0 Gateway
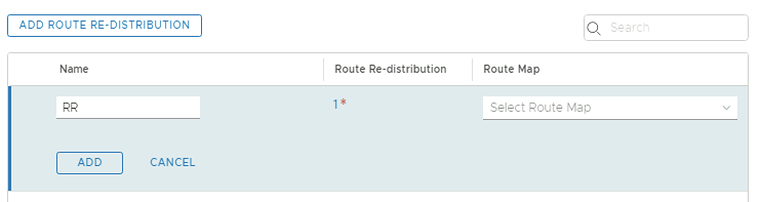
First I need to go to the route re-distribution section of the VRF enabled Tier-0 Gateway.

Provide a name for the route re-distribution entry and click on “set”.
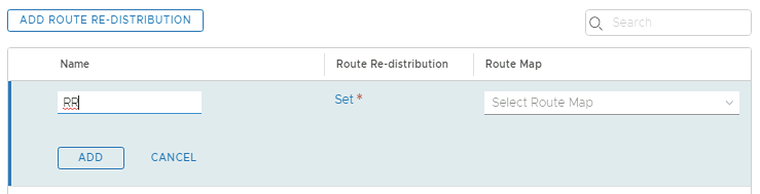
Select the”Connected Interfaces & Segments” checkbox in the “Advertised Tier-1 Subnets” section.
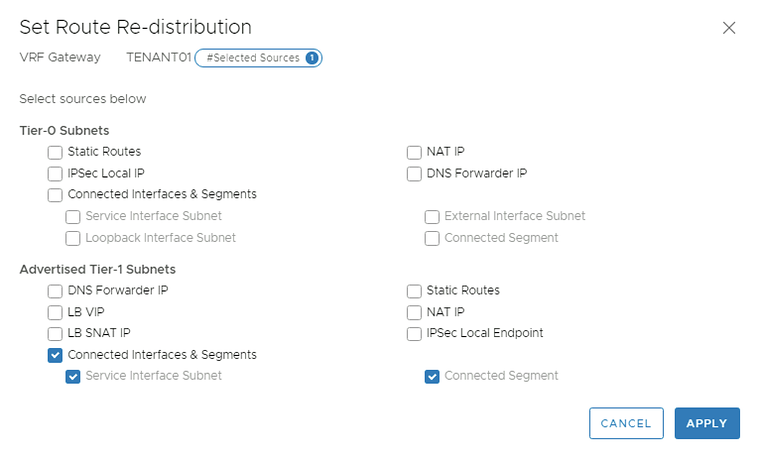
Click on Apply and look for the “1” to see if the “Route Re-distribution” entry is added. Click “Add”.
Click on “Save”

TENANT 2
Route Advertisement on Tier–1 Gateway
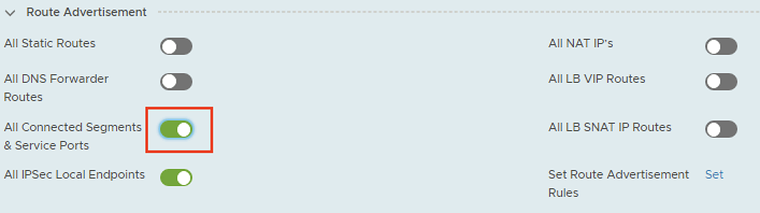
First I enabled route advertisement on the Tier-1 Gateway for the connected segments.
Route Redistribution on VRF enabled Tier–0 Gateway
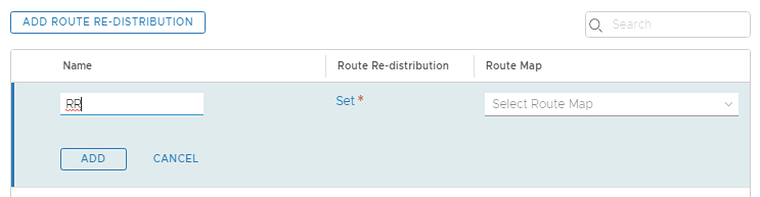
First I need to go to the route re-distribution section of the VRF enabled Tier-0 Gateway.

Provide a name for the route re-distribution entry and click on “set”.
Select the”Connected Interfaces & Segments” checkbox in the “Advertised Tier-1 Subnets” section.
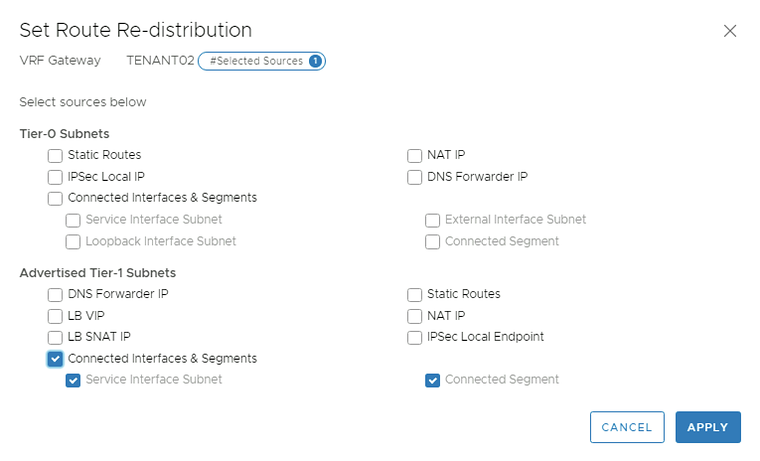
Click on Apply and look for the “1” to see if the “Route Re-distribution” entry is added. Click “Add”.
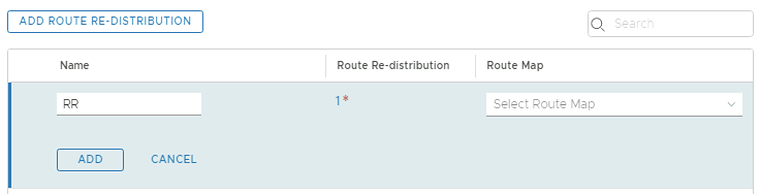
Click on “Save”

STEP 10» Create test Virtual Machines per Tenant to perform some ping tests
For my test Virtual Machines, I am using PHOTON OS Virtual Machines that you can download here.
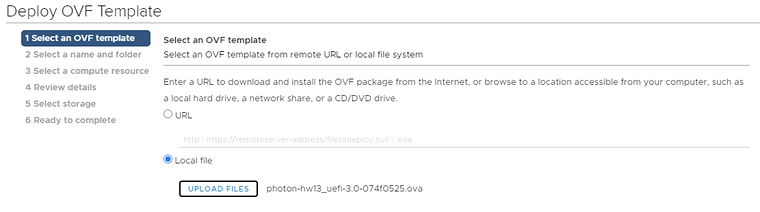
For this test I downloaded the following file: photon-hw13_uefi-3.0-074f0525.ova
TENANT 1
Creating Test VM using Photon OS
Deploy a new OVF Template from the Center Server Client.
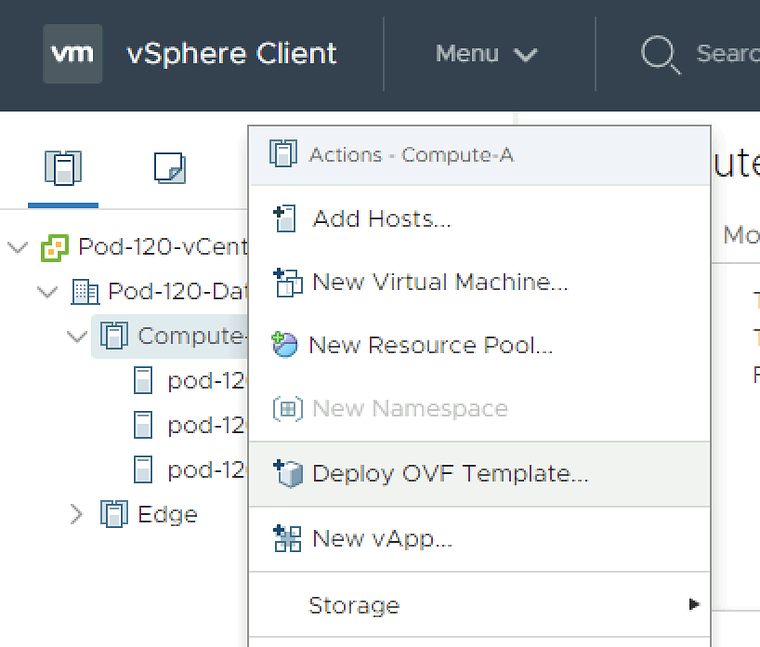
Select the local Photon OS ova file.
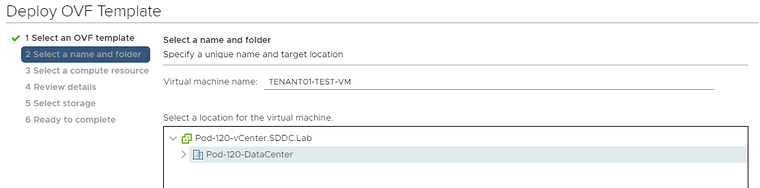
Provide a name for your Virtual Machine.
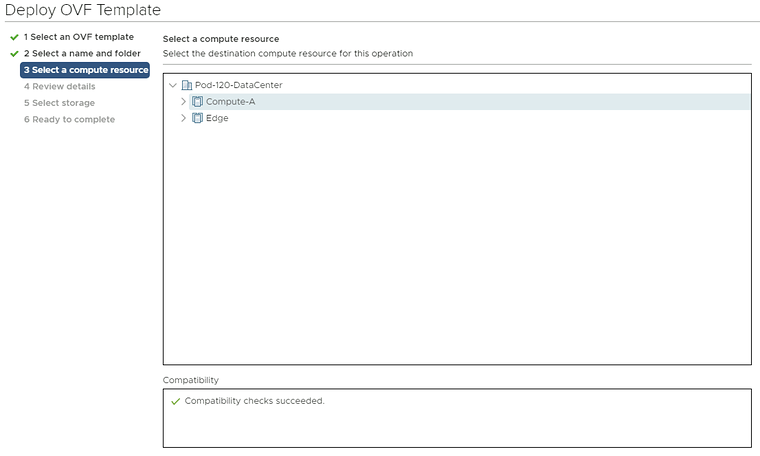
Select a computing resource where you want to deploy the VM to.
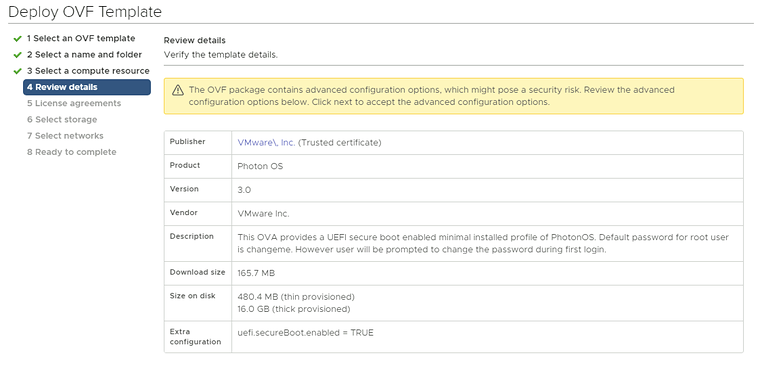
Review the details and just click next.
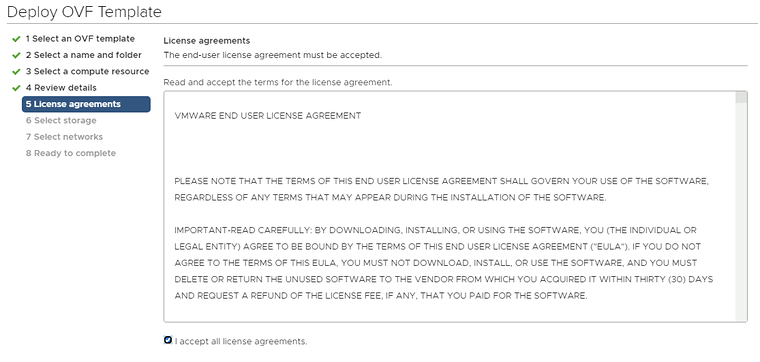
Accept the license agreement.
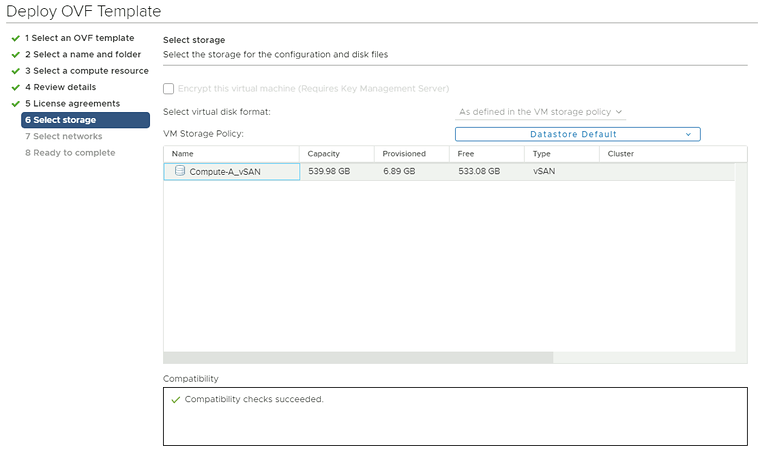
Select a storage resource where you want to deploy the VM to.
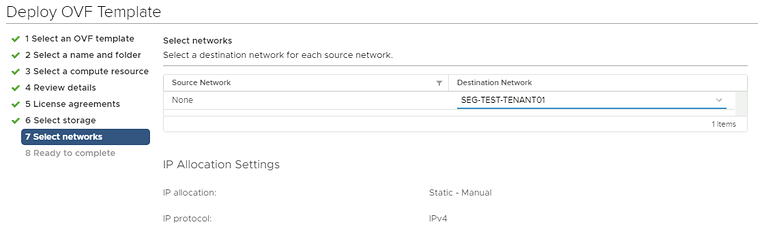
Select a networking resource that you want you’re VM to be attached to. Make sure you select the Test Overlay Tenant 1 Segment you created.
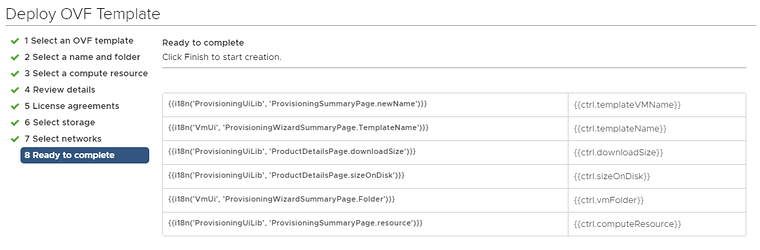
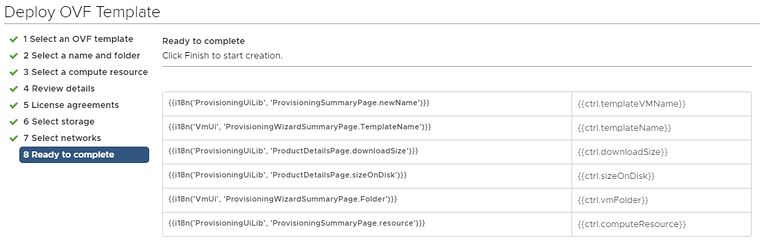
Review the details before you finish.
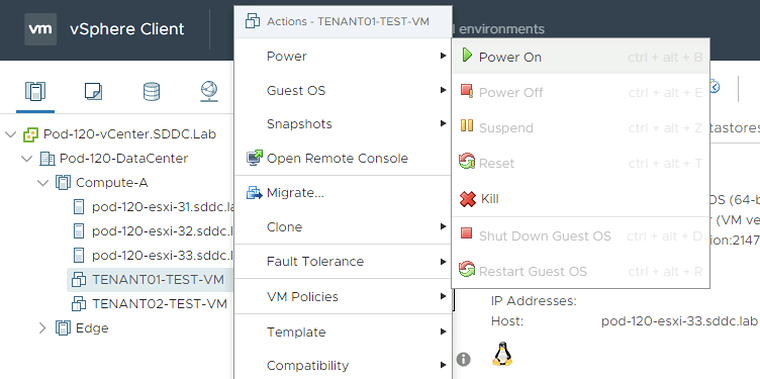
Power on the new Virtual Machine.
Network Configuration and Ping Tests
When the VM is ready and power on we need to log in to the console and provide network settings. the first time you log in to a newly deployed Photon OS VM you need to change the password. The default username is “root” and the default password is “changeme”.
Welcome to Photon 3.0 (x86_64) - Kernel 4.19.79-1.ph3-esx (tty1)photon-machine login: rootPassword: changemeYou are required to change your password immediately (administrator enforced)Changing password for root.Current password: changemeNew password: VMware1!VMware1!Retype new password: VMware1!VMware1!Here we change the hostname.
root@photon-machine [ ~ ]# hostnamectl set-hostname tenant01-test-vmHere we create a network interface configuration file to specify the static IP address details for the network interface.
root@photon-machine [ ~ ]# vi /etc/systemd/network/10-static-en.networkThis is the content of the “10-static-en.network” file.
[Match]Name=eth0
[Network]Address=172.16.10.11/24Gateway=172.16.10.1
Here we change the rights to the file so the system is allowed to use it.
root@photon-machine [ ~ ]# chmod 644 /etc/systemd/network/10-static-en.networkHere we restart the networking service of the VM.
root@photon-machine [ ~ ]# systemctl restart systemd-networkdHere we reboot the machine.
root@photon-machine [ ~ ]# rebootWhen the machine is rebooted (with the new hostname) we can verify if the IP address is correct.
root@tenant01-test-vm [ ~ ]# ip a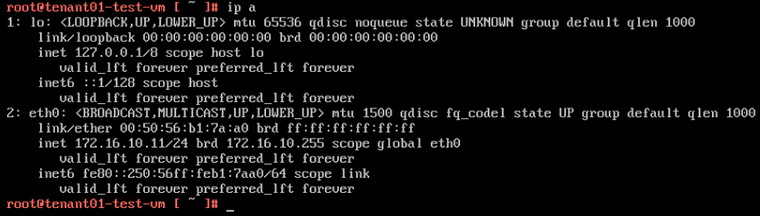
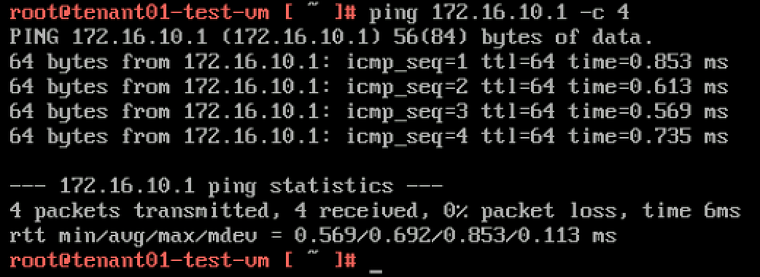
Here I do a quick ping towards my gateway to verify if we have network connectivity.
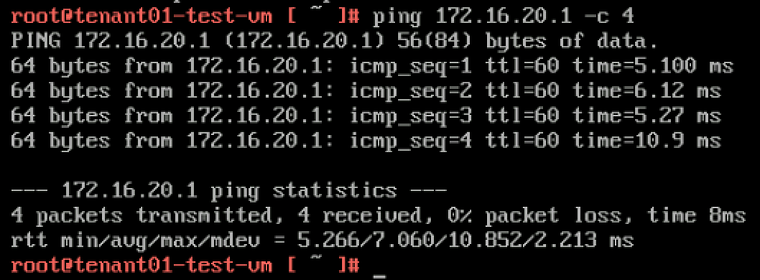
Here I do a ping to the other tenant UPLINK interface (172.16.20.1).
TENANT 2
Creating Test VM using Photon OS
Deploy a new OVF Template from the Center Server CLient.
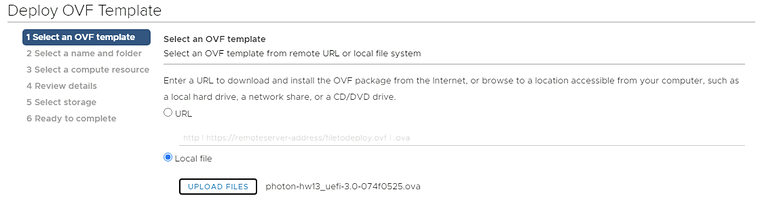
Select the local Photon OS ova file. Provide a name for your Virtual Machine (screenshot not provided).
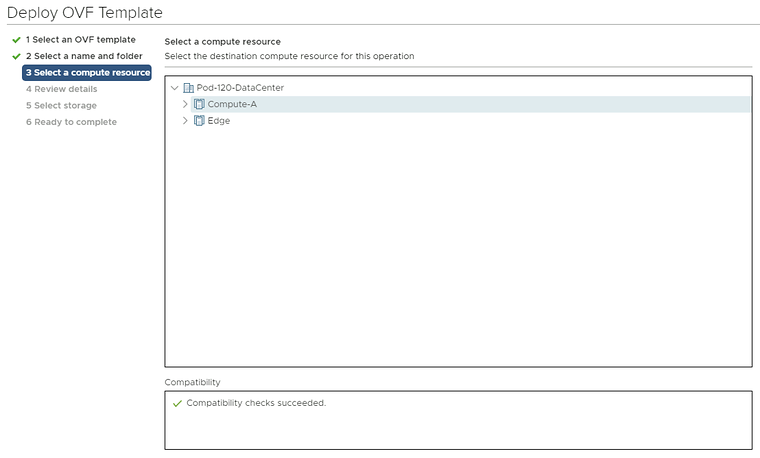
Select a computing resource where you want to deploy the VM to.
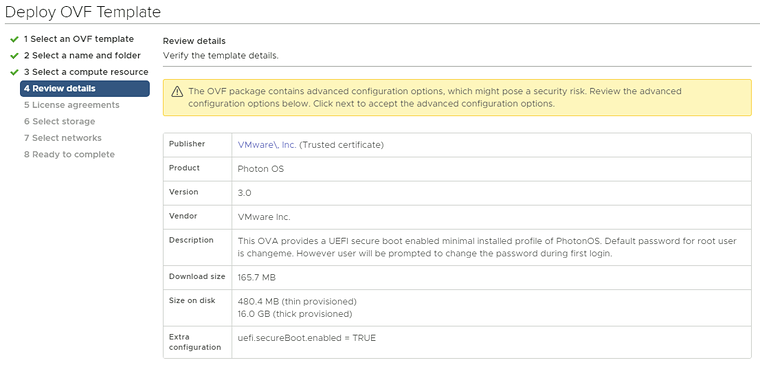
Review the details and just click next.
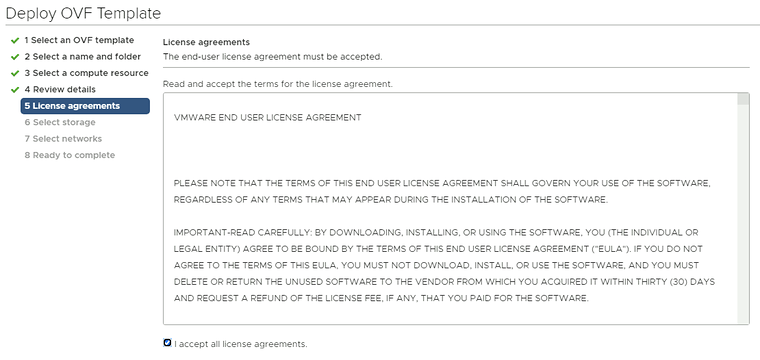
Accept the license agreement.
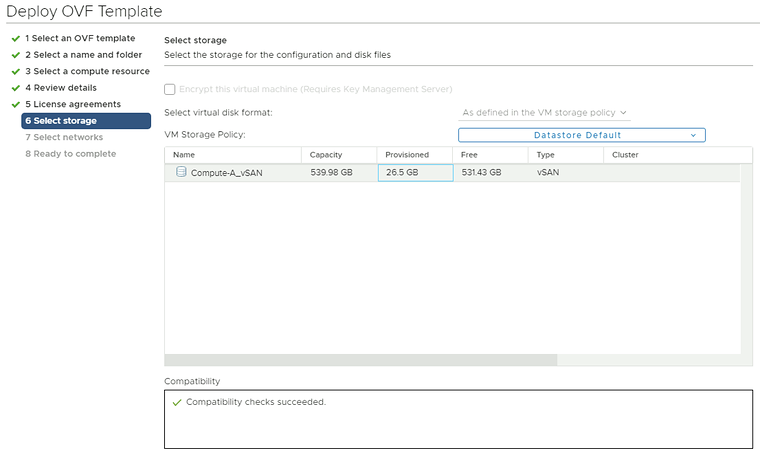
Select a storage resource where you want to deploy the VM to.
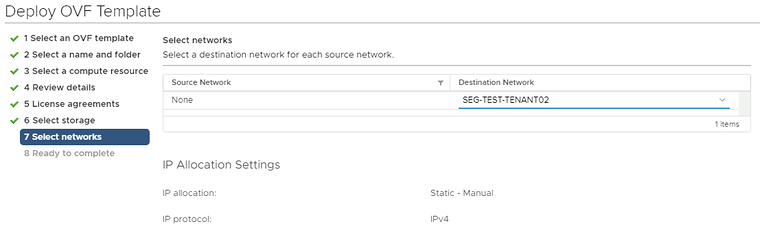
Select a networking resource that you want you’re VM to be attached to. Make sure you select the Test Overlay Tenant 2 Segment you created.
Review the details before you finish.
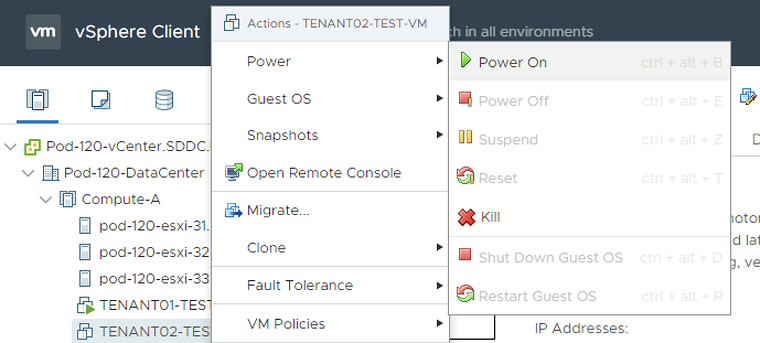
Power on the new Virtual Machine.
Network Configuration and Ping Tests
When the VM is ready and power on we need to log in to the console and provide network settings. the first time you log in to a newly deployed Photon OS VM you need to change the password. The default username is “root” and the default password is “changeme”.
Welcome to Photon 3.0 (x86_64) - Kernel 4.19.79-1.ph3-esx (tty1)photon-machine login: rootPassword: changemeYou are required to change your password immediately (administrator enforced)Changing password for root.Current password: changemeNew password: VMware1!VMware1!Retype new password: VMware1!VMware1!Here we change the hostname.
root@photon-machine [ ~ ]# hostnamectl set-hostname tenant02-test-vmHere we create a network interface configuration file to specify the static IP address details for the network interface.
root@photon-machine [ ~ ]# vi /etc/systemd/network/10-static-en.networkThis is the content of the “10-static-en.network” file.
[Match]Name=eth0
[Network]Address=172.16.20.11/24Gateway=172.16.20.1
Here we change the rights to the file so the system is allowed to use it.
root@photon-machine [ ~ ]# chmod 644 /etc/systemd/network/10-static-en.networkHere we restart the networking service of the VM.
root@photon-machine [ ~ ]# systemctl restart systemd-networkdHere we reboot the machine.
root@photon-machine [ ~ ]# rebootWhen the machine is rebooted (with the new hostname) we can verify if the IP address is correct.
root@tenant02-test-vm [ ~ ]# ip a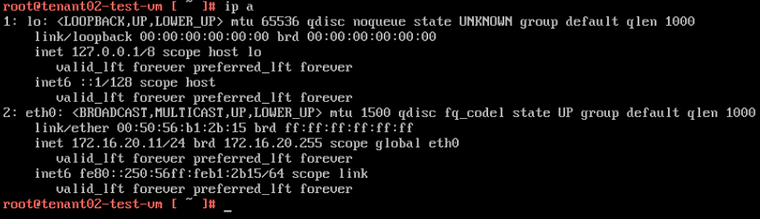
Here I do a quick ping towards my gateway to verify if we have network connectivity.
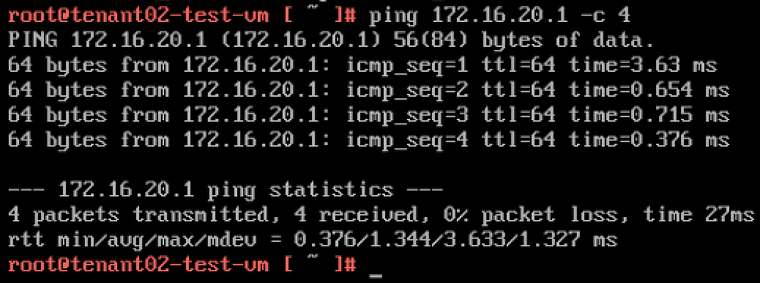
Here I do a ping to the other tenant UPLINK interface (172.16.10.1).
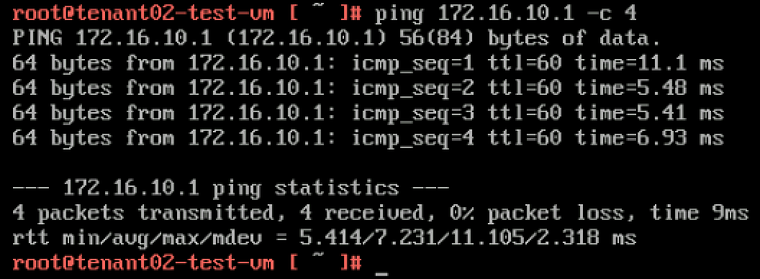
STEP 11» Perform some verification steps using CLI on the Edge Transport Nodes
Pod–120–T0–EdgeVM–01 〈Edge Transport Node 1〉
Here we verify what SR and DR components are created. You see that the “SR-VRF-TENANT01” and the “SR-VRF-TENANT02” Logical Routers are created that will take care of the BGP uplink configuration.
Pod-120-T0-EdgeVM-01> get logical-routersLogical RouterUUID VRF LR-ID Name Type Ports736a80e3-23f6-5a2d-81d6-bbefb2786666 0 0 TUNNEL 4b3c546e7-ff12-4cc4-987a-cf657a93234e 1 4 SR-T0-Gateway-01 SERVICE_ROUTER_TIER0 119825b3b1-490b-4b5d-8e7d-d270c03fd3a4 3 3 DR-T1-Gateway-01 DISTRIBUTED_ROUTER_TIER1 7675e9483-045e-4908-94eb-5f4474388c06 4 1 DR-T0-Gateway-01 DISTRIBUTED_ROUTER_TIER0 5f16a09eb-3c3a-422e-ab6f-cf0514b0b165 5 11 SR-VRF-TENANT01 VRF_SERVICE_ROUTER_TIER0 6627d6ef3-b679-4886-ab85-1de74f44f2c2 6 14 SR-VRF-TENANT02 VRF_SERVICE_ROUTER_TIER0 670435935-f34e-44d6-919c-d36e06b62109 7 9 DR-VRF-TENANT01 VRF_DISTRIBUTED_ROUTER_TIER0 4a3e29737-7abe-4f41-95cd-1fdfc65adf7a 8 19 DR-T1-Gateway-T1-01 DISTRIBUTED_ROUTER_TIER1 5a5486158-6ba0-4a79-bed6-777220fdab9d 9 12 DR-VRF-TENANT02 VRF_DISTRIBUTED_ROUTER_TIER0 43637f632-96f6-40cb-b348-af9d263d3452 10 20 DR-T1-Gateway-T2-01 DISTRIBUTED_ROUTER_TIER1 5Let’s log into the SR-VRF-TENANT01 Logical Router using VRF 5 and verify the BGP neighbor connectivity.
Pod-120-T0-EdgeVM-01> vrf 5Pod-120-T0-EdgeVM-01(tier0_vrf_sr)> get bgp neighbor summaryBFD States: NC - Not configured, AC - Activating,DC - Disconnected            AD - Admin down, DW - Down, IN - Init,UP - UpBGP summary information for VRF VRF-9 for address-family: ipv4UnicastRouter ID: 10.203.127.2  Local AS: 65001
Neighbor                            AS          State Up/DownTime  BFD InMsgs  OutMsgs InPfx  OutPfx
10.203.129.1                        65000       Estab 13:19:08     NC  1390    1383    1      110.203.128.1                        65000       Conne never        NC  0       0       0      0
Here we look at the BGP table for this specific tenant (tenant 01).
Pod-120-T0-EdgeVM-01(tier0_vrf_sr)> get bgp ipv4BGP IPv4 table version is 4Local router ID is 10.203.127.2Status flags: > - best, I - internalOrigin flags: i - IGP, e - EGP, ? - incomplete
   Network                             Next Hop                            Metric       LocPrf  Weight   Path > 0.0.0.0/0                           10.203.129.1                        0            100     0        65000 65001 i > 172.16.10.0/24                      100.64.128.3                        0            100     32768    65001 ?
Here we look at the routing table for this specific tenant (tenant 01).
Pod-120-T0-EdgeVM-01(tier0_vrf_sr)> get forwardingLogical RouterUUID VRF LR-ID Name Typef16a09eb-3c3a-422e-ab6f-cf0514b0b165 5 11 SR-VRF-TENANT01 VRF_SERVICE_ROUTER_TIER0IPv4 Forwarding TableIP Prefix Gateway IP Type UUID Gateway MAC0.0.0.0/0 10.203.129.1 route d6f962c5-95ca-44ea-aed7-4d3fca91d4d2 00:0c:29:c2:a5:9310.203.128.0/24 route 0c1fa480-fbea-4b77-9893-d10ff41c2a1b10.203.128.2/32 route c618fe04-1df1-55e1-b290-ab7c285e2d7c10.203.129.0/24 route d6f962c5-95ca-44ea-aed7-4d3fca91d4d210.203.129.2/32 route c618fe04-1df1-55e1-b290-ab7c285e2d7c100.64.128.2/32 route a64d1469-a468-550c-9526-eb7102133c1a100.64.128.2/31 route 64e87331-c284-4d20-8a69-278f08940a6f127.0.0.1/32 route a59983da-7f2d-4ce2-8a8f-6a69a0786fb9169.254.0.0/24 route 72768eea-7bad-445e-b257-f81d8a8970ed169.254.0.1/32 route a64d1469-a468-550c-9526-eb7102133c1a169.254.0.3/32 route c618fe04-1df1-55e1-b290-ab7c285e2d7c172.16.10.0/24 100.64.128.3 route 64e87331-c284-4d20-8a69-278f08940a6fLet’s log into the SR-VRF-TENANT02 Logical Router using VRF 6 and verify the BGP neighbor connectivity.
Pod-120-T0-EdgeVM-01> vrf 6Pod-120-T0-EdgeVM-01(tier0_vrf_sr)> get bgp neighbor summaryBFD States: NC - Not configured, AC - Activating,DC - Disconnected            AD - Admin down, DW - Down, IN - Init,UP - UpBGP summary information for VRF VRF-12 for address-family: ipv4UnicastRouter ID: 10.203.127.2  Local AS: 65001
Neighbor                            AS          State Up/DownTime  BFD InMsgs  OutMsgs InPfx  OutPfx
10.203.159.1                        65000       Estab 12:49:00     NC  777     772     1      110.203.158.1                        65000       Conne never        NC  0       0       0      0
Here we look at the BGP table for this specific tenant (tenant 02).
Pod-120-T0-EdgeVM-01(tier0_vrf_sr)> get bgp ipv4BGP IPv4 table version is 2Local router ID is 10.203.127.2Status flags: > - best, I - internalOrigin flags: i - IGP, e - EGP, ? - incomplete
   Network                             Next Hop                            Metric       LocPrf  Weight   Path > 172.16.20.0/24                      100.64.128.5                        0            100     32768    65001 ? > 0.0.0.0/0                           10.203.159.1                        0            100     0        65000 65001 i
Here we look at the routing table for this specific tenant (tenant 02).
Pod-120-T0-EdgeVM-01(tier0_vrf_sr)> get forwardingLogical RouterUUID VRF LR-ID Name Type627d6ef3-b679-4886-ab85-1de74f44f2c2 6 14 SR-VRF-TENANT02 VRF_SERVICE_ROUTER_TIER0IPv4 Forwarding TableIP Prefix Gateway IP Type UUID Gateway MAC0.0.0.0/0 10.203.159.1 route 13cbf327-88ef-498f-b3b1-943d8f47a748 00:0c:29:c2:a5:9310.203.158.0/24 route 8c763a23-e65a-4672-b13f-38852108aabc10.203.158.2/32 route d3f9a9c9-786e-5890-9bfa-7c478848385d10.203.159.0/24 route 13cbf327-88ef-498f-b3b1-943d8f47a74810.203.159.2/32 route d3f9a9c9-786e-5890-9bfa-7c478848385d100.64.128.4/32 route cbbdeeec-d427-58a7-9dba-a7d97b394081127.0.0.1/32 route 5596c144-a899-4b3d-bc68-fd442d58c91d169.254.0.0/24 route 6e1e1a0c-5d94-46bc-aebd-9f6c753cb4ee169.254.0.1/32 route cbbdeeec-d427-58a7-9dba-a7d97b394081169.254.0.3/32 route d3f9a9c9-786e-5890-9bfa-7c478848385d172.16.20.0/24 100.64.128.5 route 95d84644-4f89-4958-bf34-6ed0857d31c8 02:50:56:56:44:55Pod–120–T0–EdgeVM–02 〈Edge Transport Node 2〉
Here we verify what SR and DR components are created. You see that the “SR-VRF-TENANT01” and the “SR-VRF-TENANT02” Logical Routers are created that will take care of the BGP uplink configuration.
Pod-120-T0-EdgeVM-02> get logical-routersLogical RouterUUID VRF LR-ID Name Type Ports736a80e3-23f6-5a2d-81d6-bbefb2786666 0 0 TUNNEL 4c9c0e9f3-65b2-440a-a583-076aa238a3e2 1 2 SR-T0-Gateway-01 SERVICE_ROUTER_TIER0 119825b3b1-490b-4b5d-8e7d-d270c03fd3a4 3 3 DR-T1-Gateway-01 DISTRIBUTED_ROUTER_TIER1 7675e9483-045e-4908-94eb-5f4474388c06 4 1 DR-T0-Gateway-01 DISTRIBUTED_ROUTER_TIER0 5668e2b04-43ee-4e73-a714-0e9613b78221 5 10 SR-VRF-TENANT01 VRF_SERVICE_ROUTER_TIER0 6d453f169-7802-4cc7-8a08-167f4aa1ed7a 6 13 SR-VRF-TENANT02 VRF_SERVICE_ROUTER_TIER0 670435935-f34e-44d6-919c-d36e06b62109 7 9 DR-VRF-TENANT01 VRF_DISTRIBUTED_ROUTER_TIER0 4a3e29737-7abe-4f41-95cd-1fdfc65adf7a 8 19 DR-T1-Gateway-T1-01 DISTRIBUTED_ROUTER_TIER1 5a5486158-6ba0-4a79-bed6-777220fdab9d 9 12 DR-VRF-TENANT02 VRF_DISTRIBUTED_ROUTER_TIER0 43637f632-96f6-40cb-b348-af9d263d3452 10 20 DR-T1-Gateway-T2-01 DISTRIBUTED_ROUTER_TIER1 5Let’s log into the SR-VRF-TENANT01 Logical Router using VRF 5 and verify the BGP neighbor connectivity.
Pod-120-T0-EdgeVM-02> vrf 5Pod-120-T0-EdgeVM-02(tier0_vrf_sr)> get bgp neighbor summaryBFD States: NC - Not configured, AC - Activating,DC - Disconnected            AD - Admin down, DW - Down, IN - Init,UP - UpBGP summary information for VRF VRF-9 for address-family: ipv4UnicastRouter ID: 10.203.127.3  Local AS: 65001
Neighbor                            AS          State Up/DownTime  BFD InMsgs  OutMsgs InPfx  OutPfx
10.203.129.1                        65000       Conne never        NC  0       0       0      010.203.128.1                        65000       Estab 00:00:51     NC  1404    1394    1      1
Here we look at the BGP table for this specific tenant (tenant 01).
Pod-120-T0-EdgeVM-02(tier0_vrf_sr)> get bgp ipv4BGP IPv4 table version is 6Local router ID is 10.203.127.3Status flags: > - best, I - internalOrigin flags: i - IGP, e - EGP, ? - incomplete
   Network                             Next Hop                            Metric       LocPrf  Weight   Path > 0.0.0.0/0                           10.203.128.1                        0            100     0        65000 65001 i > 172.16.10.0/24                      100.64.128.3                        0            100     32768    65001 ?
Here we look at the routing table for this specific tenant (tenant 01).
Pod-120-T0-EdgeVM-02(tier0_vrf_sr)> get forwardingLogical RouterUUID VRF LR-ID Name Type668e2b04-43ee-4e73-a714-0e9613b78221 5 10 SR-VRF-TENANT01 VRF_SERVICE_ROUTER_TIER0IPv4 Forwarding TableIP Prefix Gateway IP Type UUID Gateway MAC0.0.0.0/0 10.203.128.1 route 1aa9760f-c36d-4780-87b8-75f0d7cc12a510.203.128.0/24 route 1aa9760f-c36d-4780-87b8-75f0d7cc12a510.203.128.3/32 route 28a45158-fe5c-545a-935a-3471c5a1889d10.203.129.0/24 route 0ebf292c-b6eb-45ca-b84c-5dd447d7137210.203.129.3/32 route 28a45158-fe5c-545a-935a-3471c5a1889d100.64.128.2/32 route a64d1469-a468-550c-9526-eb7102133c1a100.64.128.2/31 route 64e87331-c284-4d20-8a69-278f08940a6f127.0.0.1/32 route a59983da-7f2d-4ce2-8a8f-6a69a0786fb9169.254.0.0/24 route 5a516e3f-716b-494c-90dd-400a0047bcfc169.254.0.1/32 route a64d1469-a468-550c-9526-eb7102133c1a169.254.0.2/32 route 28a45158-fe5c-545a-935a-3471c5a1889d172.16.10.0/24 100.64.128.3 route 64e87331-c284-4d20-8a69-278f08940a6f 02:50:56:56:44:55Let’s log into the SR-VRF-TENANT02 Logical Router using VRF 6 and verify the BGP neighbor connectivity.
Pod-120-T0-EdgeVM-02> vrf 6Pod-120-T0-EdgeVM-02(tier0_vrf_sr)> get bgp neighbor summaryBFD States: NC - Not configured, AC - Activating,DC - Disconnected            AD - Admin down, DW - Down, IN - Init,UP - UpBGP summary information for VRF VRF-12 for address-family: ipv4UnicastRouter ID: 10.203.127.3  Local AS: 65001
Neighbor                            AS          State Up/DownTime  BFD InMsgs  OutMsgs InPfx  OutPfx
10.203.159.1                        65000       Conne never        NC  0       0       0      010.203.158.1                        65000       Estab 00:01:39     NC  789     782     1      1
Here we look at the BGP table for this specific tenant (tenant 02).
Pod-120-T0-EdgeVM-02(tier0_vrf_sr)> get bgp ipv4BGP IPv4 table version is 4Local router ID is 10.203.127.3Status flags: > - best, I - internalOrigin flags: i - IGP, e - EGP, ? - incomplete
   Network                             Next Hop                            Metric       LocPrf  Weight   Path > 172.16.20.0/24                      100.64.128.5                        0            100     32768    65001 ? > 0.0.0.0/0                           10.203.158.1                        0            100     0        65000 65001 i
Here we look at the routing table for this specific tenant (tenant 02).
Pod-120-T0-EdgeVM-02(tier0_vrf_sr)> get forwardingLogical RouterUUID VRF LR-ID Name Typed453f169-7802-4cc7-8a08-167f4aa1ed7a 6 13 SR-VRF-TENANT02 VRF_SERVICE_ROUTER_TIER0IPv4 Forwarding TableIP Prefix Gateway IP Type UUID Gateway MAC0.0.0.0/0 10.203.158.1 route 5e95db40-c97d-44c9-9682-d418f4dd030510.203.158.0/24 route 5e95db40-c97d-44c9-9682-d418f4dd030510.203.158.3/32 route 90691403-985e-5f27-b5ac-87ef69c4260c10.203.159.0/24 route 87f5f8c4-594a-49e9-a1bf-e64b9f9cb13410.203.159.3/32 route 90691403-985e-5f27-b5ac-87ef69c4260c100.64.128.4/32 route cbbdeeec-d427-58a7-9dba-a7d97b394081100.64.128.4/31 route 95d84644-4f89-4958-bf34-6ed0857d31c8127.0.0.1/32 route 5596c144-a899-4b3d-bc68-fd442d58c91d169.254.0.0/24 route 9c2d0144-ad65-4f1a-8fbe-acf8cb3e02ca169.254.0.1/32 route cbbdeeec-d427-58a7-9dba-a7d97b394081169.254.0.2/32 route 90691403-985e-5f27-b5ac-87ef69c4260c172.16.20.0/24 100.64.128.5 route 95d84644-4f89-4958-bf34-6ed0857d31c8 02:50:56:56:44:55STEP 12» Perform some verification steps using Traceflow on the NSX–T GUI
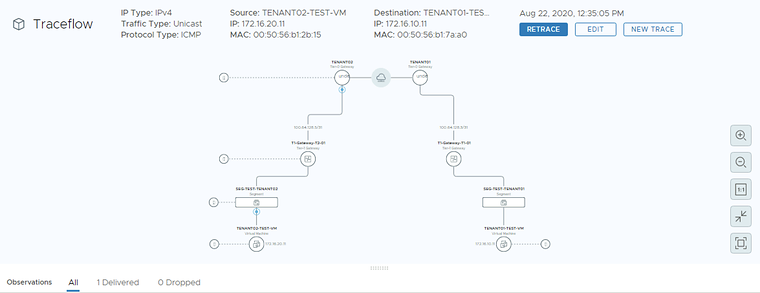
To test connectivity between the tenant VM’s we can also use NSX-T traceflow for this.
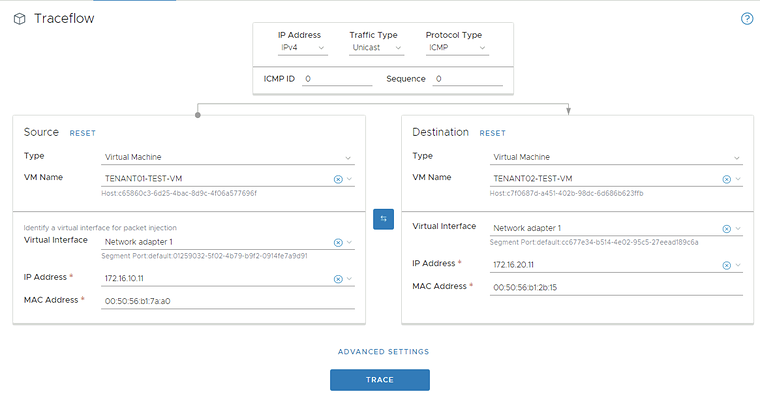
Traceflow from TENANT01–TEST–VM to TENANT02–TEST–VM
Here I have selected the virtual machine source and destination where TENANT01 is the source and TENANT02 is the destination.
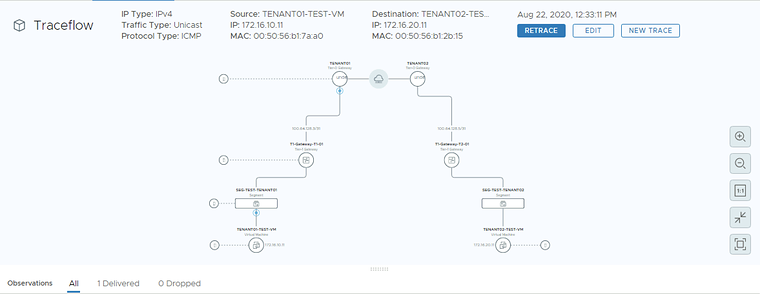
Here you see the result of the traceflow. You see that NSX-T plots the network diagram of the full end-to-end connection for you.
The strange thing here is that I could not ping, but the traceflow tells me that the packet is received at the destination. I need to find out why this is.
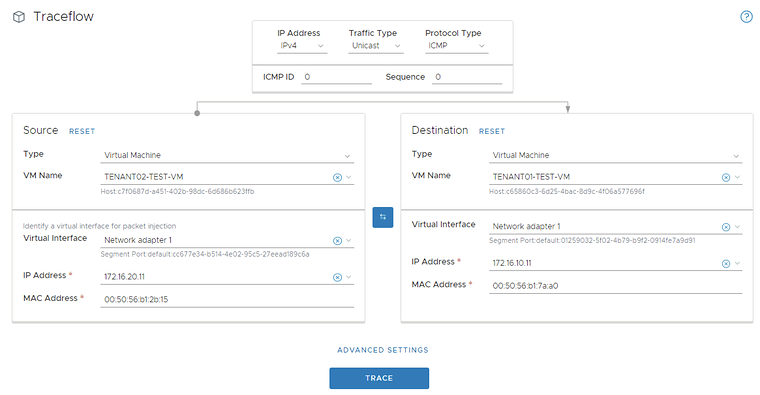
Traceflow from TENANT02–TEST–VM to TENANT01–TEST–VM
Here I have selected the virtual machine source and destination where TENANT02 is the source and TENANT01 is the destination.
Here you see the result of the traceflow. You see that NSX-T plots the network diagram of the full end-to-end connection for you.
The strange thing here is that I could not ping, but the traceflow tells me that the packet is received at the destination. I need to find out why this is.
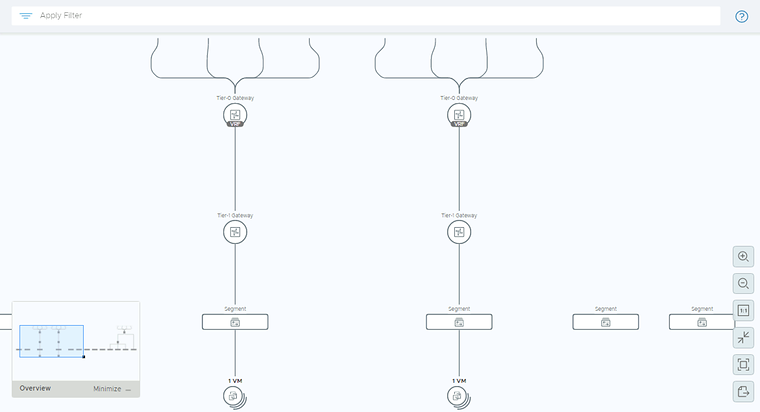
STEP 13» Perform some verification steps using the Network Topology Map on the NSX–T GUI
STEP 14» Configure Route leaking between the two tenants 〈Inter–VRF–Routing〉
Routing between the VRFs work, but this is now using the physical network as the main transport mechanism.
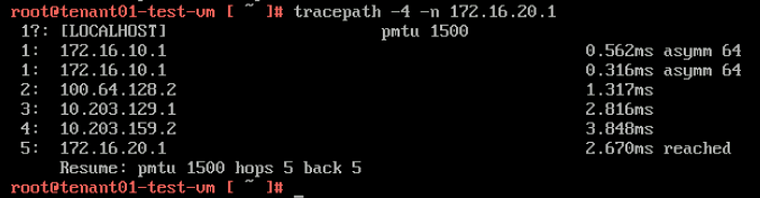
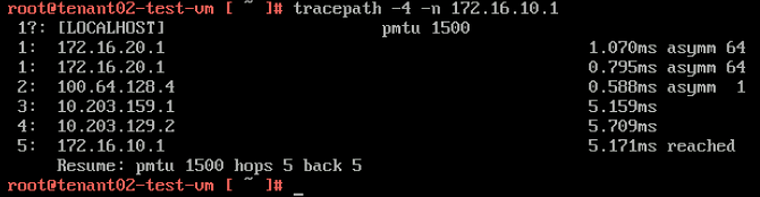
When I execute the “tracepath” command from the tenant VM’s towards the Tier-1 Segment Gateway IP address you can follow the path:
From TENANT01-TEST-VM (172.16.10.11) to TENANT02-TIER-1 GATEWAY DOWNLINK IP (172.16.20.1):
Here you see that the path is taking 5 hops, and when you look at the diagram you see that the “physical network” is used to route the traffic from the TENANT01 VRF to the TENANT02 VRF.
Here you see that the path is taking 5 hops, and when you look at the diagram you see that the “physical network” is used to route the traffic from the TENANT02 VRF to the TENANT01 VRF.
From TENANT02-TEST-VM (172.16.20.11) to TENANT01-TIER-1 GATEWAY DOWNLINK IP (172.16.10.1):
To get routing working between the VRF enabled networks (172.16.10.0/24 and 172.16.20.0/24) using Route leaking it is important to first look at the figure below:
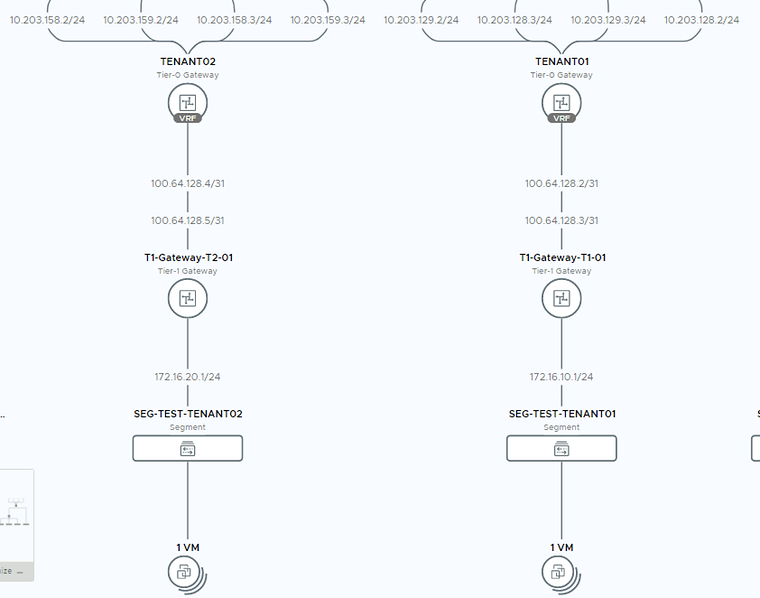
In the diagram take note of the 100.64.128.3/31 and 172.16.10.1/24 (Tenant 1) and 100.64.128.5/31 and 172.16.20.1/24 (Tenant 2) IP addresses. We need to use (one of) these IP addresses as the next-hop IP addresses in a static route we define on the VRF enabled Tier-0 Gateways.
On the Tier-0 VRF enabled Gateway for TENANT01:
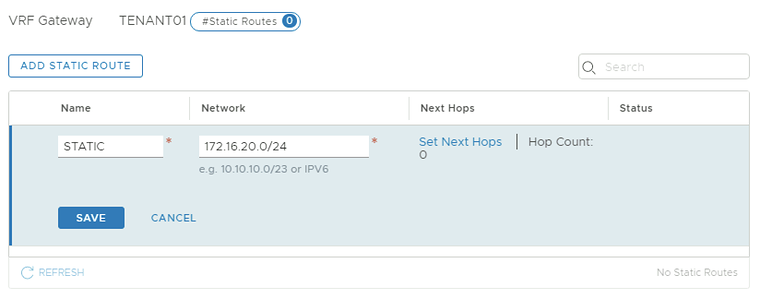
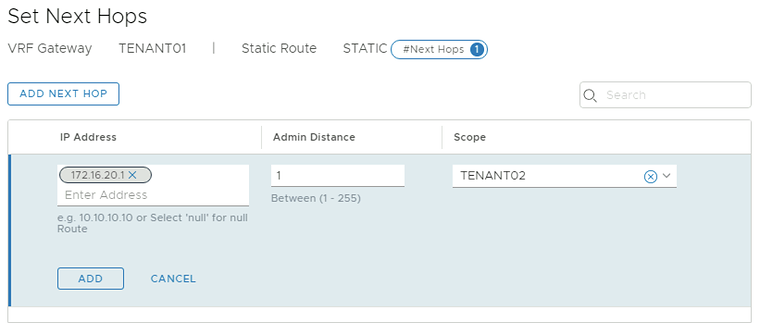
On the Tier-0 VRF enabled Gateway for TENANT02:
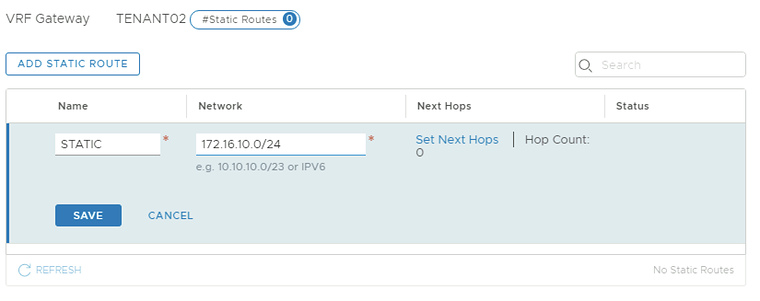
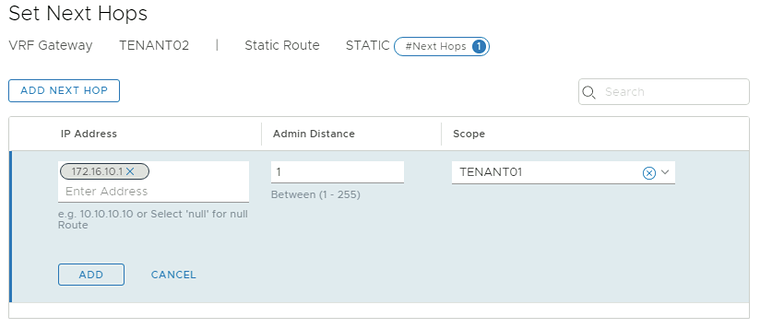
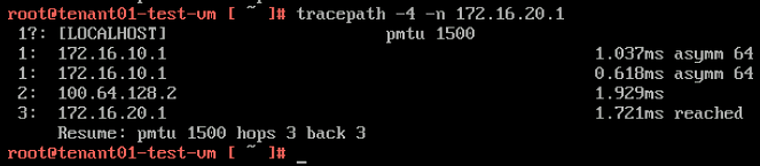
Now that the static routes are in I I executed another “tracepath” command from the tenant VM’s towards the Tier-1 Segment Gateway IP address:
Here you see that the path is taking 3 hops, and when you look at the diagram you see that the “VRF leaking” is used to route the traffic from the TENANT01 VRF to the TENANT02 VRF.
From TENANT01-TEST-VM (172.16.10.11) to TENANT02-TIER-1 GATEWAY DOWNLINK IP (172.16.20.1):
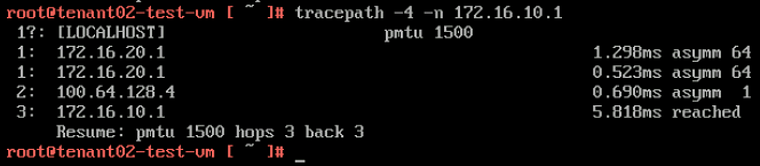
Here you see that the path is taking 3 hops, and when you look at the diagram you see that the “VRF leaking” is used to route the traffic from the TENANT02 VRF to the TENANT01 VRF.
From TENANT02-TEST-VM (172.16.20.11) to TENANT01-TIER-1 GATEWAY DOWNLINK IP (172.16.10.1):
End–to–end testing with the tenant Virtual Machines
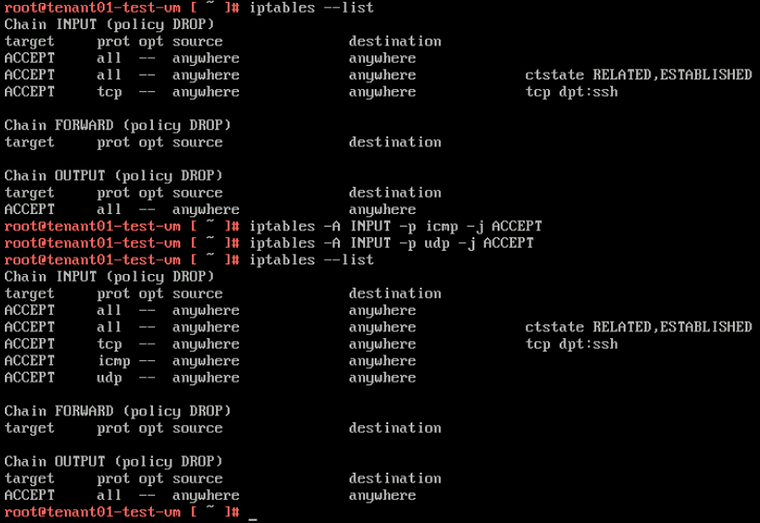
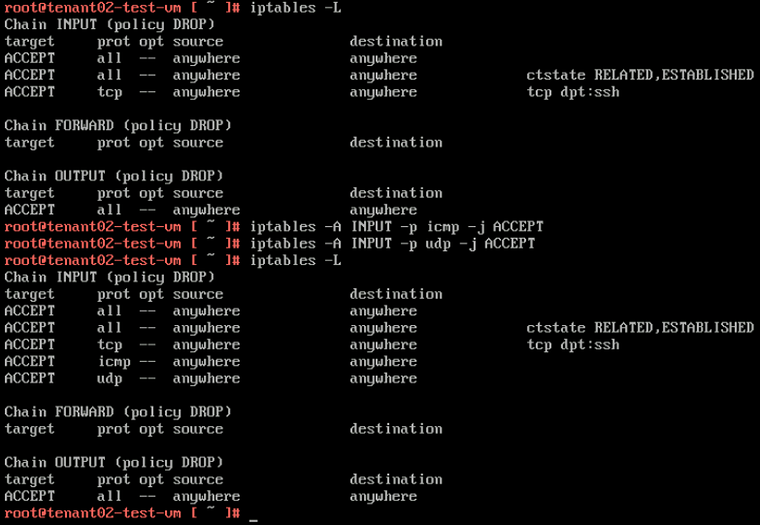
Because I am using Photon OS I first need to open up some INBOUND IPTABLE rules on the Tenant Virtual Machines to allow ping and traceroute/tracepath.
TENANT01-TEST-VM
TENANT02-TEST-VM
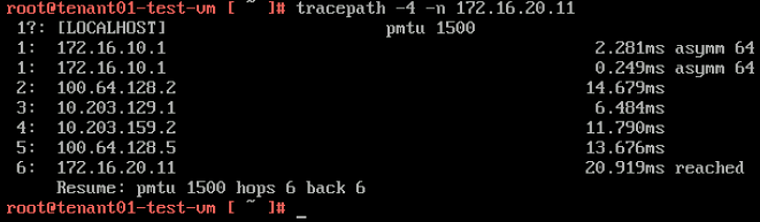
Withouth VRF leaking
Now that the IPTABLE rules are in we can test the hops using tracepath. Here you see that it takes 6 hops to go from the TENANT01-TEST-VM to the TENANT02-TEST-VM.
From TENANT01-TEST-VM (172.16.10.11) to TENANT02-TEST-VM (172.16.20.11):
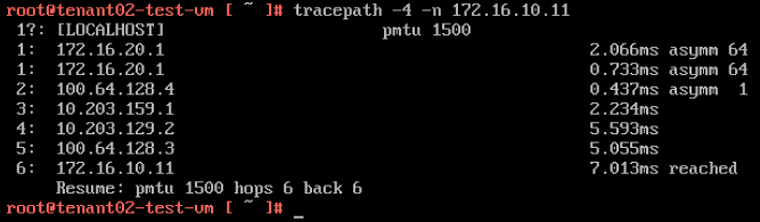
On the return path, you also see that it takes 6 hops to go from the TENANT02-TEST-VM to the TENANT01-TEST-VM.
From TENANT02-TEST-VM (172.16.20.11) to TENANT01-TEST-VM (172.16.10.11):
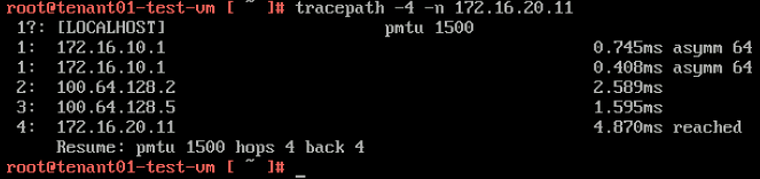
With VRF leaking
With VRF leaking enabled (so I added the static routes as described here) you see that it takes 4 hops to go from the TENANT01-TEST-VM to the TENANT02-TEST-VM.
From TENANT01-TEST-VM (172.16.10.11) to TENANT02-TEST-VM (172.16.20.11):
On the return path, you also see that it takes 4 hops to go from the TENANT02-TEST-VM to the TENANT01-TEST-VM.
From TENANT02-TEST-VM (172.16.20.11) to TENANT01-TEST-VM (172.16.10.11):
I am always trying to improve the quality of my articles so if you see any errors, mistakes in this article or you have suggestions for improvement, please contact me and I will fix this.
Originally published on the old wiki at /index.php/Configure_NSX-T_VRF_Lite.